1. Produktet er slutview
The LASUNEY 12-in-1 USB-C Docking Station is a versatile multiport adapter designed to expand the connectivity of your laptop. It provides a comprehensive solution for connecting multiple peripherals, external displays, and network devices through a single USB-C connection.
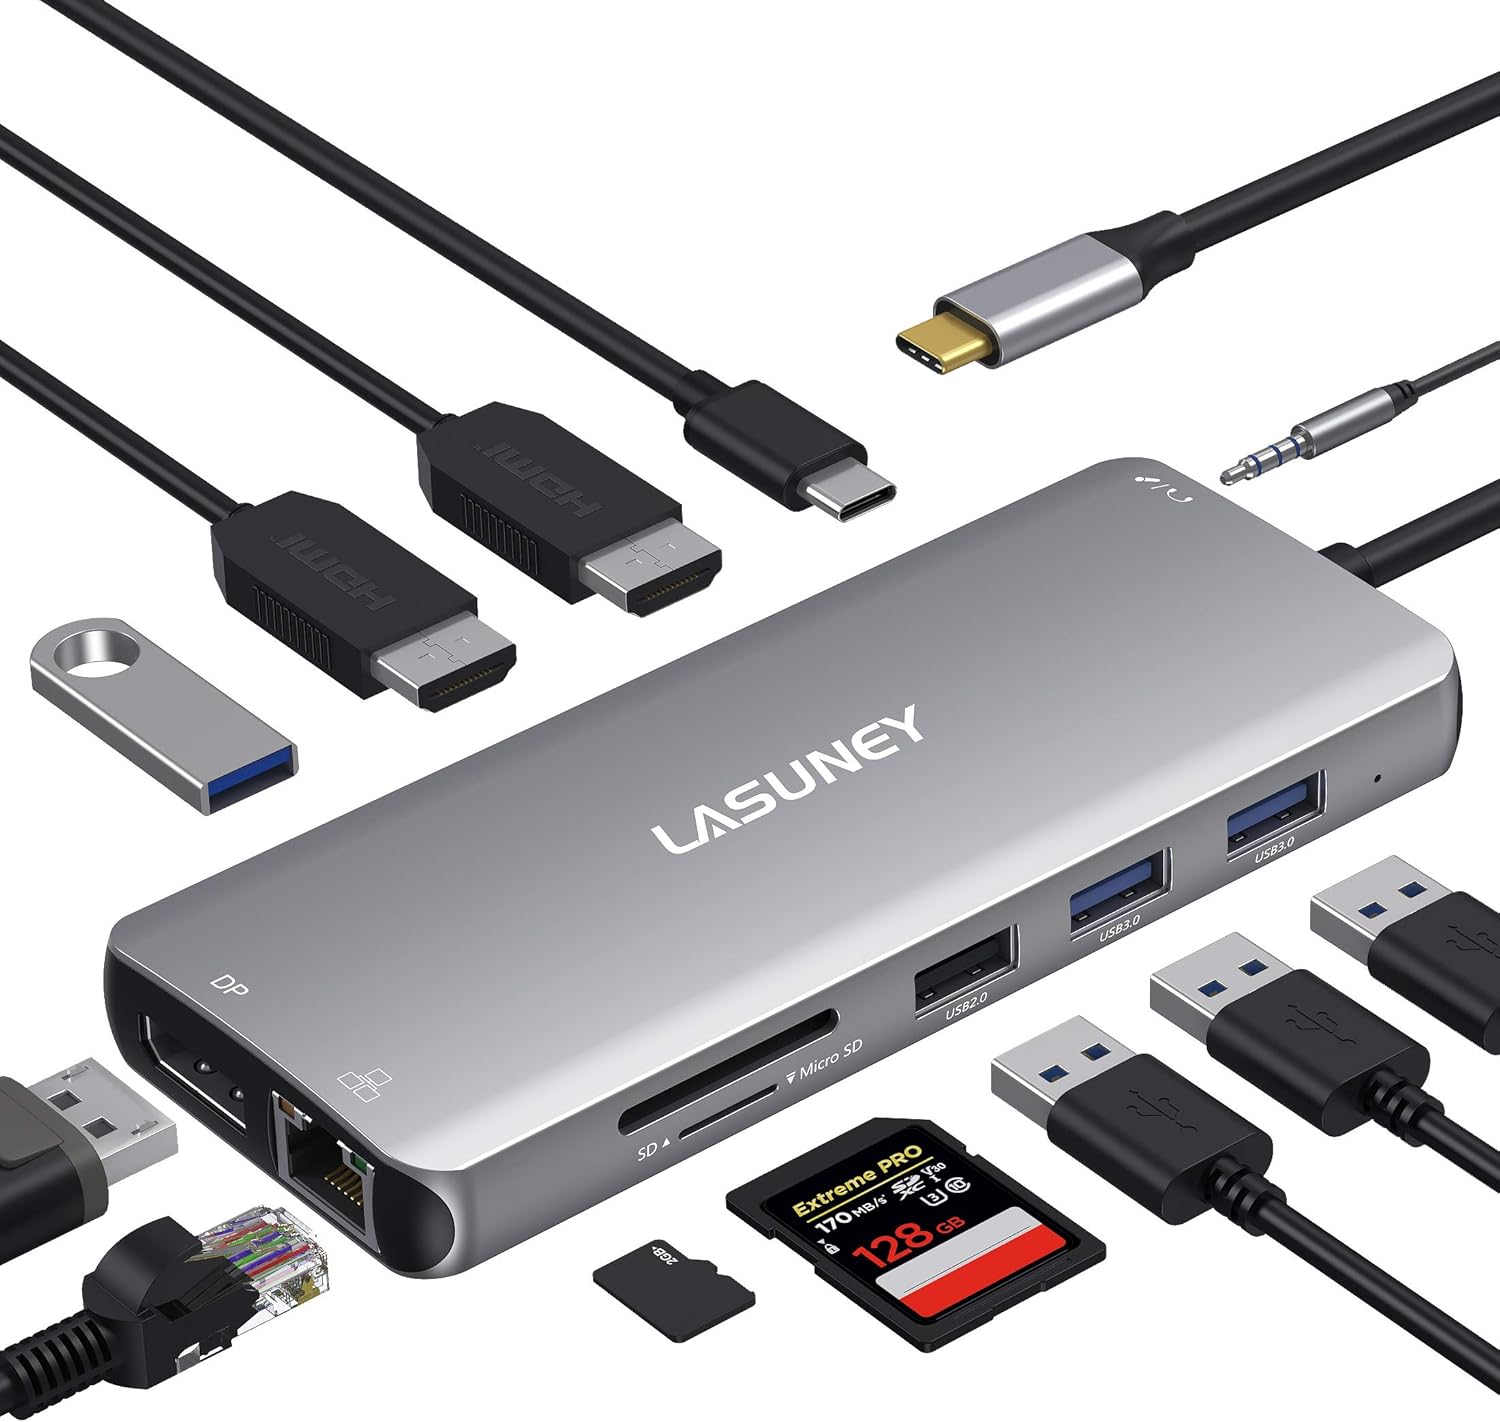
The LASUNEY 12-in-1 USB-C Docking Station, shown with its included USB-C cable and various compatible peripherals like HDMI cables, USB drives, SD/TF cards, and an Ethernet cable, highlighting its comprehensive connectivity.
Port layout
The docking station features the following ports:
- 2 x HDMI Ports (up to 4K@60Hz)
- 1 x DisplayPort (up to 4K@60Hz)
- 1 x RJ45 Gigabit Ethernet Port (up to 1000Mbps)
- 1 x USB-C PD Port (up to 100W Power Delivery)
- 1 x USB-C Data Port (10Gbps)
- 2 x USB-A 3.0-porte (5 Gbps)
- 2 x USB-A 2.0 Ports (480Mbps)
- 1 x SD-kortplads
- 1 x TF-kortplads
- 1 x 3.5 mm lyd-/mikrofonstik

A detailed diagram illustrating the 12 ports of the docking station, including USB-C PD3.0, HDMI, TF & SD card slots, USB-A 2.0, USB-A 3.0, DisplayPort, RJ45, and 3.5mm Audio, with labels for each function.
2. Opsætningsvejledning
Follow these steps to set up your LASUNEY 12-in-1 USB-C Docking Station:
- Bekræft USB-C-portkompatibilitet: Ensure your laptop's USB-C port supports video output (DisplayPort Alt Mode) and Power Delivery (PD) for full functionality. Look for Thunderbolt 3/4, USB-C with a lightning bolt icon, or a 'D' symbol next to the USB-C port.
- Tilslut til bærbar computer: Sæt det integrerede USB-C-kabel fra dockingstationen i en kompatibel USB-C-port på din bærbare computer.
- Strømtilslutning (valgfrit men anbefalet): For stable operation and charging your laptop, connect your laptop's original charger (or a 90W+ USB-C PD charger) to the USB-C PD port on the docking station.
- Tilslut ydre enheder:
- Eksterne skærme: Connect your HDMI or DisplayPort cables from your monitors to the corresponding ports on the docking station.
- Netværk: Plug an Ethernet cable into the RJ45 port for a stable wired internet connection.
- USB-enheder: Connect USB-A devices (e.g., mouse, keyboard, external hard drives) to the USB-A 2.0 or USB-A 3.0 ports.
- SD/TF-kort: Insert your SD or TF memory cards into the dedicated slots.
- Lyd: Connect headphones or speakers to the 3.5mm audio/mic jack.
- Konfigurer skærmindstillinger: Your operating system should automatically detect the connected monitors. You may need to adjust display settings (resolution, refresh rate, mirror/extend mode) in your system preferences.
This video demonstrates how to connect a docking station to a PC and configure display settings for multiple monitors. It covers checking USB-C port functions, setting display modes (mirror/extend), adjusting resolution, and refresh rates on Windows.
3. Betjeningsvejledning
Skærmkonfiguration (Windows)
For Windows, the docking station supports both SST (Single Stream Transport) and MST (Multi-Stream Transport) modes. If your laptop supports DP1.4, you can achieve triple displays (2 HDMI, 1 DP) by shutting down the laptop screen.
- Gå til Indstillinger > System > Vise.
- Under "Multiple displays," select your desired display mode (e.g., "Extend desktop to this display" or "Duplicate desktop").
- Adjust resolution and refresh rate for each monitor as needed.

An illustration demonstrating the multiple display modes: for Windows, a laptop connected to three external monitors (two HDMI, one DP) for extended display; for Apple OS, a laptop connected to three external monitors showing mirrored displays.
Display Configuration (Mac OS)
Mac OS does not natively support MST. You can achieve one extended display with the hub. For multiple monitors, they will typically mirror the extended display.
- Gå til Systemindstillinger > Viser.
- Select the external monitor.
- Choose "Extended display" or "Mirror for Built-in Display" from the "Use as" dropdown.
- Adjust resolution and refresh rate as needed.
Note: For Mac, you can only get one extended display totally with the hub. One display of HDMI1=HDMI2=DP, and one of your MacBook. To achieve this, go to Set-Display-Arrangement-Cancel Mirror Display. Then drag the setting box to the page of the external screen.
This video provides a general user guide for a docking station, covering various ports and their functions, including HDMI, USB, SD/TF, DisplayPort, and Ethernet. It also shows how to connect the hub to a laptop and use multiple displays.
This short video demonstrates a docking station enabling triple display setup on a Windows laptop, showcasing HDMI and DisplayPort connections for enhanced productivity.
Dataoverførsel og opladning
Utilize the USB-A 3.0 ports for high-speed data transfer up to 5Gbps and USB-A 2.0 ports for broader compatibility. The USB-C PD port supports up to 100W for fast charging of your laptop.

The docking station connected to a laptop, showcasing its RJ45 Gigabit Ethernet port for stable wired access up to 1000Mbps, and USB 2.0 and USB 3.0 ports for high-speed data transfer.

The docking station connected to a laptop, featuring a 3.5mm audio/mic port for HD lossless sound quality and SD/TF card slots for efficient file access and management.
4. Fejlfinding
HDMI/DP/VGA Port Issues
- Why does my monitor have no signal input when plugged into HDMI/DP/VGA?
Our products require specific USB-C port functionality on laptops. Only computer models with Full Function, Support Display, or Thunderbolt capabilities (often indicated by a Thunderbolt logo or 'D' symbol next to the USB-C port) can use our docking station for video output.
If your device lacks exterior markings, consult the manufacturer's website for your laptop model to verify USB-C functionality. If you are unsure, please provide us with a screenshot of your laptop's bottom text for confirmation.

This image illustrates different USB-C port types, indicating which support video output (Full Function, Data+PD+Displayport Alt, Data+Displayport Alt) and which do not (Only Charging, Only Data Transfer).
- Why does the monitor have signal input, but it is a black screen?
This usually occurs if the monitor's frame rate exceeds the docking station's supported rates, especially with monitors supporting 90/120/144 Hz or higher. Adjust the frame rate externally on your monitor and change the resolution and frame rate on your connected laptop's display settings.
- Why can't I choose a higher resolution?
When using multiple HDMI/DP/VGA ports, the resolution for each connected monitor may be reduced. Refer to the product detail page for specific resolution capabilities. If the display quality is not as expected, connect the monitors one by one and gradually adjust their resolutions.
- Why are the images on external monitors all the same?
You can switch between mirroring and non-mirroring (extended) modes in your operating system's display settings:
- Windows: Gå til Indstillinger > System > Vise, then select your desired display mode (Duplicate or Extend).
- Mac OS: Gå til Systemindstillinger > Viser, then choose "Extended display" or "Mirror for Built-in Display."
- Why does the screen flicker when using HDMI/DP/VGA?
First, confirm which graphics card your system is using and update its drivers. If flickering persists, try replacing the cable to check for faults. Screen flickering is also more likely with HDMI/DP/VGA cables longer than 3 meters.
Power Delivery Port Issues
- Why does the laptop show low power or unable to charge while connecting to Power Delivery Port?
Laptop motherboards have varying power requirements. If you use a power supply of 65W or less, the motherboard's protection mechanism might activate, leading to low power mode. A power supply of 45W or below may not be sufficient to charge the motherboard.
We recommend using a 90W or higher power supply, or using a second USB-C port or pin header for charging.
- Why does the display get black when I connect the monitor by USB C Power Delivery port?
Only specific dual-plug MacBook products with a Thunderbolt logo next to the USB-C port on the docking station support video-out via the Power Delivery port. USB-C ports without the Thunderbolt logo do not support video output.
USB-A/USB-C Port Issues
- Why are wireless devices delayed?
USB 3.0 technology operating on the 2.4GHz/2.5GHz frequency band can interfere with conventional 2.4GHz/2.5GHz wireless Bluetooth devices, causing delays or non-functionality due to increased noise. While the product incorporates electromagnetic shielding, complete isolation of interference may not always be possible.
To mitigate this, consider the following solutions:
- Keep wireless mouse/keyboard receivers as close to the device as possible.
- Keep receivers far from USB 3.0 devices. Use an extended USB 2.0 cable for wireless receivers if necessary.
- If your Wi-Fi supports dual-band (2.4G/5G), use the 5GHz band.
- Apply EMI shielding tape around the USB 3.0 port.
- Avoid using other 2.4GHz devices (e.g., microwave ovens) simultaneously with the hub.
- Use wireless interference-resistant products (e.g., Razer V3pro, ROG TKL).
- Use a wired mouse and keyboard.
- Why does the USB port on the docking station not work?
This issue may be caused by multiple USB ports going dormant causing the entire HUB to be considered dormant and thus insufficient external power supply. To resolve this, you may need to adjust power management settings in your operating system:
- Windows: Disable "USB selective suspend" in Power Options (Control Panel > Power Options > Change plan settings > Change advanced power settings > USB settings). Also, in Device Manager, for "USB Root Hub" properties, uncheck "Allow the computer to turn off this device to save power."
- Mac OS: In Privatliv og sikkerhed settings, ensure "Allow accessories to connect" is set to "Always" or "Ask for new accessories."
If using a high-power hard disk, other USB devices might be ejected. If these steps don't work, and all connected devices are low-power, try uninstalling and updating your USB drivers.
- Why do I get frequent device loading pop-up sounds after using the USB C or USB A Port?
This often occurs when a high-power hard disk is connected, causing other USB devices to be ejected. Refer to the solutions for "Why does the USB port on the docking station not work?" (above). If the issue persists with low-power devices, try uninstalling and updating your USB drivers.
SD/TF Port Issues
- Why are my SD/TF cards not showing up?
First, try cleaning the gold contacts on your SD/TF card. If the issue persists, ensure your operating system is configured to display external disks:
- Mac OS: Gå til Finder > Præferencer > Generel, and make sure the "External disks" option is ticked to show the SD card on your Desktop.
Problemer med Ethernet-porten
- Why can't I get 1000Mbps on my network port?
While our products support up to 1000Mbps, real-time network speed depends on various factors including your network environment and the quality of your Ethernet cable. We recommend using at least a CAT6 cable to ensure optimal performance.
3.5mm Audio & Mic Port Issues
- Why does the Audio port not working?
If you have multiple audio devices connected, only one independent audio output is allowed per unit. Ensure the correct audio output device is selected in your system's sound settings.
- Windows: Gå til Indstillinger > System > Sund, and select the desired output device. You may need to set it as the default device.
- Mac OS: Gå til Systemindstillinger > Sund, and select the correct output device.
- Why is there a lot of bottom noise when I connect to the jack?
Clean the 3.5mm metal cylindrical head of your audio jack, insert it, and rotate it to find the optimal angle and depth. If the issue persists, check that the headphone monitoring function and microphone enhancement are turned off, and noise cancellation is turned on in your audio settings.
5. Specifikationer
| Mærke | LASUNEY |
| Model | 12 IN 1 Light Gray |
| Antal havne | 12 |
| Samlet USB-porte | 4 |
| Hardware-interface | Thunderbolt, USB Type C |
| Kompatible enheder | MacBook/Pro (2016-2021), MacBook Air/Mac Mini (2018-2020), Dell Latitude (3500/5290), HP Spectre (13/X360-13T), Lenovo Yoga (370/720/730), and more. |
| Varens vægt | 5 ounce |
| Pakkedimensioner | 6.34 x 3.94 x 0.83 tommer |
6. Vedligeholdelse
To ensure the longevity and optimal performance of your LASUNEY 12-in-1 USB-C Docking Station, please follow these maintenance guidelines:
- Rensning: Brug en blød, tør klud til at rengøre dockingstationens yderside. Undgå at bruge flydende rengøringsmidler eller aerosoler, da de kan beskadige enheden.
- Opbevaring: Opbevar dockingstationen et køligt, tørt sted væk fra direkte sollys og ekstreme temperaturer.
- Håndtering: Handle the device with care. Avoid dropping it or subjecting it to strong impacts. Do not pull on the cable forcefully when disconnecting.
- Ventilation: Ensure the docking station has adequate ventilation to prevent overheating, especially during prolonged use with multiple connected devices.
- Kabelstyring: Keep cables organized and untangled to prevent damage to the ports or cables themselves.
7. Garanti og support
For any questions, technical support, or warranty inquiries regarding your LASUNEY 12-in-1 USB-C Docking Station, please contact LASUNEY customer support through the following methods:
- Amazon besked: Find the "sold by..." information on the product details page, click our store name, and then select "Ask a Question" to send us a message.
- Officiel Webwebsted: Visit the official LASUNEY webwebsted for supportressourcer og kontaktoplysninger.
Please have your product model and purchase details ready when contacting support to facilitate a quicker resolution.