
1.Overview
The Atomos Ninja TX 5.2" Camera to Cloud Monitor/Recorder is a versatile device designed to enhance your filmmaking workflow. It combines a high-resolution touchscreen monitor with advanced recording capabilities and seamless cloud integration, providing filmmakers with powerful tools for on-set monitoring, recording, and collaboration.
Nøglefunktioner
- 1920 x 1080 IPS Touchscreen, 4K60 I/O: A vibrant 5.2-inch Full HD display with intuitive touch controls and support for up to 4K60 input/output.
- All Codecs + NDI License Preloaded: Ready to record with a comprehensive suite of professional codecs, including ProRes RAW, and an NDI license for network video workflows.
- Locking 12G-SDI/HDMI 2.0 Input/Output: Secure and reliable connectivity for professional cameras and video sources.
- Records to CFexpress Type B Slot, USB-C: Flexible recording options to high-speed CFexpress Type B cards or external USB-C drives.
- 1500 cd/m² Brightness: Exceptionally bright display for clear visibility in various lighting conditions, including bright daylight.
- Integrated Wi-Fi/TC Sync/Uploading: Built-in Wi-Fi for cloud connectivity, timecode synchronization, and direct uploading of footage.
- 8K30 ProRes RAW Recording: Capture stunning 8K ProRes RAW footage for maximum flexibility in post-production.
- Cross Conversion, Wi-Fi Firmware Updates: Advanced signal conversion capabilities and convenient over-the-air firmware updates.
- Updated AtomOS Linux Operating System: A powerful and user-friendly operating system for efficient control and monitoring.
- L-Series Battery Slot: Compatible with widely available Sony NP-F L-series batteries for extended power.
2. Produktkomponenter
Familiarize yourself with the physical layout and connections of your Atomos Ninja TX.
Front View

Image: The front of the Atomos Ninja TX, showcasing its 5.2-inch touchscreen display.
The front features the vibrant 5.2-inch IPS touchscreen display, which is your primary interface for monitoring footage, navigating menus, and controlling recording functions.
Side View

Image: The side of the Atomos Ninja TX, highlighting the HDMI input/output ports and the CFexpress Type B slot.
One side of the device houses the HDMI input and output ports, along with the CFexpress Type B card slot for high-speed media storage.
Bag View og tilslutningsmuligheder
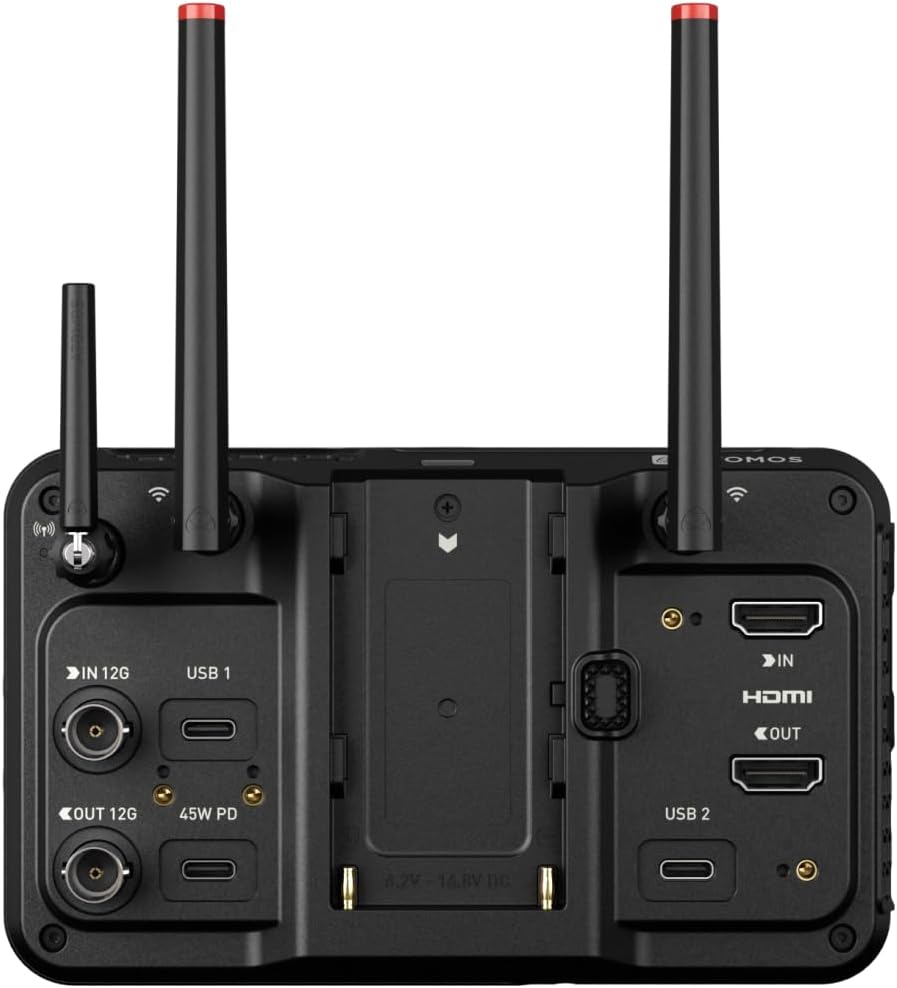
Image: The rear of the Atomos Ninja TX, showing the L-series battery slot, 12G-SDI ports, USB-C ports, and antenna connections.
The rear panel includes the L-series battery slot, 12G-SDI input and output ports, multiple USB-C ports (including one for 45W Power Delivery), and connections for the AirGlu antennas for wireless functionality.
Detailed Port View
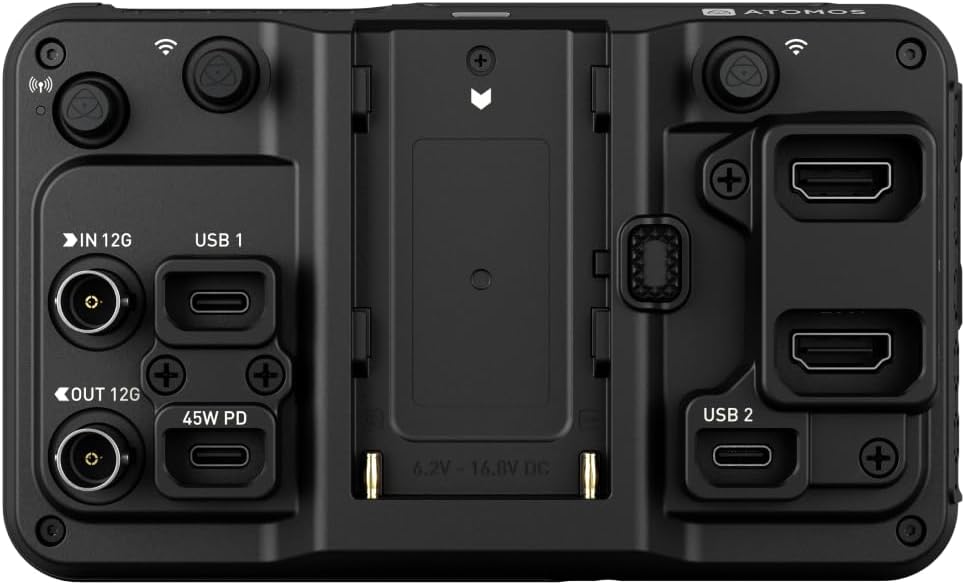
Image: A detailed close-up of the various input/output ports on the Atomos Ninja TX, including HDMI, USB-C, and audio connections.
Dette nærbillede view illustrates the precise layout of the HDMI, USB-C, microphone/line input, headphone output, and remote control ports, ensuring clear identification for connections.
Storage Media Slot
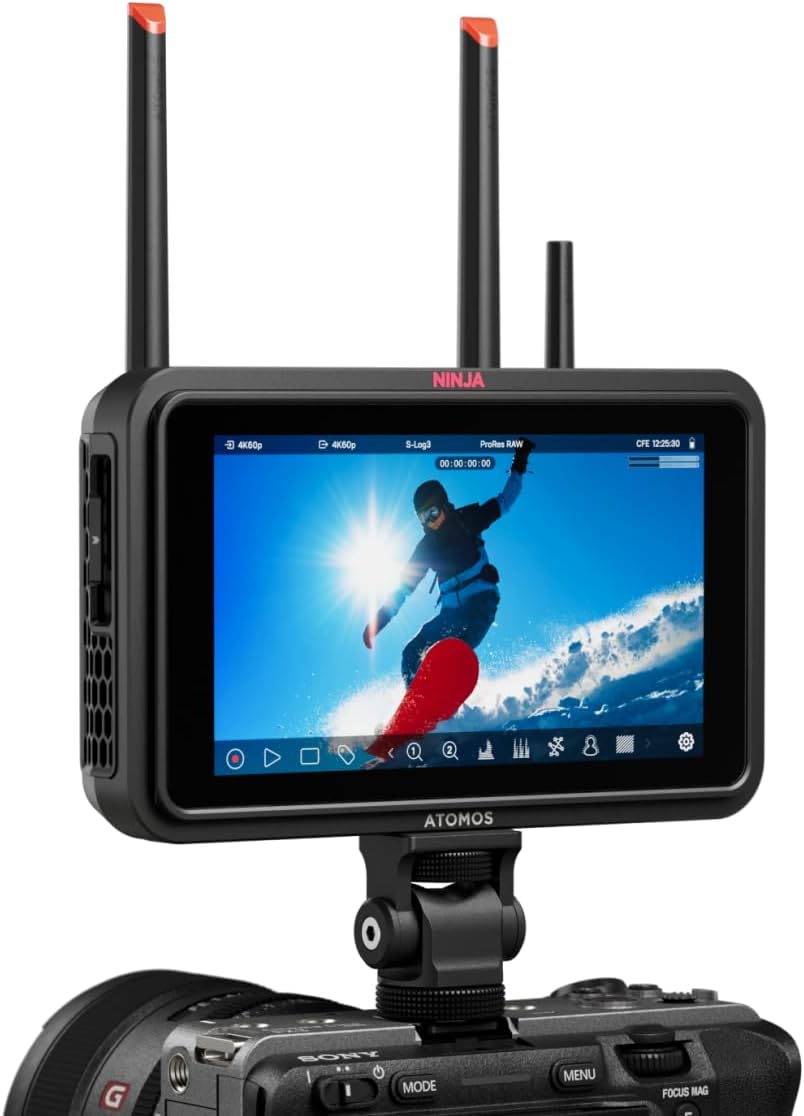
Image: A CFexpress Type B memory card being inserted into the Atomos Ninja TX.
The Ninja TX supports high-speed CFexpress Type B cards for reliable and fast recording of high-resolution video formats.
Fleksible strømmuligheder

Image: A USB-C cable connected to the Atomos Ninja TX for Power Delivery.
The Ninja TX can be powered directly from a compatible USB-C source, such as power banks or wall adapters, offering versatile power solutions.

Image: An NP-F battery attached to the Atomos Ninja TX's L-series battery slot.
NP-F batteries are ideal for field use, powering the monitor-recorder through extended shoots without the need for frequent swaps or complex power setups.

Image: A battery eliminator connected to the Atomos Ninja TX, allowing for continuous power from an AC adapter.
For continuous power, a battery eliminator compatible with NP-F Sony L-series type batteries can be used with an Atomos Locking AC Power Adapter.
3. Opsætning
Udpakning og første inspektion
Når du åbner pakken, skal du sørge for, at alle komponenter er til stede og ubeskadigede:
- Atomos Ninja TX Monitor/Recorder
- USB-C Locking Cable Adapter
- HDMI Locking Cable Adapter
- Antenna Tip Set (Black, White, Yellow, Green, Red)
- AirGlu Antenna
- Antenna Cap Set
- USB-C PD Locking Cable (17.7")
- Limited 1-Year Manufacturer Warranty (Registration Extension: 2-Year)
Tænder
- Insert a charged NP-F L-series battery into the battery slot on the rear of the Ninja TX, or connect a compatible USB-C PD power source.
- Press and hold the power button located on the side of the device until the Atomos logo appears on the screen.
Tilslutning til et kamera

Image: The Atomos Ninja TX mounted on a camera hot shoe, connected via HDMI.
Mount the Ninja TX to your camera using a compatible mounting solution (e.g., hot shoe mount, cage). Connect your camera's HDMI or SDI output to the corresponding input port on the Ninja TX using the provided locking cables. Ensure connections are secure to prevent signal loss.
Monteringstilbehør
The Ninja TX is compatible with various accessories, such as cages, for added protection and mounting points. Below is a video demonstrating the installation of a monitor cage, which can provide additional stability and attachment options for your setup.
Video: Installation of a monitor cage on an Atomos Ninja V. This demonstrates a similar process for securing your Ninja TX and adding accessory mounting points.
4. Operating the Ninja TX
Touchscreen Interface and AtomOS

Image: The Atomos Ninja TX touchscreen displaying various monitoring overlays and controls.
The Ninja TX runs on the intuitive AtomOS Linux operating system, providing a responsive touchscreen interface. Swipe and tap to access various monitoring tools, recording settings, and playback options.
Overvågningsværktøjer

Image: The AtomOS interface showing detailed recording settings like codec, format, and space remaining.
AtomOS offers a suite of professional monitoring tools, including waveforms, vectorscopes, false color, and focus peaking, to ensure accurate exposure and sharp focus. The 1500 cd/m² brightness and 10-bit HDR support provide a clear and accurate representation of your footage.

Image: The Atomos Ninja TX displaying a waveform monitor, a critical tool for analyzing video signal levels and ensuring proper exposure.
Utilize the waveform monitor to analyze the luminance and chrominance levels of your video signal, helping you achieve optimal exposure and prevent clipping.
Optagelsesfunktioner
The Ninja TX supports a wide range of recording formats and resolutions, including 4K60 and 8K30 ProRes RAW. All codecs are preloaded, allowing you to start recording immediately. Use the touchscreen to select your desired codec, resolution, frame rate, and other recording parameters.
Cloud integration
With integrated Wi-Fi, the Ninja TX offers Camera to Cloud functionality. This allows for seamless timecode synchronization and direct uploading of your footage to cloud platforms, streamlining your post-production workflow and enabling remote collaboration.
Cross Conversion and Firmware Updates
The device supports cross conversion between HDMI and SDI signals. Firmware updates are delivered via Wi-Fi, ensuring your Ninja TX always has the latest features and performance enhancements.
5. Vedligeholdelse
Proper maintenance ensures the longevity and optimal performance of your Atomos Ninja TX.
Rensning
- Skærm: Brug en blød, fnugfri mikrofiberklud, der er specielt designet til elektronik. Tør let på genstridige pletter.ampen the cloth with distilled water or a screen-cleaning solution. Avoid harsh chemicals or abrasive materials.
- Legeme: Wipe the body with a dry, soft cloth. If necessary, a slightly damp cloth can be used, but ensure no moisture enters any ports or vents.
- Porte: Keep all ports clean and free of dust. Use a can of compressed air to gently blow out any debris.
Opbevaring
- Store the Ninja TX in a cool, dry place away from direct sunlight and extreme temperatures.
- When not in use, store the device in its original packaging or a protective case to prevent scratches and damage.
- Fjern batterierne, hvis de opbevares i længere perioder, for at forhindre lækage.
Batteripleje
- Always use genuine or certified compatible NP-F L-series batteries.
- Charge batteries fully before use and avoid completely draining them to prolong their lifespan.
- Store batteries in a cool, dry place, ideally at around 50% charge for long-term storage.
6. Fejlfinding
If you encounter issues with your Atomos Ninja TX, refer to the following common troubleshooting steps:
Intet signal på displayet
- Tjek kabler: Ensure all HDMI/SDI cables are securely connected to both the camera and the Ninja TX. Try using different cables if available.
- Verify Camera Output: Confirm that your camera's HDMI/SDI output is enabled and set to a compatible resolution and frame rate.
- Valg af input: On the Ninja TX, verify that the correct input source (HDMI or SDI) is selected in the AtomOS menu.
- Power Cycle: Power off both the camera and the Ninja TX, then power them back on.
Enheden tænder ikke
- Batterikontrol: Ensure the NP-F battery is fully charged and correctly inserted. Try a different battery if possible.
- USB-C strøm: If using USB-C PD, verify the power source is active and providing sufficient wattage (45 W anbefales).
- Power knap: Tryk og hold tænd/sluk-knappen nede i et par sekunder for at sikre, at den registreres.
Optagelsesproblemer
- Media Check: Ensure the CFexpress Type B card or USB-C SSD is correctly inserted, formatted, and has sufficient free space.
- Mediekompatibilitet: Verify that your recording media is compatible with the Ninja TX and meets the required speed specifications for your chosen codec and resolution.
- Codec/Resolution Settings: Confirm that the selected recording codec, resolution, and frame rate are supported by your media and camera output.
- Firmware: Ensure your Ninja TX firmware is up to date.
7. Specifikationer
| Feature | Specifikation |
|---|---|
| Produktdimensioner | 7.75 x 5.25 x 3 tommer |
| Varens vægt | 1.47 pund |
| Varemodelnummer | ATOMNJTX01 |
| Vise | 5.2" IPS Touchscreen, 1920 x 1080 |
| Lysstyrke | 1500 cd/m² |
| Video input/output | Locking 12G-SDI/HDMI 2.0 (4K60 I/O) |
| Optagelsesformater | 8K30 ProRes RAW, All Codecs + NDI License Preloaded |
| Lagermedier | CFexpress Type B Slot, USB-C |
| Forbindelse | Integrated Wi-Fi, TC Sync |
| Operativsystem | Updated AtomOS Linux |
| Magt | L-Series Battery Slot, USB-C PD (45W) |
| Fabrikant | ATOMOS |
| Sprog | engelsk, tysk |
| Dato først tilgængelig | 8. august 2025 |
8. Garanti og support
Garantioplysninger
The Atomos Ninja TX comes with a Limited 1-Year Manufacturer Warranty. Registration of your product may extend this warranty by an additional 2 years. Please refer to the warranty card included in your product packaging for full terms and conditions, or visit the official Atomos website for details on warranty registration.
Kundesupport
For technical assistance, troubleshooting, or service inquiries, please contact Atomos customer support through their official website. You can find FAQs, software downloads, and contact information for your region on the Atomos support page.


