1. Introduktion
The fishkeeper FK130-8W Electric Aquarium Gravel Cleaner and Water Changer is a versatile tool designed for efficient aquarium maintenance. It integrates automatic water changing, sand washing, debris removal, and water filtration into a single device. The unit features a scraper-edged, grid-guarded duckbill intake to effectively dislodge and suction biofilm and sludge. A debris cup with a filter sponge captures fine waste, protecting the pump and ensuring clean substrate. This device is suitable for both freshwater and saltwater tanks.
Important Safety Note: The handle controller is not waterproof. Ensure it remains dry and away from water sources during operation and cleaning.
2. Produktkomponenter
Carefully unpack the box and verify that all components are present and undamaged. The package should include:
- Handle controller with integrated buttons and battery indicator
- Filter chamber with filter sponge
- Vandpumpe
- Water inlet pipes (x2, 34.5cm/13.58in each)
- Connector for 2 water inlet tubes
- Sand-washing cup (x1)
- Plastic blade (x1)
- Water tube (x1, 1.3cm/0.51in, 6.56ft/2m)
- Power Adapter (x1, 5ft/1.55m)
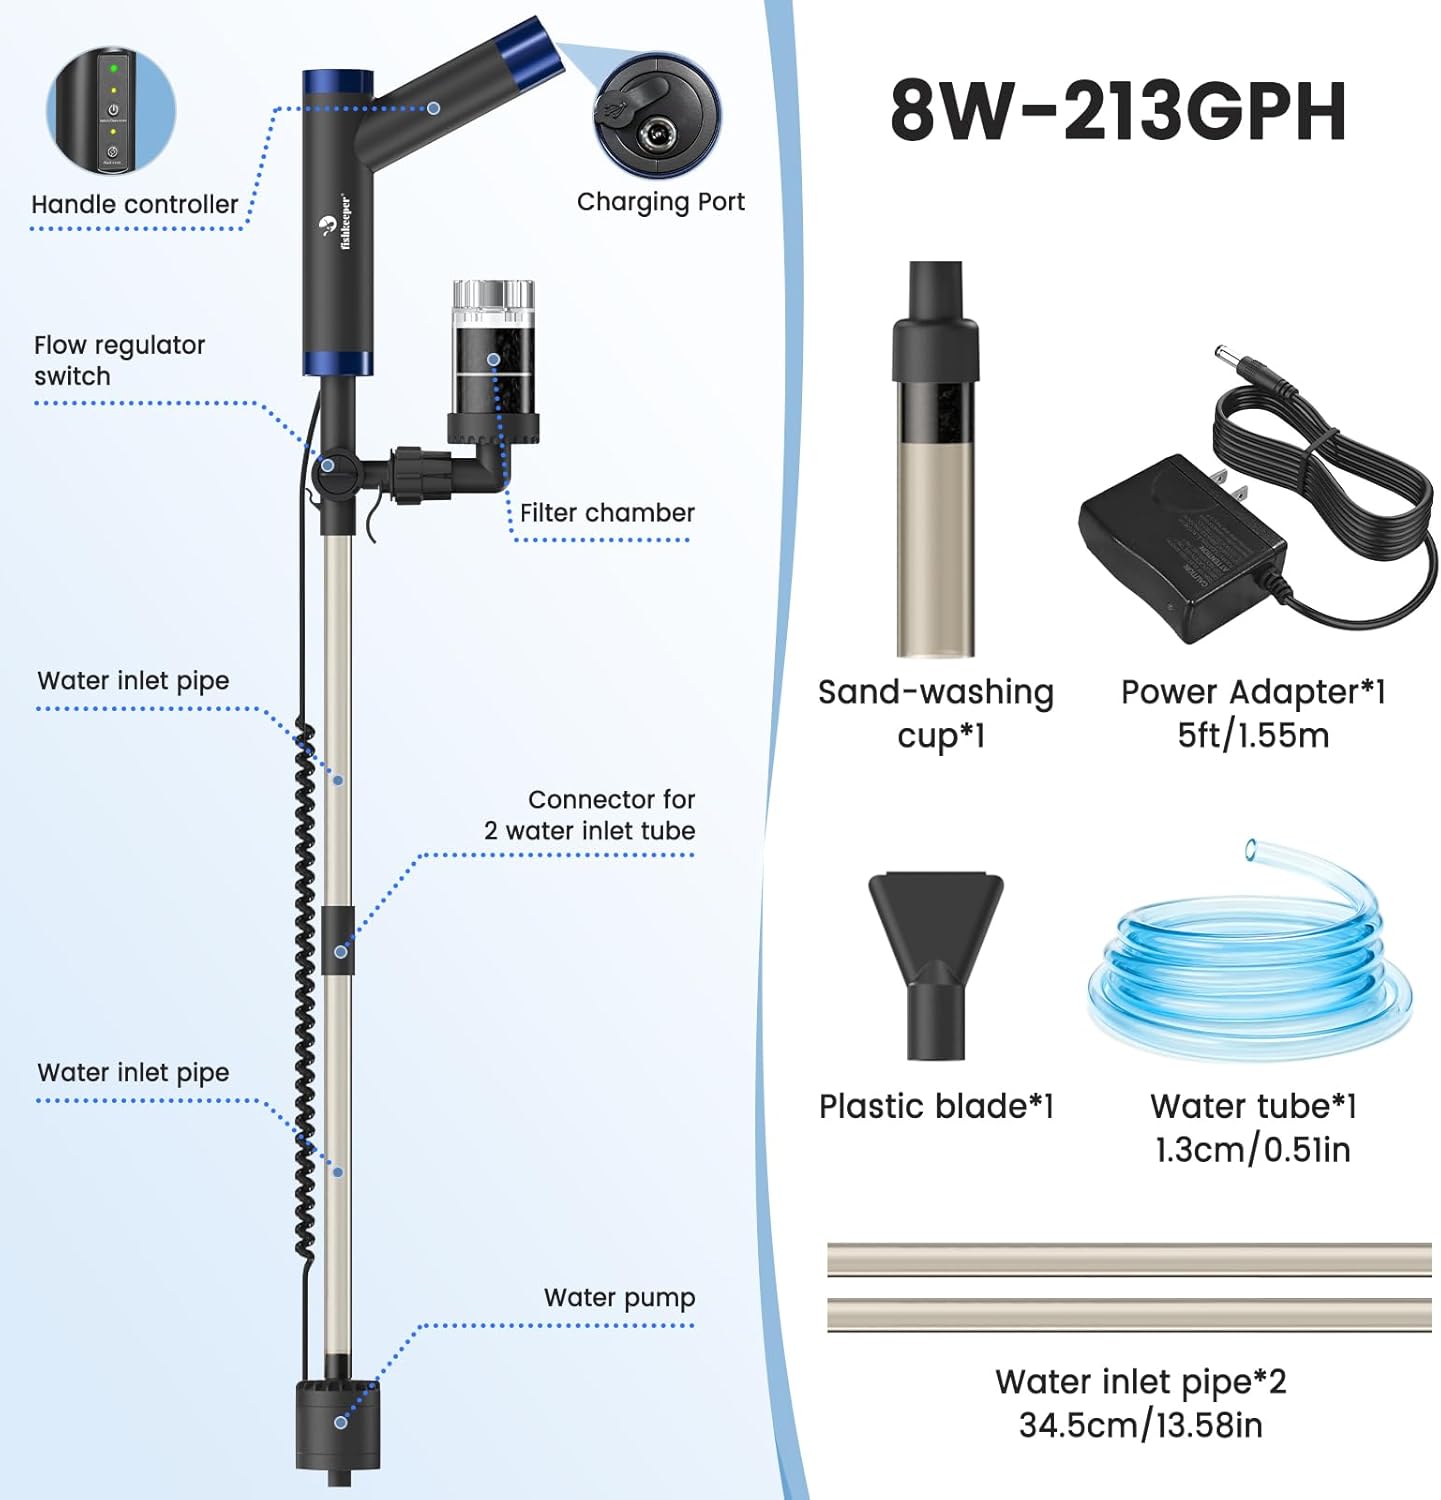
Figur 2.1: Eksploderet view of the fishkeeper FK130-8W Electric Aquarium Gravel Cleaner components.
3. Opsætningsvejledning
Follow these steps to assemble your fishkeeper aquarium cleaner:
- Attach Extension Tubes: Connect the extension tubes to the dual water intake connector. The length can be adjusted based on your tank's depth.
- Secure Handle and Pump Unit: Attach the handle and pump unit to the opposite end of the assembled extension tube.
- Tilslut jævnstrøm: Align the DC connector with its port on the handle. Ensure the O-ring seal is properly seated to prevent water ingress. Firmly tighten the connection.
- Installer tilbehør: Attach the desired accessory (e.g., gravel vacuum head or plastic blade) to the pump's intake port.
- Install Drainage Hose: Securely install the drainage hose onto the L-shaped outlet tube of the filter chamber.
- Dykpumpe: Before connecting to power, ensure the pump unit is fully submerged in the aquarium water. Operating the pump without water can cause immediate overheating and permanent damage.

Figure 3.1: Visual guide for assembling the fishkeeper FK130-8W cleaner.
Video 3.1: Official product video demonstrating the assembly and initial operation of the fishkeeper aquarium gravel cleaner.
4. Betjeningsvejledning
The fishkeeper FK130-8W offers two primary operating modes: Clean Mode and Wash Mode.
4.1 Tænd og valg af tilstand
The device can be operated in two power modes: Plug-in tilstand for continuous power or Cordless Mode using the rechargeable battery for portability.

Figure 4.1: Plug-in vs. Cordless operation modes.
The handle controller features indicator lights for battery level and selected mode:
- Indikatorlys for batteriniveau:
- Green (Constantly on): Approximately 2 hours of power supply.
- Yellow (Constantly on): Approximately 1.2 hours of power supply.
- Red (Constantly on): Approximately 0.6 hours of power supply.
- Red (Flashing): Approximately 10 minutes of power supply remaining.
- Switch/Clean Mode Indicator Light: Illuminates when Clean Mode is active.
- Wash Mode Indicator Light: Flashes when Wash Mode is active.

Figure 4.2: Handle controller button and indicator light descriptions.
4.2 Clean Mode (Gravel & Waste)
In Clean Mode, the motor runs continuously for sand washing, cleaning, and adding water (from low to higher water level). This mode is ideal for removing debris from the substrate.
- Submerge the pump completely in water before activating.
- Gently lift and lower the vacuum head into the gravel. The pulsating action agitates the sand, releasing trapped waste such as fish waste, uneaten food, and other debris.
- The released debris is drawn up by the suction, while the cleaned sand settles back down.
- The scraper-edged duckbill intake helps dislodge biofilm and sludge from surfaces.

Figure 4.3: Cleaning Mode in action, demonstrating gravel cleaning.

Figure 4.4: Detail of the scraper edge and pre-filter mechanism.
4.3 Wash Mode (Water Exchange)
In Wash Mode, the motor operates for approximately 2 minutes to initiate water flow. After this initial period, the siphon principle takes over to complete the water change without consuming additional electricity.
- Ensure the drainage hose is directed into a suitable waste container.
- Activate Wash Mode. The pump will run briefly to start the siphon.
- Monitor the water level and turn off the device or remove the hose when the desired amount of water has been drained.
- When draining water from the bottom of the tank, switch to Cleaning Mode for more thorough drainage.

Figure 4.5: Water Draining and Refilling capabilities.
5. Vedligeholdelse
Regular maintenance ensures optimal performance and extends the lifespan of your fishkeeper cleaner.
- Pumpe rengøring: Regularly disassemble the pump housing and impeller to remove any accumulated debris. This prevents clogging and maintains efficient operation.
- Filtersvamp: The debris cup contains a washable filter sponge. Remove and rinse the sponge thoroughly after each use to ensure effective filtration.
- Generel rengøring: Rinse all components with clean water after use. Ensure no debris remains in the tubes or attachments.

Figure 5.1: Pump cleaning and maintenance guide.
6. Fejlfinding
If you encounter issues with your fishkeeper cleaner, refer to the following common troubleshooting tips:
- Ingen strøm/Enhed tænder ikke:
- Ensure the battery is fully charged or the power adapter is securely connected and receiving power.
- Check the DC connector for proper alignment and a secure O-ring seal.
- Verify that the pump unit is fully submerged in water before attempting to power on.
- Weak Suction or No Water Flow:
- Confirm the pump is completely submerged and the water level is above the minimum line.
- Check for blockages in the intake nozzle, extension tubes, or filter chamber. Clean any debris.
- Ensure the filter sponge in the debris cup is clean and not clogged.
- If air is trapped inside the pump, remove the pump from the water, lift it above the tank surface, gently shake or tilt it to expel air bubbles, then fully submerge and restart.
- Verify that the flow regulator switch (if applicable) is set to the desired flow rate.
- Vandlækager:
- Inspect all connections, especially the DC connector and tube joints, for proper seating and tightness.
- Check O-rings for damage or misalignment.
- Vanskeligheder med montering:
- Refer to the detailed assembly steps in Section 3 and Figure 3.1.
- Ensure all parts are correctly oriented and securely fastened. Some tubing may require firm pressure to connect.
7. Specifikationer
| Feature | Detalje |
|---|---|
| Modelnavn | FK130-8W |
| Mærke | fiskeholder |
| Magt | 8W |
| Flowhastighed | 213 GPH (800 L/H) |
| Funktioner | Automatic Water Changing, Sand Washing, Debris Removal, Water Filtration |
| Strømkilde | Rechargeable Battery / Plug-in (AC/DC power supply) |
| Battery Life (Green) | Ca. 2 timer |
| Water Tube Length | 6.56 fod (2 m) |
| Strømadapterkabellængde | 5 fod (1.55 m) |
| Varens vægt | 2.4 pund |
| Emne Pakke Dimensioner | 15.2 x 7.87 x 3.7 tommer |
| Kompatibilitet | Ferskvands- og saltvandsbeholdere |

Figure 7.1: The cleaner's adjustable length for various tank sizes.
8. Garanti og support
The fishkeeper FK130-8W Electric Aquarium Gravel Cleaner and Water Changer comes with a 2 års garanti fra købsdatoen, dækker fabrikationsfejl og funktionsfejl ved normal brug.
For technical support, warranty claims, or any questions regarding your product, please contact fishkeeper customer service through the retailer where you purchased the product or visit the official fishkeeper webwebsted for kontaktoplysninger.