1. Introduktion
This manual provides comprehensive instructions for the installation, operation, and maintenance of your Jansite 6.25-inch Motorcycle CarPlay/Android Auto GPS Navigation System. Please read this manual thoroughly before using the device to ensure proper functionality, optimal performance, and rider safety. Familiarizing yourself with the contents will help you maximize your experience with the product.
2. Sikkerhedsoplysninger
- Trafiksikkerhed: Always prioritize your safety and the safety of others on the road. Do not operate the device in a manner that distracts you from riding.
- Sikker montering: Ensure the device is securely mounted according to the installation instructions to prevent it from detaching during operation, which could cause injury or damage.
- Elektrisk installation: If you are not confident with electrical wiring, consult a qualified professional for assistance with power connections. Incorrect wiring can lead to damage or electrical hazards.
- Vandeksponering: The device is IP67 waterproof, offering protection against rain and dust. However, avoid prolonged submersion in water.
- Temperaturgrænser: Operate the device within its specified temperature range (-25°C to 60°C) to ensure proper function and longevity.
3. Pakkens indhold
Bekræft at alle varer er til stede i pakken:
- Jansite 6.25-inch Motorcycle CarPlay/Android Auto Screen
- Monteringsbeslag (styrmontering)
- Forbindelsesstang
- Strømkabel
- Lynlåsebånd
- Installationsnøgle
- Brugermanual
4. Opsætning og installation
4.1 Montering af enheden
The device supports two primary installation methods: Rearview Mirror Bracket and Handlebar Bracket. Choose the method best suited for your motorcycle and preference.
Handlebar Bracket Installation:
- Use the provided wrench to securely install the bracket onto your motorcycle's handlebar. Ensure it is tightened to prevent movement during riding.
- Install the connecting rod onto the handlebar bracket.
- Attach the CarPlay screen to the rod and adjust its position for optimal viewing angle. The bracket allows for 360-degree adjustment.
- Verify that the installation is complete and secure before operating the motorcycle.
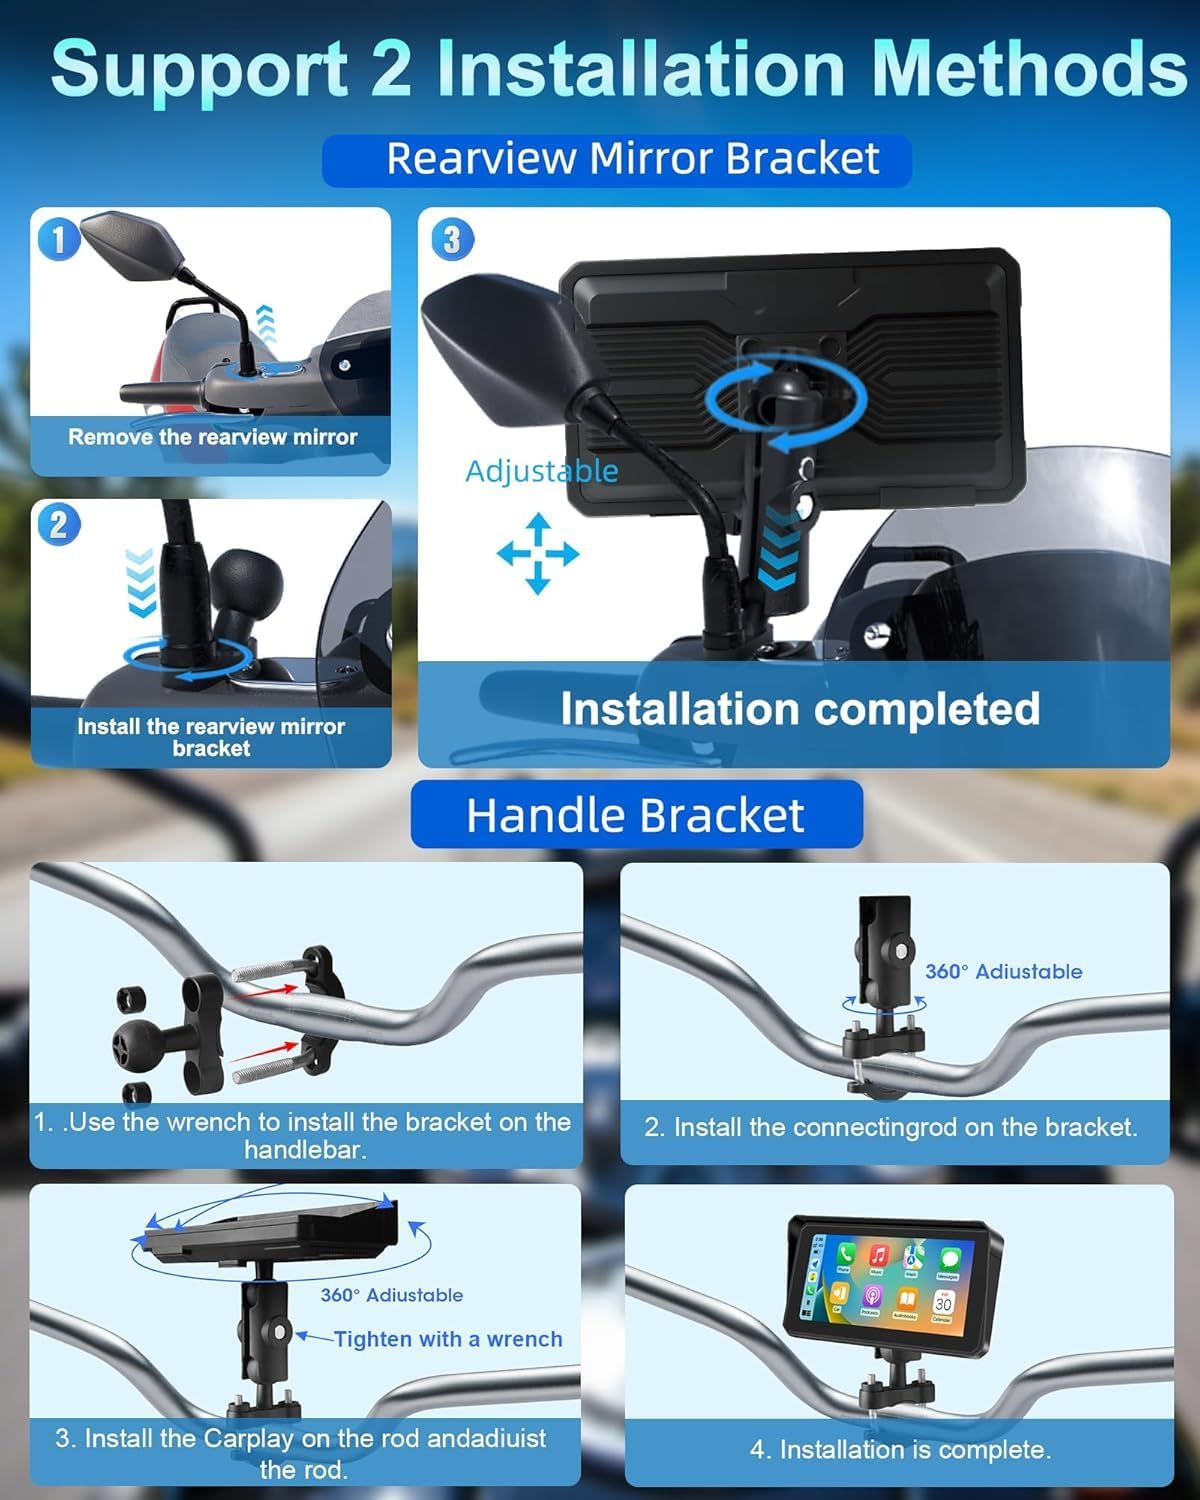
Step-by-step guide for installing the device using either a rearview mirror bracket or a handlebar bracket, showing adjustable components.
Bagview Mirror Bracket Installation (if applicable):
- Carefully remove the rearview mirror from its mounting point on your motorcycle.
- Monter bagsidenview mirror bracket in place of the mirror.
- Attach the CarPlay screen to the adjustable arm of the bracket.
- Re-attach the rearview mirror (if applicable) and adjust the screen's position and angle for clear visibility without obstructing your view.
4.2 Strømtilslutning
- Connect the provided power cable to the designated port on the device.
- Route the power cable safely along your motorcycle's frame, securing it with the included zip ties to prevent interference with moving parts or accidental snagging.
- Connect the other end of the power cable to your motorcycle's 12V power source. For a secure and protected connection, it is highly recommended to use a fuse tap.

Detailed visual steps for handlebar installation, including components like the mounting bracket, power cable, zip ties, and user manual.
5. Betjeningsvejledning
5.1 Tænd/sluk
The device is designed to power on automatically when your motorcycle's ignition is turned on and power is supplied. To power off the device, simply turn off your motorcycle's ignition.
5.2 Trådløs CarPlay/Android Auto-forbindelse
- Sørg for, at Bluetooth og Wi-Fi er aktiveret på din smartphone.
- On the device, navigate to the CarPlay or Android Auto interface.
- Follow the on-screen prompts to pair your smartphone. This typically involves selecting your device from a list and confirming a pairing code.
- Once connected, your smartphone's compatible applications will be displayed on the screen, allowing for seamless interaction.

Illustration of the device displaying Apple CarPlay and Android Auto interfaces, demonstrating voice command functionality for navigation and music.
5.3 Bluetooth Connectivity (Helmet/Headset)
The system supports dual Bluetooth connections for enhanced audio experience:
- First, pair your smartphone to the CarPlay screen via Bluetooth. This enables calls and audio streaming from your phone to the device.
- Second, pair your Bluetooth helmet or headset directly to your smartphone. This setup routes audio from the CarPlay screen (via your phone) to your helmet/headset, ensuring clear sound without removing your helmet.

Diagram showing a motorcycle rider with the device, illustrating how a smartphone connects to the device and then to a Bluetooth helmet or headset for audio.
5.4 Stemmestyring (Siri/Google Assistant)
Once connected to Apple CarPlay or Android Auto, you can activate voice control by saying "Hey Siri" or "OK Google," or by tapping the voice assistant icon on the screen. Use voice commands to:
- Initiate navigation to a destination.
- Make or receive phone calls.
- Send or read messages.
- Play specific music or podcasts.
- Check weather conditions.

Depiction of the device on a motorcycle handlebar, showing voice command prompts for Siri and Google Assistant to control navigation, music, and calls.
5.5 Navigation & Music Playback
- Navigation: Access your preferred map applications (e.g., Google Maps, Apple Maps, Waze) through the CarPlay or Android Auto interface. Input destinations via touch or voice command.
- Musikafspilning: Control music and audio from your smartphone's compatible applications directly on the device screen.
5.6 Screen Brightness & Display Modes
The device features manual brightness adjustment and an anti-glare design to ensure optimal visibility in various lighting conditions. You can adjust settings as needed:
- Dagstilstand: Provides a bright display for clear visibility under direct sunlight.
- Nattilstand: Reduces screen brightness and glare for comfortable viewing during nighttime riding.

Visual demonstrating the anti-glare screen design with a sun visor for improved visibility in sunlight, and the waterproof touch screen functionality.
6. Funktioner overview
- IP67 vandtæt og støvtæt: The device is rated IP67, providing robust protection against dust ingress and immersion in water up to 1 meter for 30 minutes. This ensures reliable operation in various weather conditions, including heavy rain.
- Anti-refleksdesign: The screen incorporates an optimized sun visor and anti-glare technology to reduce reflections and improve visibility, even in bright sunlight.
- Bred temperaturtolerance: Engineered to operate reliably in extreme temperatures, from -25°C (-13°F) to 60°C (140°F), making it suitable for diverse riding environments.
- High-Definition IPS Display: A crisp 6.25-inch IPS touch screen with a resolution of 1600x600 ensures clear visuals and detailed map displays.

Image highlighting the IP67 waterproof rating of the device, with visuals depicting its resilience in rain, high temperatures (60°C), and low temperatures (-25°C).
7. Fejlfinding
If you encounter issues with your device, refer to the following troubleshooting steps:
- Enheden tænder ikke:
- Check all power cable connections to the device and your motorcycle's power source.
- Ensure the motorcycle's ignition is turned on.
- If a fuse tap was used, verify that the fuse is intact and not blown.
- Cannot connect to CarPlay/Android Auto:
- Ensure Bluetooth and Wi-Fi are active on your smartphone.
- Genstart både enheden og din smartphone.
- On your phone's Bluetooth settings, forget the device and attempt to pair again.
- Sørg for, at din smartphones operativsystem er opdateret.
- Ingen lyd fra hjelm/headset:
- Confirm that your Bluetooth helmet or headset is successfully paired to your smartphone.
- Check volume settings on both the device and your smartphone.
- Ensure audio is routed correctly through your smartphone's audio settings.
- Screen glare/poor visibility:
- Adjust screen brightness manually through the device settings.
- Utilize the anti-glare design and sun visor to minimize reflections.
- Switch to night mode if riding in low light conditions for reduced glare.
8. Specifikationer
| Skærmstørrelse | 6.25 tommer |
| Opløsning | 1600x600 |
| Vandtæt vurdering | IP67 |
| Forbindelse | Wireless Apple CarPlay, Wireless Android Auto, Dual Bluetooth |
| Stemmekontrol | Siri, Google Assistent |
| Driftstemperatur | -25°C til 60°C (-13°F til 140°F) |
| Monteringstype | Styrbeslag, bagpåview Spejlmontering |
| Varens vægt | 1.43 pund |
| Pakkedimensioner | 7 x 5 x 5 tommer |
| Type køretøjstjeneste | Motorcykel |
9. Vedligeholdelse
- Rensning: Clean the screen and exterior surfaces with a soft, damp klud. Undgå at bruge slibende rengøringsmidler, opløsningsmidler eller stærke kemikalier, da disse kan beskadige skærmen ellerasing.
- Monteringstjek: Periodically check all mounting points and screws for tightness. Vibrations from riding can loosen connections over time.
- Kabelinspektion: Inspect the power cable and any other connections for signs of wear, fraying, or corrosion. Replace damaged cables immediately.
- Opbevaring: When not in use for extended periods, store the device in a dry, temperate environment, away from direct sunlight and extreme temperatures.
10. Garantioplysninger
This Jansite product is covered by a 1 års begrænset garanti from the original date of purchase. The warranty covers manufacturing defects in materials and workmanship under normal use.
Det gør garantien ikke dække:
- Skader forårsaget af forkert brug, misbrug, ulykke eller forsømmelse.
- Damage resulting from unauthorized modifications or repairs.
- Almindelig slitage.
- Damage from improper installation or power connection.
To make a warranty claim, you will need to provide proof of purchase. Please retain your sales receipt or other documentation as evidence of the purchase date.
11. Kundesupport
For technical assistance, troubleshooting guidance, or warranty inquiries, please contact Jansite customer support. Refer to the product packaging or the official Jansite website for the most current contact information, including email and phone numbers.
When contacting support, please have your product model number and a detailed description of the issue ready to facilitate a quicker resolution.