1. Introduktion
This manual provides instructions for the assembly, operation, and maintenance of the MONTECH X5M Micro ATX Gaming PC Case. The X5M is designed for high airflow and features pre-installed ARGB fans, a glass side panel, and an integrated GPU holder.
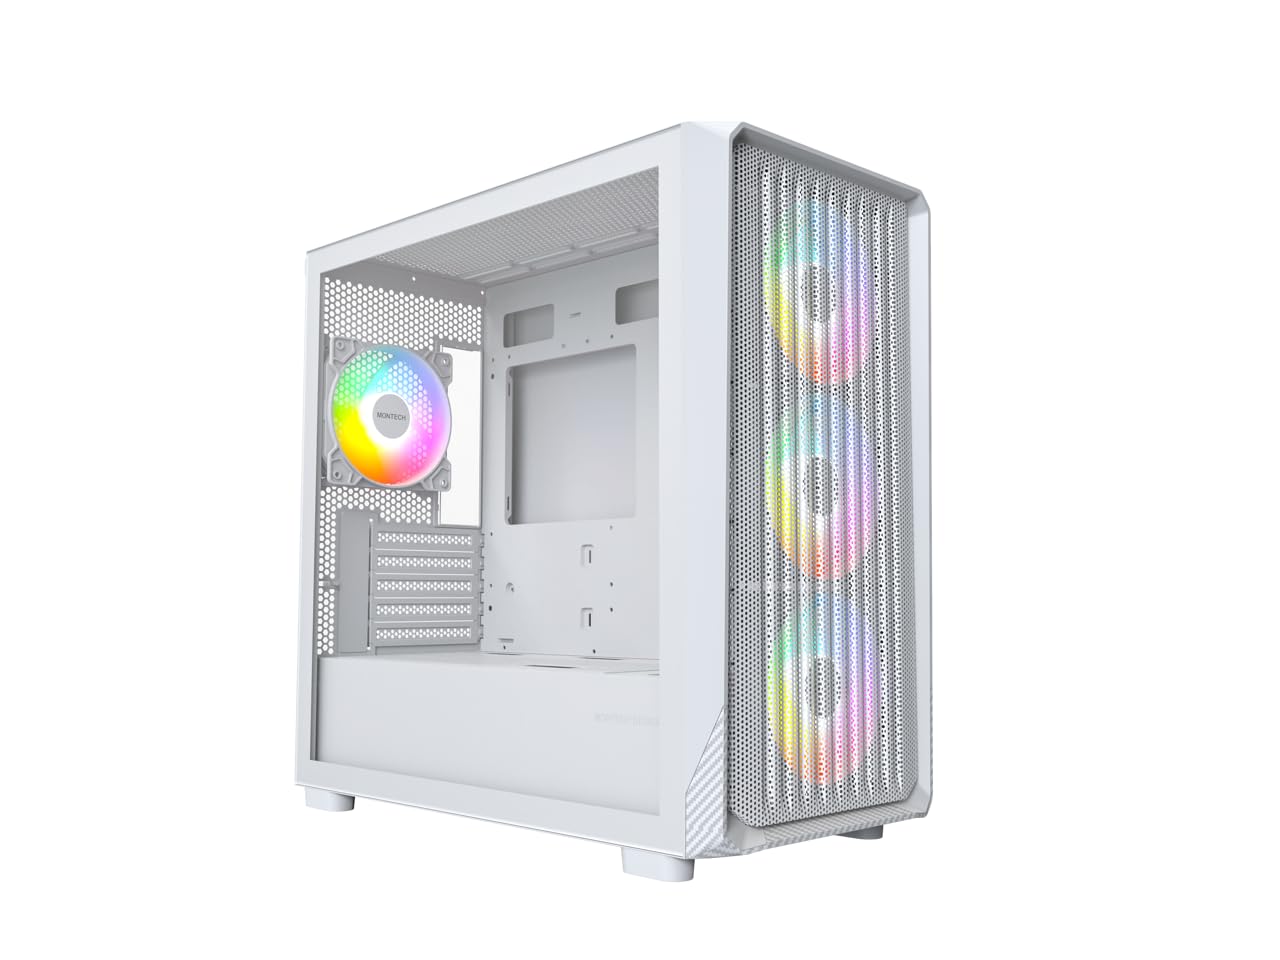
Figure 1: MONTECH X5M Micro ATX Gaming PC Case (White variant).
2. Nøglefunktioner
- Integrated GPU Holder: An adjustable GPU support stand is included to provide physical support for graphics cards.
- Design med høj luftstrøm: Optimized structure for efficient cooling.
- Forinstallerede ARGB-blæsere: Four 120mm ARGB fans are pre-installed for immediate cooling and customizable lighting.
- Hærdet glas sidepanel: Giver en klar view af interne komponenter.
- Carbon Fiber Print Accents: Aesthetic detailing on the front panel.
- Alsidig tilslutning: Front I/O panel includes USB 2.0, USB 3.0, USB Type-C, and audio ports.

Figur 2: Overview of the MONTECH X5M case highlighting internal layout and ARGB fans.
3. Specifikationer
| Mærke | Montech |
| Modelnavn | X5M |
| Sagstype | Micro ATX Mid Tower |
| Bundkort kompatibilitet | Mikro ATX |
| Forudinstallerede ventilatorer | 4 x 120 mm ARGB blæsere |
| GPU-længdeunderstøttelse | Op til 405 mm |
| CPU Cooler Height Support | Op til 165 mm |
| Understøttelse af strømforsyningslængde | Op til 230 mm |
| Opbevaringsbåse | Up to 2 HDDs & 4 SSDs |
| Front I / O-porte | 1x USB 2.0, 1x USB 3.0, 1x USB Type-C, Mic & Audio, LED Button, Power Button |
| Afkølingsmetode | Luft |
| AIO Radiator Support | Top: Up to 360mm; Front: Up to 360mm |
| Materiale | Plastic with Carbon Fiber Accents, Tempered Glass |
| Varens vægt | 14.3 pund (6.49 kg) |

Figure 3: Close-up of the carbon fiber print detailing on the front panel of the X5M case.
4. Opsætning og installation
Follow these steps for installing components into your MONTECH X5M PC case. Ensure your system is powered off and unplugged before beginning any installation.
4.1. Forberedelse af sagen
- Carefully remove the tempered glass side panel by unscrewing the thumb screws and sliding it off.
- Fjern bagpanelet for at få adgang til kabelhåndteringsområdet.
4.2. Installation af bundkort
- Installer I/O-skjoldet (hvis det ikke er forudmonteret på dit bundkort) i den bageste åbning af kabinettet.
- Align your Micro ATX motherboard with the standoffs inside the case.
- Fastgør bundkortet med de medfølgende skruer.
4.3. Installation af strømforsyningsenhed (PSU)
- Place the PSU into the dedicated compartment at the bottom rear of the case.
- Fastgør strømforsyningen med skruer fra bagsiden af kabinettet.
4.4. Storage Device Installation (HDDs/SSDs)
The X5M supports up to 2 HDDs and 4 SSDs.
- 2.5" SSD'er: Mount SSDs onto the designated brackets behind the motherboard tray or on the PSU shroud.
- 3.5" harddiske: Install HDDs into the drive cage located under the PSU shroud.
4.5. Installation af grafikkort (GPU)
- Fjern de nødvendige PCIe-slotdæksler fra bagsiden af kabinettet.
- Insert the GPU into the appropriate PCIe slot on your motherboard.
- Fastgør GPU'en med skruer.
- Adjust the integrated GPU support stand to provide stability for your graphics card.
4.6. Installation af ventilator og radiator
The X5M comes with four 120mm ARGB fans pre-installed. Additional fans or AIO radiators can be installed as follows:
- Top: Supports 3x 120mm or 2x 140mm fans, or AIO radiators up to 360mm.
- Front: Supports 3x 120mm or 2x 140mm fans, or AIO radiators up to 360mm.
- Bag: Supports 1x 120mm fan.
- PSU kappe: Understøtter 2x 120mm blæsere.

Figure 4: Illustration of airflow within the MONTECH X5M case and the pre-installed ARGB fans.

Figure 5: Diagram detailing fan and radiator support locations and sizes within the X5M case.
4.7. Kabelforvaltning
Brug kabelføringsudskæringerne og fastgørelsespunkterne bag bundkortbakken til at organisere kablerne. Dette forbedrer luftgennemstrømningen og æstetikken.
4.8. Forbindelser til frontpanelet (I/O)
Connect the front panel cables (USB 2.0, USB 3.0, USB Type-C, HD Audio, Power Switch, Reset Switch, LED) to the corresponding headers on your motherboard. Refer to your motherboard manual for specific header locations.

Figure 6: Front I/O panel of the MONTECH X5M, showing USB 2.0, USB 3.0, USB Type-C, Mic & Audio jacks, LED button, and Power button.
5. Betjening
5.1. Tænder
After all components are installed and cables connected, replace the side panels. Connect your monitor, keyboard, mouse, and power cable. Press the Power Button on the front I/O panel to start your system.
5.2. ARGB-blæserstyring
De forudinstallerede ARGB-blæsere kan styres på to måder:
- Dedicated LED Button: Use the LED button on the front I/O panel to cycle through 25 built-in lighting modes.
- Synkronisering af bundkort: Connect the ARGB cables to a compatible 5V 3-pin ARGB header on your motherboard. Use your motherboard's RGB software (e.g., ASUS Aura Sync, MSI Mystic Light Sync, GIGABYTE RGB Fusion, ASRock Polychrome Sync) to synchronize and customize lighting effects.
6. Vedligeholdelse
Regelmæssig vedligeholdelse er med til at sikre optimal ydeevne og levetid for dine pc-komponenter.
- Rengøring af støvfilter: Periodically remove and clean the dust filters (located on the top, front, and bottom) to maintain optimal airflow. Use compressed air or a soft brush.
- Udvendig rengøring: Tør de udvendige overflader af med en blød, damp klæde. Undgå slibende rengøringsmidler.
- Indvendig rengøring: With the system powered off and unplugged, use compressed air to remove dust from internal components and fans.
7. Fejlfinding
- Systemet tænder ikke:
- Sørg for, at strømkablet er korrekt tilsluttet strømforsyningen og stikkontakten.
- Kontroller, at strømforsyningskontakten er i "ON"-positionen.
- Verify all front panel connectors (especially the Power Switch) are correctly attached to the motherboard.
- Confirm the 24-pin ATX and 8-pin CPU power cables are securely connected to the motherboard.
- Ventilatorer drejer ikke / RGB lyser ikke:
- Check that all fan power cables are securely connected to the fan hub or motherboard headers.
- Ensure ARGB cables are properly connected to the fan hub or a compatible 5V 3-pin ARGB header on the motherboard.
- If using motherboard synchronization, verify that the RGB software is installed and configured correctly.
- Try cycling through modes using the dedicated LED button on the front panel.
- Ingen skærmoutput:
- Ensure your monitor cable is connected to the graphics card (GPU) and not the motherboard's integrated graphics port (unless you are using integrated graphics).
- Sæt grafikkortet tilbage i dets PCIe-slot.
- Check that the GPU power cables are securely connected.
8. Garanti og support
8.1. Garantioplysninger
The MONTECH X5M PC Case comes with a 1 års fabriksgaranti. This warranty covers defects in materials and workmanship under normal use. For specific terms and conditions, please refer to the official Montech webwebsted eller kontakt kundesupport.
8.2. Kundesupport
For further assistance, technical support, or warranty claims, please visit the official Montech website or contact their customer service department. You can find contact information on the Montech webwebsted: www.montechpc.com