
1. Introduktion
Thank you for choosing the Osram Ceiling Wing Fan 36W D105. This manual provides essential information for the safe installation, operation, and maintenance of your new ceiling fan. Please read these instructions carefully before installation and retain them for future reference.
This modern ceiling fan features an integrated LED light with adjustable white color and dimming capabilities, controlled conveniently by a remote. It is designed for indoor use in various rooms such as living rooms, bedrooms, kitchens, and dining areas.
2. Sikkerhedsinstruktioner
- Elektrisk sikkerhed: Afbryd altid strømmen til hovedafbryderen, før du forsøger at installere, vedligeholde eller rengøre. Sørg for, at al ledningsføring udføres af en kvalificeret elektriker og overholder lokale el-forskrifter.
- Montering: The mounting structure must be capable of supporting the weight of the fan (approximately 4.2 kg) and the dynamic load during operation.
- Klingeafstand: Ensure there is adequate clearance between the fan blades and any obstacles, including walls and furniture, to prevent injury or damage.
- Vandeksponering: This product is designed for indoor use only and has a water resistance level of 'Water Resistant'. Do not expose it to direct water spray or high humidity environments like uncovered outdoor areas.
- Børn og kæledyr: Hold børn og kæledyr væk fra ventilatoren under drift og installation.
- Opretholdelse: Do not attempt to repair or modify the fan. Refer all servicing to qualified personnel.
3. Pakkens indhold
Pak forsigtigt kassen ud, og sørg for, at alle dele er til stede og ubeskadigede. Hvis der mangler eller er beskadigede dele, skal du straks kontakte din forhandler.
- Osram Ceiling Wing Fan Unit (with integrated LED light)
- Fjernbetjening
- Monteringshardware (skruer, ankre osv.)
- Instruktionsmanual (dette dokument)
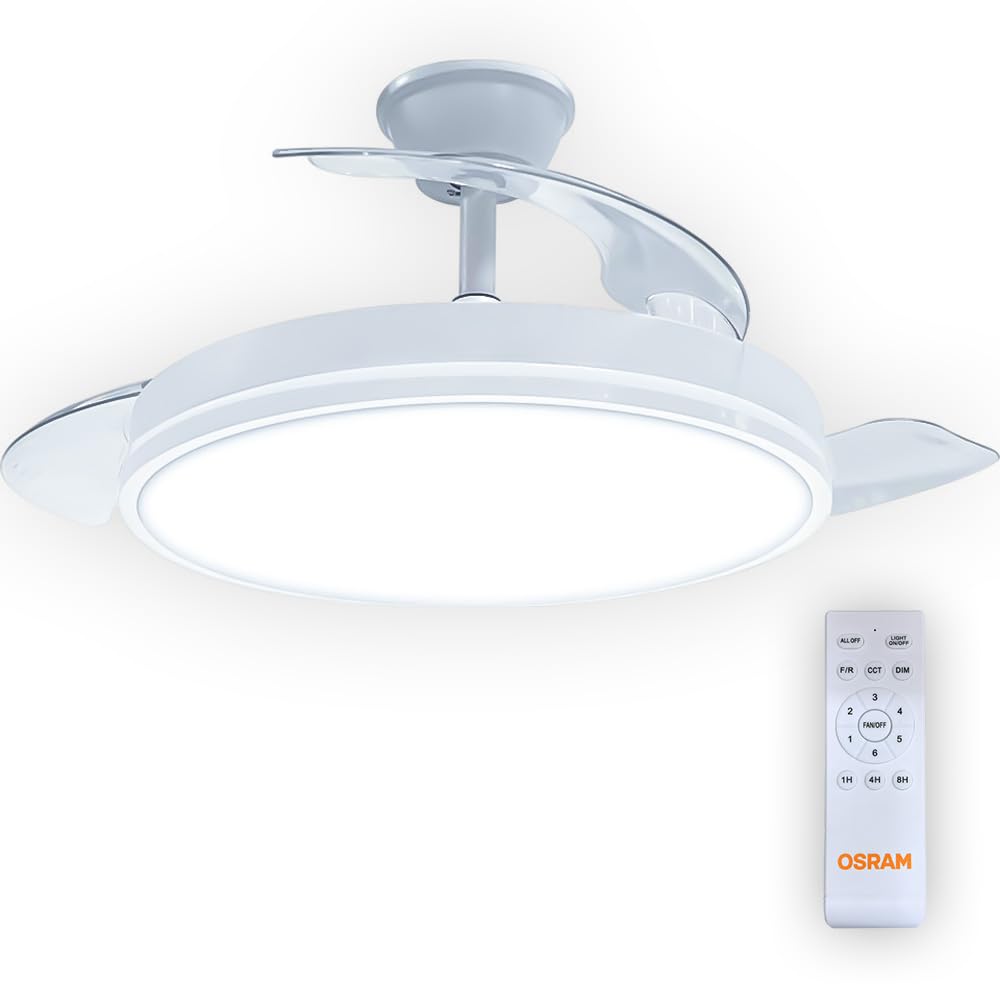
Image 1: Osram Ceiling Wing Fan 36W D105. This image shows the complete ceiling fan unit with its central LED light and transparent wing-like blades.
4. Opsætning og installation
Assembly is required for this product. Follow these steps carefully. If you are unsure about any part of the installation, consult a qualified electrician.
4.1 Forinstallation
- Sluk for strømmen: Locate the circuit breaker for the room where you will install the fan and turn off the power. Verify power is off using a voltage tester.
- Forbered monteringssted: Ensure the ceiling junction box is securely mounted and capable of supporting the fan's weight.
4.2 Montering af ventilatoren
- Fastgør monteringsbeslag: Fastgør monteringsbeslaget til loftssamledåsen med de medfølgende skruer og skiver. Sørg for, at det er fastgjort korrekt.
- Ledningsforbindelser: Connect the electrical wires from the ceiling to the fan's wiring. Typically, this involves connecting Live (L), Neutral (N), and Ground (GND) wires. Match colors (e.g., Black to Black, White to White, Green/Bare Copper to Green/Bare Copper). Use wire nuts to secure connections.
- Secure Fan Body: Carefully lift the fan body and attach it to the mounting bracket. Follow the specific instructions in the included diagram for your model to ensure proper alignment and secure fastening. This fan uses a Semi-Flush Mount installation type.
- Installer klinger: If the blades are separate, attach them to the fan motor housing according to the instructions. Ensure all screws are tightened securely.
- Fastgør lysdæksel: Secure the LED light cover to the fan body.

Billede 2: Side view of the Osram Ceiling Wing Fan. This view highlights the fan's profile and the semi-flush mounting point, which is crucial for installation planning.
4.3 Efterinstallation
- Gendan strøm: Når installationen er færdig, og alle forbindelser er sikre, skal strømmen genoprettes ved afbryderen.
- Testventilator: Use the remote control to test the fan and light functions.
5. Betjeningsvejledning
Your Osram Ceiling Wing Fan is controlled by the included remote control. Ensure the remote has working batteries (not included, typically 2x AAA) before use.

Image 3: Osram Ceiling Fan Remote Control. This image displays the layout of the remote control with buttons for fan speed, light control, timer, and direction.
5.1 Fjernbetjeningsfunktioner
- ALT FRA: Slukker både ventilator og lys.
- LYS TIL/FRA: Slår LED-lyset til eller fra.
- F/R (Forward/Reverse): Changes the direction of the fan blades. Use forward rotation for cooling in summer and reverse rotation for circulating warm air in winter.
- CCT (Korreleret farvetemperatur): Adjusts the color temperature of the LED light (e.g., warm white, neutral white, cool white).
- SVAG: Dims or brightens the LED light. Press and hold to cycle through brightness levels.
- VENTILATOR/SLUK: Tænder eller slukker for blæseren.
- 1-6: Selects one of the six available fan speeds. '1' is the lowest speed, '6' is the highest.
- 1H / 4H / 8H: Activates the timer function, setting the fan to turn off automatically after 1, 4, or 8 hours, respectively.
6. Vedligeholdelse
Regelmæssig vedligeholdelse sikrer optimal ydeevne og forlænger levetiden på din loftsventilator.
- Rensning: Always turn off the power before cleaning. Use a soft, damp cloth to wipe down the fan body and blades. Do not use abrasive cleaners or solvents, as they may damage the finish.
- Støvning: Regularly dust the fan blades and light cover to prevent dust buildup, which can affect performance and light output.
- Spænd skruer: Periodically check and tighten all screws on the fan body and mounting bracket to ensure secure operation.
- Ingen smøring nødvendig: Ventilatormotoren er permanent smurt og kræver ikke yderligere smøring.
7. Fejlfinding
Hvis du støder på problemer med din ventilator, kan du se følgende almindelige problemer og løsninger:
| Problem | Mulig årsag | Løsning |
|---|---|---|
| Ventilator starter ikke | Ingen strøm til blæseren Fjernbetjeningens batterier er døde Forkert ledningsføring | Kontroller afbryderen og vægafbryderen Udskift fjernbetjeningens batterier Kontroller ledningsforbindelser (kontakt elektriker) |
| Lys virker ikke | Ingen strøm til lyset Forkert ledningsføring LED-modulfejl | Kontroller afbryderen og vægafbryderen Kontroller ledningsforbindelser (kontakt elektriker) Contact customer support for LED module replacement |
| Blæseren slingrer | Løse monteringsskruer Ubalancerede klinger | Sørg for, at alle monteringsskruer er spændte Check if blades are securely attached and balanced (balancing kit may be needed if severe) |
| Fjernbetjeningen reagerer ikke | Døde batterier Forhindring mellem fjernbetjening og modtager Fjernbetjening ikke parret (hvis relevant) | Udskift batterierne Ensure clear line of sight to the fan Refer to specific pairing instructions if provided (not common for basic fans) |
8. Specifikationer
| Mærke: | Osram |
| Modelnummer: | Ceiling Blade |
| Produkttype: | Loftsventilator med lys |
| Elektrisk strøm: | 36 watt |
| Lyskilde: | LED |
| Lys farve: | Justerbar hvid |
| Kontrolmetode: | Fjern |
| Strømkilde: | Elektrisk med ledning |
| Monteringstype: | Ceiling Mount, Semi-Flush Mount |
| Indendørs/udendørs brug: | Indendørs |
| Produktmål (L x B x H): | 50U x 20G x 50Y centimeters |
| Vægt: | 4.2 kg |
| Skyggemateriale: | Plast |
| Farve: | Hvid |
| Stil: | Moderne |
| Montering påkrævet: | Ja |
| Inkluderede komponenter: | Fjernbetjening |
9. Garanti og support
For garantioplysninger eller teknisk support henvises til den dokumentation, der fulgte med dit køb, eller kontakt din forhandler. Gem dit købsbevis i tilfælde af garantikrav.