
1. Introduktion
This manual provides detailed instructions for the installation, operation, and maintenance of your Acegeek Panther01 Monitor Stand. Designed for a single monitor, this stand offers full adjustability to enhance your viewing comfort and ergonomic posture. Please read these instructions carefully before installation and retain them for future reference.

Figure 1: Acegeek Panther01 Monitor Stand, showing the full arm and VESA plate.
2. Pakkens indhold
Please verify that all components are present and undamaged before proceeding with installation. If any parts are missing or damaged, please contact customer support.
- Monitor Arm Assembly (1)
- Skrivebord Clamp Base (1)
- Grommet Mount Base (1)
- VESA Plate (1)
- Hardware Kit (Screws, Washers, Allen Keys)
- Instruktionsmanual (dette dokument)
3. Sikkerhedsoplysninger
- Vægt kapacitet: Overskrid ikke den maksimale vægtkapacitet på 9 kg (19.8 lbs).
- Skærmstørrelse: Kompatibel med skærme fra 15 til 32 tommer.
- VESA-kompatibilitet: Supports VESA patterns 75x75mm and 100x100mm.
- Klemmepunkter: Be aware of moving parts during adjustment to avoid pinching fingers.
- Stabil overflade: Ensure the desk or mounting surface is stable and strong enough to support the combined weight of the stand and monitor.
4. Opsætning og installation
The Acegeek Panther01 Monitor Stand offers two installation options: desk clamp and grommet mount.

Figure 2: Monitor stand installed on a desk, side view with monitor.
4.1. Skrivebord Clamp Installation
- Fastgør skrivebordet clamp base to the main pole of the monitor arm.
- Placer clamp på kanten af dit skrivebord.
- Spænd clamp screw until the stand is securely fastened to the desk. Ensure it is stable and does not wobble.
4.2. Montering af rørbeslag
- If your desk has a grommet hole, remove the existing grommet cover.
- Insert the grommet mount base through the hole.
- Secure the base from underneath the desk using the provided plate and tightening knob/screws.
4.3. Montering af skærmen
- Remove the VESA plate from the monitor arm by lifting it upwards.
- Attach the VESA plate to the back of your monitor using the appropriate screws from the hardware kit. Ensure the screws are tightened securely.
- Carefully slide the monitor with the attached VESA plate back onto the monitor arm until it clicks into place.
- Justering af gasfjederspænding: The monitor arm features a gas spring counterweight. After mounting the monitor, adjust the tension using the provided Allen key. Turn clockwise to increase tension for heavier monitors, or counter-clockwise to decrease tension for lighter monitors. Adjust until the monitor stays at the desired height without drifting up or down.
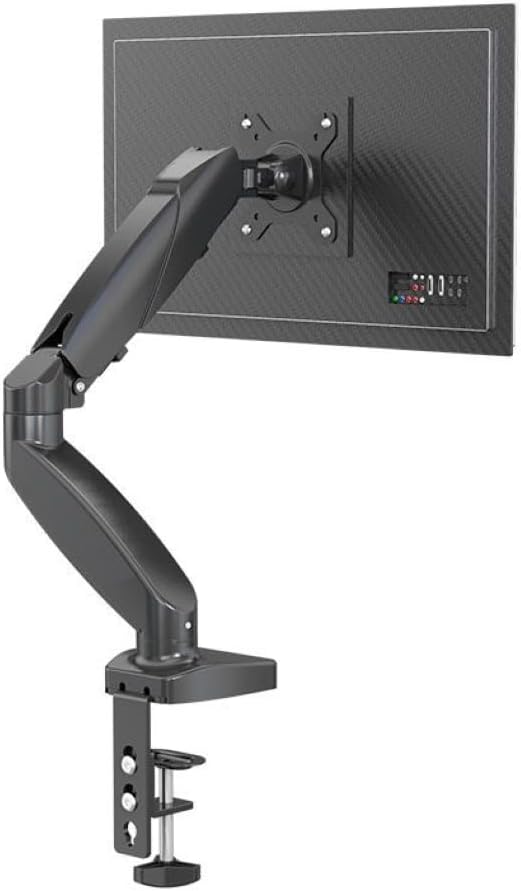
Figur 3: Bagside view of a monitor attached to the stand, highlighting the VESA connection.

Figure 4: Detail of the gas spring adjustment point on the arm.
5. Betjeningsvejledning (Justeringer)
The Acegeek Panther01 Monitor Stand offers a wide range of adjustments for optimal viewkomfort.

Figure 5: The monitor arm demonstrating its full articulation and range of motion.
- Højdejustering: Use the gas spring counterweight to effortlessly raise or lower your monitor to the desired ergonomic height.
- Justering af hældning: The monitor can be tilted from -85° (downwards) to +90° (upwards) to reduce glare and find the perfect viewvinkel.
- Drejejustering: Swivel the monitor 180° left or right to share your screen with colleagues or adjust for different tasks.
- Rotation (Pivot) Adjustment: Rotate the monitor 360° to switch between landscape and portrait orientations without removing the monitor.

Figure 6: Detail of the tilt mechanism on the VESA plate.
6. Kabelforvaltning
The Acegeek Panther01 features integrated cable management channels to keep your workspace tidy and organized.
- Open the cable covers located on the underside of the arm segments.
- Route your monitor power and video cables through these channels.
- Close the covers to secure the cables.

Figure 7: Monitor stand with cables neatly routed through the arm.
7. Vedligeholdelse
To ensure the longevity and proper function of your monitor stand, follow these simple maintenance guidelines:
- Rensning: Tør stativet af med en blød kludamp klud. Undgå slibende rengøringsmidler eller opløsningsmidler, der kan beskadige overfladen.
- Periodiske kontroller: Kontrollér regelmæssigt alle skruer og forbindelser for at sikre, at de forbliver stramme og sikre. Spænd efter om nødvendigt.
- Gasfjeder: The gas spring is designed for long-term use and generally requires no maintenance. If adjustments become difficult, re-check the tension setting.
8. Fejlfinding
| Problem | Mulig årsag | Løsning |
|---|---|---|
| Monitor drifts up or down | Gas spring tension is incorrect for monitor weight. | Adjust the gas spring tension using the Allen key (see Section 4.3). |
| Stand is unstable or wobbles | Skrivebord clamp/grommet mount is not tightened sufficiently. | Sørg for, at skrivebordet klamp or grommet mount is securely fastened to the desk. Check desk stability. |
| Monitor cannot be tilted or rotated | Samlingerne er for stramme. | Loosen the relevant screws on the tilt or rotation joints slightly with an Allen key. |
| VESA plate does not fit monitor | Monitor VESA pattern is not 75x75mm or 100x100mm. | Verify your monitor's VESA compatibility. This stand supports 75x75mm and 100x100mm. |
9. Specifikationer
- Model: AG-PANTHER01
- Materiale: High-quality Steel Alloy
- Farve: Sort
- Monteringstype: Skrivebord Clamp / Grommet Mount
- Skærmstørrelseskompatibilitet: 15" - 32"
- Vægt kapacitet: 2 kg - 9 kg (4.4 lbs - 19.8 lbs)
- VESA-kompatibilitet: 75x75mm, 100x100mm
- Hældningsområde: -85° ~ +90°
- Drejerækkevidde: 180°
- Rotationsområde: 360°
- Funktioner: Quick insert function, Gas spring counterweight, Cable management, Adjustable head.
10. Garanti og support
The Acegeek Panther01 Monitor Stand comes with a 12 måneders garanti fra købsdatoen, dækker fabrikationsfejl. Gem venligst din købsbevis i tilfælde af garantikrav.
For technical support, warranty inquiries, or replacement parts, please contact Acegeek customer service through the retailer where the product was purchased or visit the official Acegeek webwebsted for kontaktoplysninger.