
1. Produktet er slutview
This manual provides instructions for the Gebildet 16mm Blue LED Metal Locking Push Button Switch. This durable switch features a latching mechanism, meaning one press turns it ON and a second press turns it OFF. It is designed for various applications requiring a reliable and waterproof switch with an integrated blue LED indicator.

Image 1.1: Five Gebildet 16mm Blue LED Metal Locking Push Button Switches. These switches feature a metallic housing and a blue LED ring.
2. Pakkens indhold
- 5 x Gebildet 16mm Blue LED Metal Locking Push Button Switches
3. Specifikationer
| Feature | Specifikation |
|---|---|
| Monteringshulstørrelse | 16 mm (5/8") |
| Switch Type | 1 Normally Open (NO) 1 Normally Closed (NC) |
| Operationstype | Latching (Self-locking) |
| Nominel strøm/voltage | 5A, 12-24V |
| LED liv | 40,000 timer |
| Elektrisk liv | 100,000 cyklusser |
| Mekanisk liv | 500,000 cyklusser |
| Beskyttelsesgrad | IP65 (Waterproof & Dustproof), IK09 (Anti-vandal) |
| Skal materiale | Forniklet messing |
| Kontaktmateriale | Sølvlegering |
| Paneltykkelse | 1-11 mm |
| Nut Torque | 5-14 Nm |
| Kontakt modstand | ≤50mΩ |
| Isoleringsmodstand | ≥1000MΩ |
| Omgivelsestemperatur | -20°C ~ +50°C |
| Modelnummer | E1598 |

Image 3.1: Detailed specifications and dimensions of the Gebildet 16mm push button switch, including mounting hole size, switch type, and material.
4. Sikkerhedsoplysninger
- Elektrisk sikkerhed: Always disconnect power before installing or servicing the switch to prevent electrical shock.
- Vandtæthed: The switch is rated IP65 for water and dust resistance, making it suitable for wet or dusty environments. However, do not immerse the switch in water.
- Anti-Vandal: The IK09 rating indicates resistance to external mechanical impact.
- Små dele: This product contains small parts. Keep out of reach of children under 3 years to prevent choking hazards.

Image 4.1: The switch is designed to be splashproof with an IP65 rating, suitable for use in challenging environments.

Image 4.2: Regulatory information and safety warnings, including a choking hazard notice for small parts.
5. Installation
- Sørg for, at strømforsyningen er afbrudt, før installationen påbegyndes.
- Drill a 16mm (5/8") diameter mounting hole in the desired panel. The panel thickness should be between 1mm and 11mm.
- Insert the switch into the mounting hole from the front of the panel.
- Secure the switch by tightening the nut on the back of the panel. Apply a torque of 5-14Nm.
- Fortsæt med ledningsføringen som beskrevet i afsnit 6.
6. Wiring Methods
The switch features 5 brass connections, allowing for flexible wiring configurations. It includes 1 Normally Open (NO) and 1 Normally Closed (NC) contact, and the LED can be wired to be always on or to illuminate only when the device is operating.
Refer to the diagram below for common wiring methods:
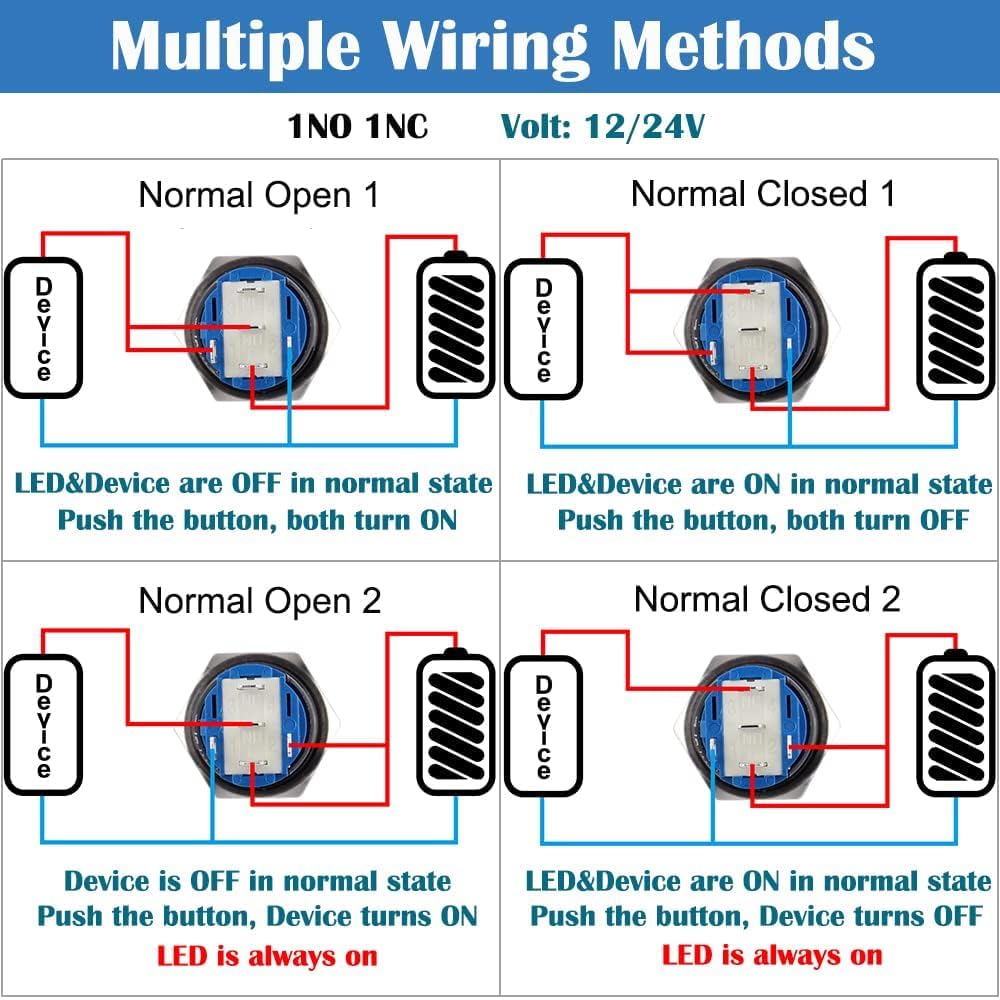
Image 6.1: This diagram illustrates four common wiring configurations for the switch, showing how to control both the device and the LED indicator in Normally Open and Normally Closed setups.
- Normally Open (NO) Configuration: The circuit is open (OFF) when the button is not pressed. Pressing the button closes the circuit (ON).
- Normally Closed (NC) Configuration: The circuit is closed (ON) when the button is not pressed. Pressing the button opens the circuit (OFF).
- The LED can be wired independently or in conjunction with the device operation.
7. Betjening
This is a latching (self-locking) push button switch. Its operation is straightforward:
- At tænde: Press the button once. The switch will lock into the ON position, and the connected device will activate. The LED will illuminate if wired accordingly.
- At slukke: Press the button again. The switch will release from the locked position, and the connected device will deactivate. The LED will turn off if wired accordingly.

Image 7.1: This diagram illustrates the latching operation: one press turns the switch ON, and a second press turns it OFF.
8. Vedligeholdelse
- Rensning: To clean the switch, wipe it with a soft, damp klud. Undgå at bruge slibende rengøringsmidler eller opløsningsmidler, da disse kan beskadige overfladen eller de indvendige komponenter.
- Inspektion: Periodically inspect the switch for any signs of physical damage, loose connections, or wear. Ensure the mounting nut remains securely tightened.
- Ingen interne dele, der kan serviceres af brugeren. Forsøg ikke at skille kontakten ad.
9. Fejlfinding
- Switch Not Activating Device:
- Kontroller alle ledningsforbindelser for korrekt kontakt og polaritet.
- Verify the power supply to the switch and the connected device.
- Ensure the switch is fully pressed and latched.
- LED lyser ikke:
- Check the LED's dedicated wiring for correct connections and polarity.
- Confirm the power supply to the LED is within the 12-24V range.
- Ensure the switch is in the ON position if the LED is wired to activate with the device.
10. Garanti og support
For warranty information or technical support, please refer to the retailer where the product was purchased or visit the official Gebildet webwebsted for kontaktoplysninger.