1. Introduktion
This manual provides essential information for the safe and efficient operation of your Generic 4K Drone Model 22028158. Please read this manual thoroughly before operating the drone to ensure proper usage and to prevent damage or injury. This drone features a 4K adjustable triple camera, brushless motors, 360° obstacle avoidance, optical flow positioning, and a 4.5-inch LCD remote control.
2. Sikkerhedsoplysninger
Vigtige sikkerhedsretningslinjer:
- Brug altid dronen i åbne områder, væk fra mennesker, dyr og forhindringer.
- Hold en sikker afstand fra dronen under drift.
- Do not operate the drone near airports, restricted airspace, or sensitive areas.
- Ensure all propellers are securely attached and undamaged before each flight.
- Keep batteries away from naked flames or direct heat sources.
- Forsøg ikke at modificere dronen eller dens komponenter.
- Hold opsyn med børn, når de betjener eller er i nærheden af dronen.
- Always turn off the drone and remote control when not in use.
- Refer to local regulations regarding drone operation in your area.
3. Pakkens indhold
Bekræft, at alle nedenstående varer er inkluderet i din pakke. Hvis der mangler eller er beskadigede varer, bedes du kontakte kundesupport.

Billede 3.1: Contents of the drone package. This includes the foldable drone, the 4.5-inch LCD remote control, one body battery, a set of spare propeller blades, a screwdriver, a USB charging cable, and a storage bag.
- Generic 4K Drone (Model 22028158)
- 4.5-Inch LCD Remote Control
- Kropsbatteri (x1)
- Spare Propeller Blades (x4)
- USB opladningskabel
- Skruetrækker
- Opbevaringspose
- Brugervejledning (dette dokument)
4. Komponenter overview
4.1 Dronekomponenter

Billede 4.1: The Generic 4K Drone in both unfolded and folded states, alongside its 4.5-inch LCD remote control. Key features visible include the triple camera system, propellers, and motor arms.
- Propeller: Generate lift for flight.
- Børsteløse motorer: Provide efficient and powerful propulsion.
- Adjustable Triple Camera: Captures 4K UHD video and photos from multiple angles.
- Obstacle Avoidance Sensors: Detect obstacles in multiple directions.
- Optisk flowsensor: Assists with stable hovering, especially indoors.
- Batterirum: Houses the drone's flight battery.
- Foldbare arme: Allow for compact storage and transport.
4.2 Remote Control Components

Billede 4.2: The 4.5-inch LCD remote control, showing the screen, joysticks, and various control buttons for drone operation and camera functions.
- 4.5-tommer LCD-skærm: Displays real-time video feed and flight data.
- Kontrolpinde: Left stick for throttle/yaw, right stick for pitch/roll.
- Power knap: Tænder/slukker fjernbetjeningen.
- Start/landingsknap: One-key automatic takeoff and landing.
- Return-to-Home (RTH) Button: Initiates automatic return to the takeoff point.
- Foto/video knap: Tager billeder eller starter/stopper videooptagelse.
- Justering af kameravinkel: Controls the tilt of the drone's camera.
- Speed Mode Button: Toggles between different flight speeds.
5. Opsætning
5.1 Opladning af batteriet
- Tilslut dronens batteri til USB-opladerkablet.
- Plug the USB cable into a 5V/2A USB power adapter (not included).
- The charging indicator light will show the charging status. Charge until fully charged (refer to battery indicator for full charge).
- Charge the remote control using its dedicated charging port and cable.
Note: Ensure batteries are fully charged before each flight for optimal performance and safety.
5.2 Installation af propeller
- Fold dronearmene ud.
- Identify the 'A' and 'B' marked propellers and corresponding motor arms.
- Attach each propeller to its designated motor shaft, ensuring a secure fit. Use the provided screwdriver if necessary.
- Double-check that all propellers are firmly attached and rotate freely without obstruction.
5.3 Installation af dronebatteri
- Find batterirummet på dronen.
- Insert the fully charged battery into the compartment, ensuring it clicks into place.
- Luk batterirummets dæksel forsvarligt.
5.4 Parring af fjernbetjeningen
- Placer dronen på en flad, plan overflade.
- Tryk og hold tænd/sluk-knappen på dronen nede, indtil indikatorlamperne begynder at blinke.
- Tænd for fjernbetjeningen.
- Push the left control stick (throttle) all the way up, then all the way down.
- Dronens indikatorlamper vil holde op med at blinke og forblive konstante, hvilket indikerer vellykket parring.
6. Betjeningsvejledning
6.1 Tjekliste før flyvning
- Sørg for, at batterierne til dronen og fjernbetjeningen er fuldt opladet.
- Check that propellers are correctly installed and undamaged.
- Verify the drone and remote control are successfully paired.
- Vælg et åbent, klart område til flyvning, fri for forhindringer og mennesker.
- Check weather conditions; avoid strong winds (drone has 5-level wind resistance, but extreme conditions should be avoided).
6.2 Start og landing
- Automatisk start: After pairing, press the One-Key Takeoff/Landing button on the remote control. The drone will automatically ascend to a safe hovering altitude.
- Manuel start: Push both control sticks down and outwards simultaneously to unlock the motors. Then, slowly push the left control stick (throttle) upwards to ascend.
- Automatisk landing: Press the One-Key Takeoff/Landing button again. The drone will slowly descend and land.
- Manuel landing: Slowly pull the left control stick (throttle) downwards until the drone lands. Once landed, push both control sticks down and inwards to lock the motors.
6.3 Flight Controls (4.5-Inch LCD Remote)
The 4.5-inch LCD screen provides real-time flight data and video feed. Familiarize yourself with the control stick functions:
- Venstre pind (gas/drej):
- Up/Down: Ascend/Descend (Throttle)
- Venstre/højre: Roter venstre/højre (drej)
- Højre pind (Pitch/Roll):
- Op/Ned: Flyv frem/tilbage (Pitch)
- Venstre/Højre: Flyv venstre/højre (Rul)
6.4 Kamerabetjening
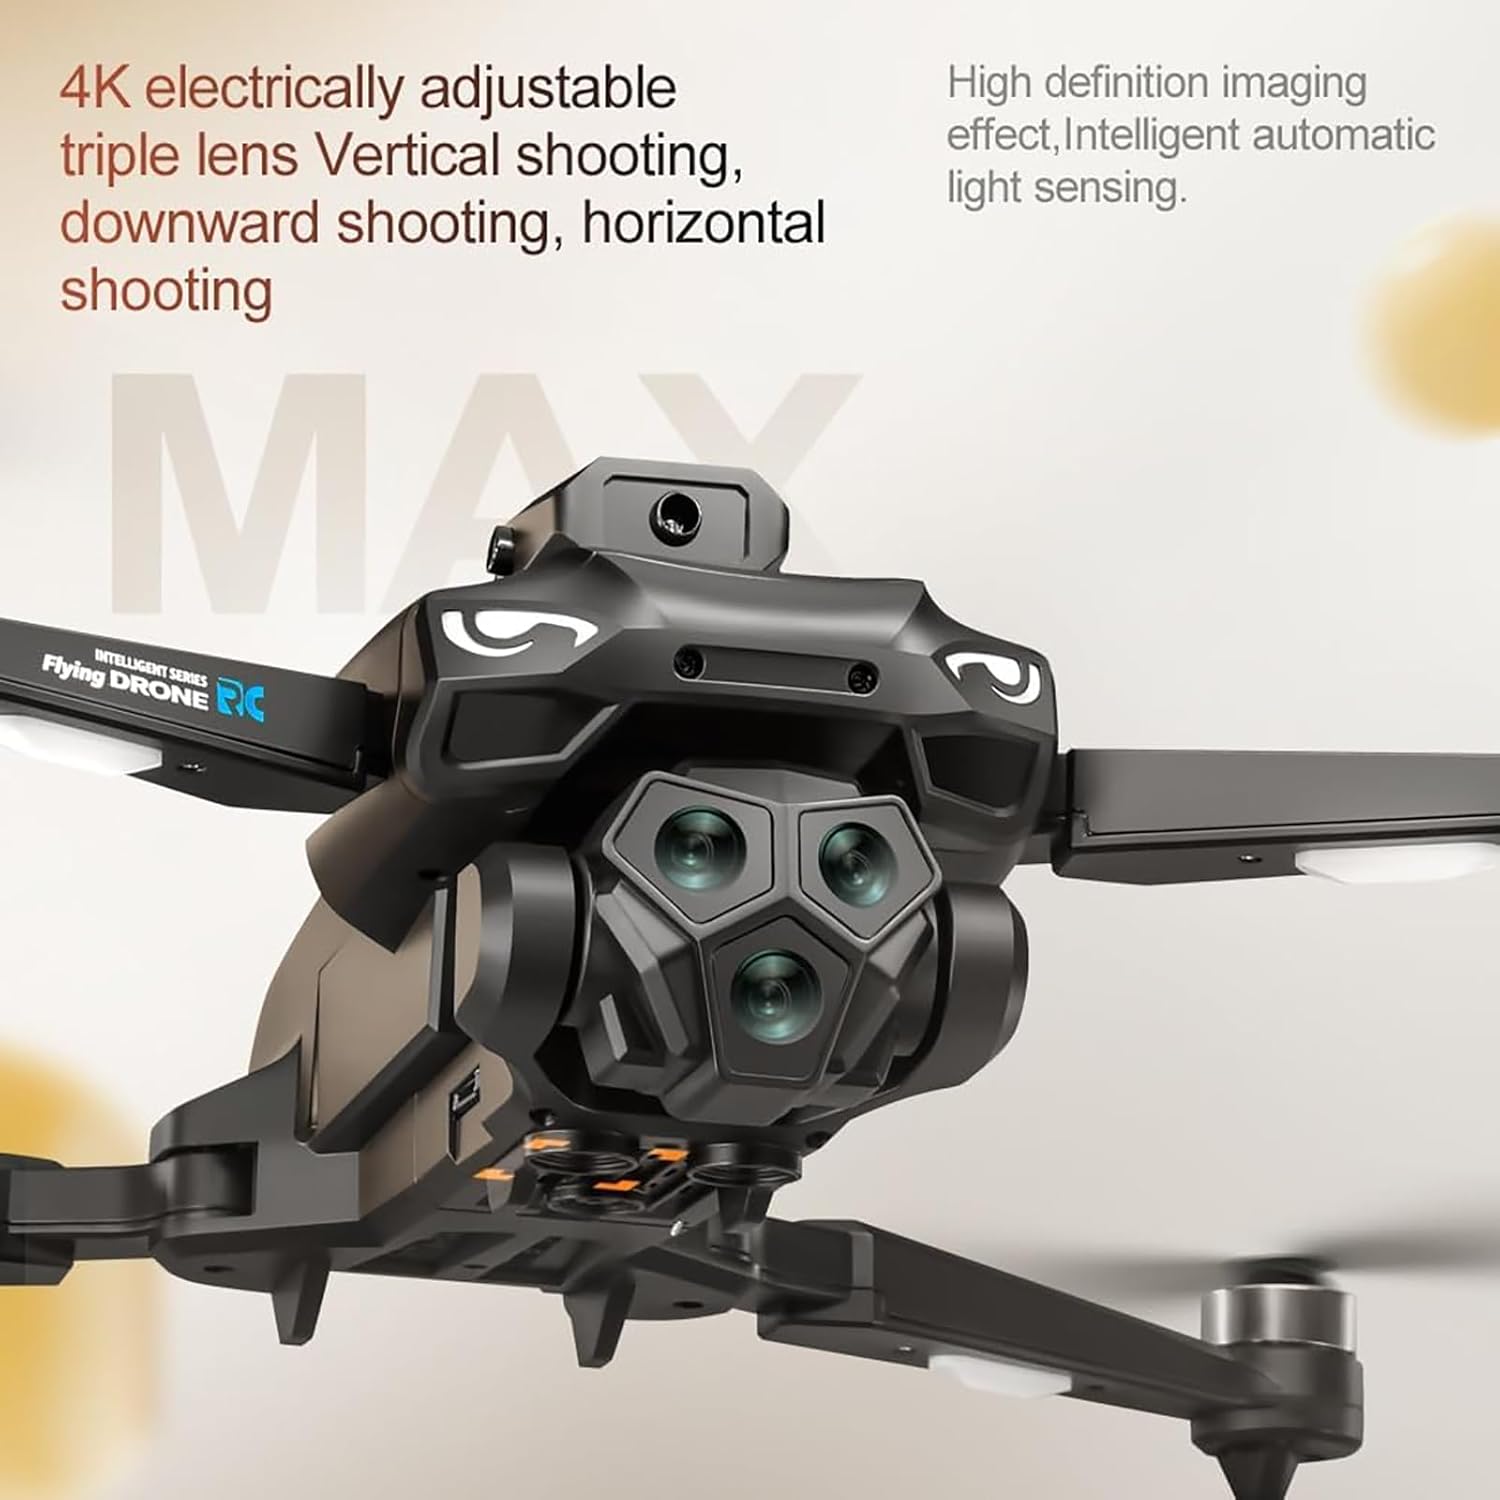
Billede 6.1: The drone's triple camera setup, capable of vertical, downward, and horizontal shooting with intelligent light sensing for 4K UHD capture.
- 4K UHD Triple Camera: The drone is equipped with a high-resolution 4K camera system that can be adjusted to capture vertical, downward, and horizontal views.
- Tager billeder: Press the Photo button on the remote control once to capture an image.
- Optagelse af video: Press the Video button once to start recording. Press it again to stop recording.
- Justering af kameravinkel: Use the dedicated button/dial on the remote control to adjust the camera's tilt angle during flight.
- Intelligent Light Sensing: The camera system automatically adjusts for optimal clarity in varying light conditions.
6.5 Avancerede flyfunktioner
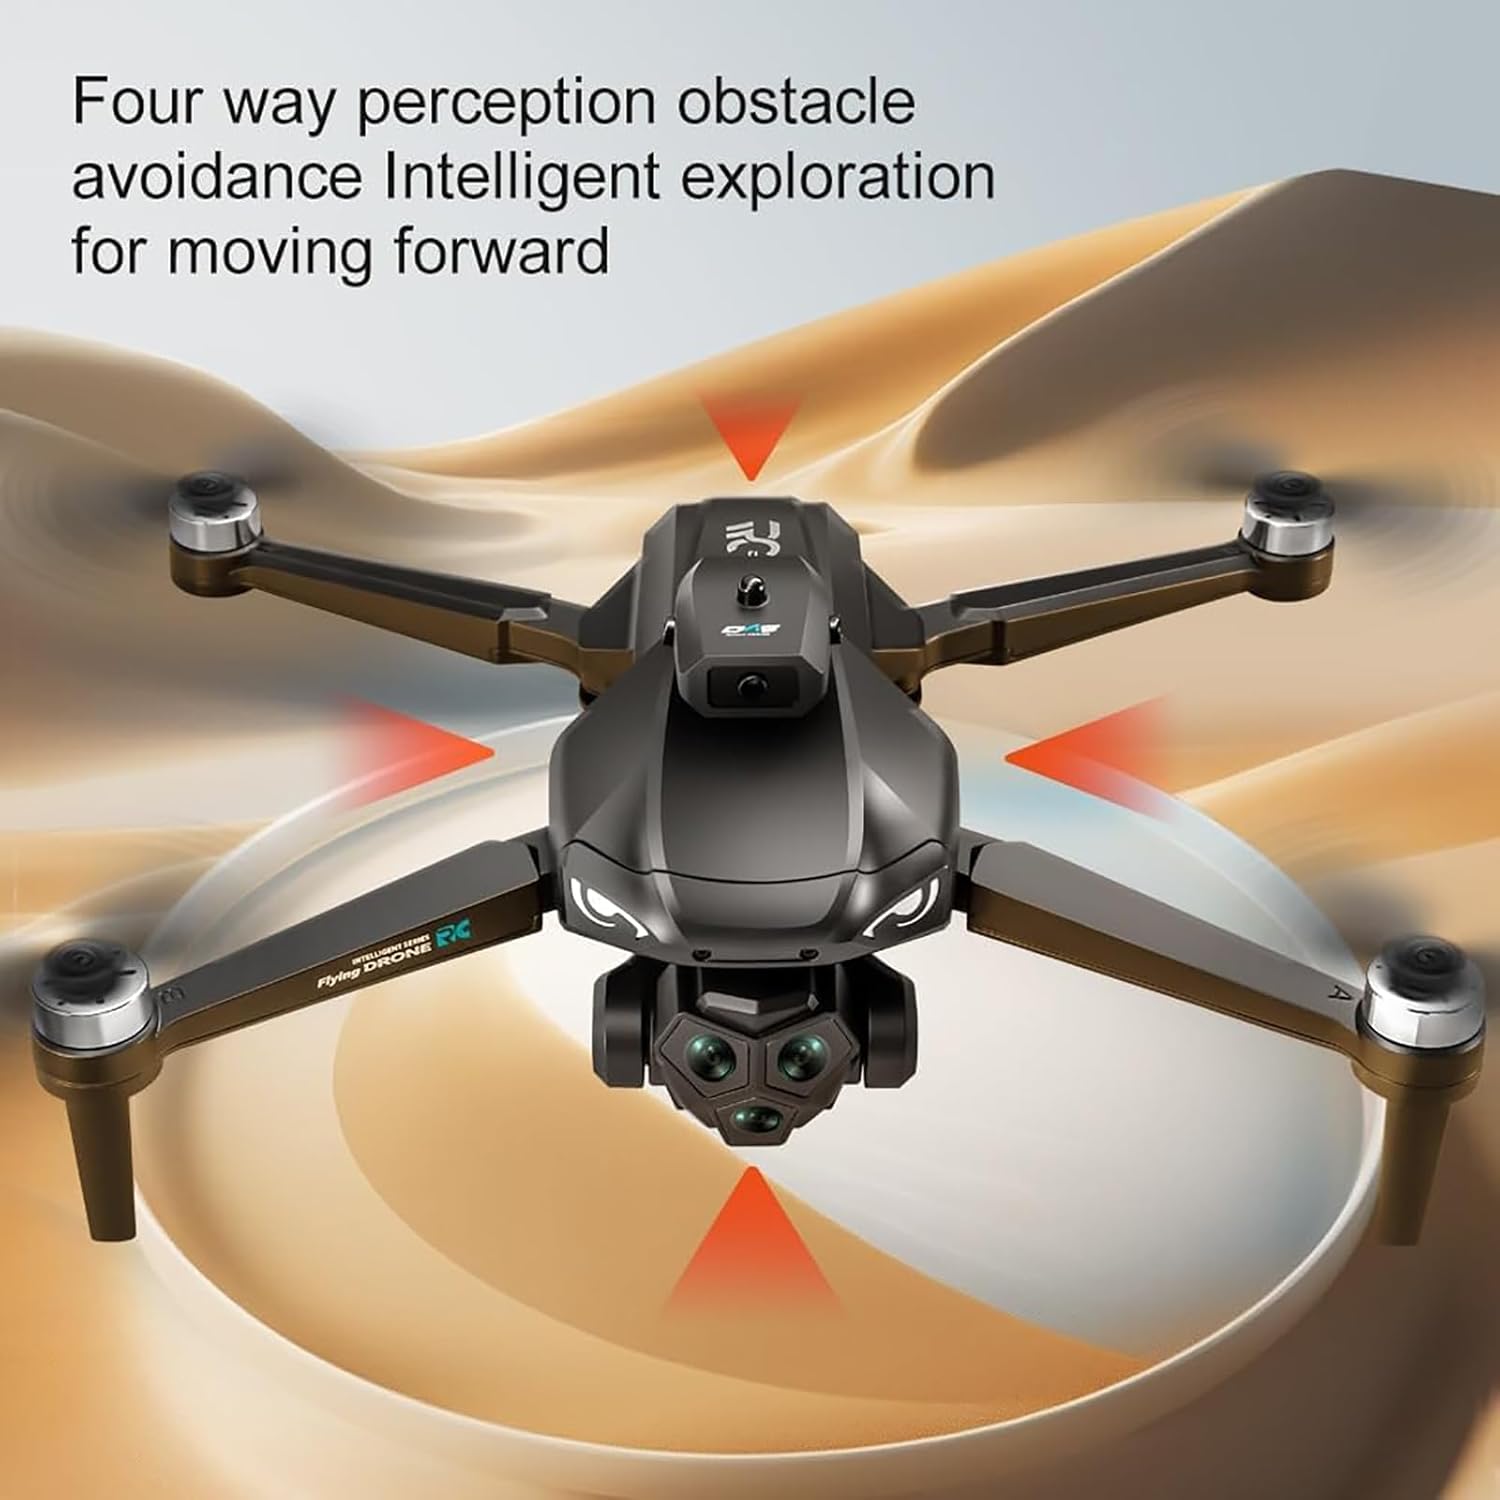
Billede 6.2: Visualization of the drone's four-way perception obstacle avoidance system, detecting obstacles from multiple directions.
- 360° forhindringsundgåelse: The drone features four-way perception obstacle detection. When an obstacle is detected, the drone will automatically adjust its flight path to avoid collision. This system enhances safety, especially for new pilots.
- Optisk flowpositionering: This technology helps the drone maintain a stable hover, particularly in indoor environments or when GPS signals are weak. It uses a downward-facing camera to track ground patterns.
- 5-Level Wind Resistance: Equipped with powerful brushless motors, the drone can maintain stable flight even in moderate wind conditions. Exercise caution in strong winds.
- GPS Return-to-Home (RTH): Press the RTH button on the remote control. The drone will automatically fly back to its recorded takeoff point. Ensure a clear path for return.
- Baneflyvning: (If available via app) Draw a path on the connected app interface, and the drone will follow the specified route.
- Stuntrulle: (If available) Perform aerial stunts by pressing the designated button and moving the right control stick in a desired direction.
7. Vedligeholdelse
- Rensning: Use a soft, dry cloth to clean the drone and remote control. Avoid using liquids or solvents. Ensure camera lenses and sensors are free from dust and debris.
- Propelinspektion: Regularly check propellers for cracks, bends, or damage. Replace any damaged propellers immediately using the provided spare blades and screwdriver.
- Batteripleje:
- Opbevar batterier på et køligt, tørt sted.
- Undlad at overoplade eller overaflade batterier.
- If storing for extended periods, charge batteries to approximately 50-60%.
- Udsæt ikke batterier for ekstreme temperaturer.
- Opbevaring: When not in use, fold the drone arms and store the drone and remote control in the provided storage bag to protect them from dust and physical damage.
8. Fejlfinding
| Problem | Mulig årsag | Løsning |
|---|---|---|
| Dronen tænder ikke. | Batteri ikke opladet eller forkert installeret. | Ensure battery is fully charged and correctly inserted into the drone. |
| Remote control does not connect to drone. | Not paired correctly or low remote battery. | Re-attempt pairing process. Charge remote control battery. |
| Drone driver afsted under flyvning. | Not calibrated on a flat surface; strong wind. | Recalibrate the drone on a level surface. Avoid flying in strong winds. |
| Dårlig kamerabilledkvalitet. | Dirty lens; insufficient light; SD card issue. | Clean camera lens. Ensure adequate lighting. Check SD card for proper insertion and format. |
| Forhindringsundgåelse virker ikke. | Sensors obstructed or dirty. | Clean all obstacle avoidance sensors. Ensure no physical obstructions. |
9. Specifikationer
| Feature | Detalje |
|---|---|
| Modelnavn | 22028158 |
| Mærke | Generisk |
| Kamera | 4K UHD Adjustable Triple Camera |
| Motortype | Børsteløs motor |
| Forhindring af hindringer | 360° Four-way Perception |
| Positioneringssystem | Optical Flow Positioning, GPS Return |
| Vindmodstand | 5-niveau |
| Fjernbetjening | 4.5-Inch LCD Screen Remote |
| Materiale | Plast |
| Produktdimensioner | 0.39 x 0.39 x 0.39 inches (Note: These dimensions appear to be placeholder values and may not reflect the actual size of the drone.) |
| Varens vægt | 2.2 pund (1 kilo) |
| Anbefalet alder | Adult (Manufacturer also suggests 6-15 years, but adult supervision is recommended for younger users.) |
10. Garanti og support
For garantioplysninger eller teknisk support henvises til den dokumentation, der fulgte med dit køb, eller kontakt forhandleren/producenten direkte. Gem din købsbevis til eventuelle garantikrav.