
1. Introduktion
Thank you for choosing the SOBATTY 2.1 Channel Home Audio Amplifier. Det her amplifier is designed to provide high-quality stereo audio with a dedicated subwoofer output, Bluetooth 5.0 connectivity, USB playback, and multiple input options including RCA and Coaxial. It also features two microphone inputs with echo control, making it suitable for home entertainment, karaoke, and theater speaker systems. Please read this manual carefully before operation to ensure proper use and to maximize the performance of your device.
2. Sikkerhedsoplysninger
- Strømforsyning: Sørg for ampapparatet er tilsluttet en strømkilde, der matcher den angivne lydstyrketage (110V/60Hz).
- Ventilation: Bloker ikke ventilationsåbningerne. Sørg for tilstrækkelig luftgennemstrømning omkring enheden for at forhindre overophedning.
- Fugtighed: Behold amplifier away from water, moisture, and high humidity environments.
- Varmekilder: Undgå at placere enheden i nærheden af varmekilder såsom radiatorer, varmeregistre, komfurer eller andre varmeproducerende apparater.
- Service: Forsøg ikke selv at servicere dette produkt. Overlad al service til kvalificeret servicepersonale.
- Højttalerimpedans: Connect speakers with an impedance of 4-16 Ohms. Connecting speakers outside this range may damage the amplivligere.
3. Hvad er der i æsken
- SOBATTY 2.1 Channel Home Audio Ampløfter (x1)
- Fjernbetjening (x1)
- Instruktionsmanual (x1)
Note: Wireless microphones and their receiver, if included with your specific package (e.g., '2.1CH +UHF MIC' variant), will be separate items. Please check your packaging contents.
4. Produktet er slutview
4.1 Betjeningselementer på frontpanelet
Dette billede viser frontpanelet på amplifier, highlighting the various knobs, buttons, and ports for user interaction. Key controls include master volume, microphone volume, music volume, input selection, and tone adjustments.
- MIC VOL: Adjusts the overall volume of the connected microphones.
- INPUT: Selects the audio input source (e.g., Bluetooth, USB, RCA, Coaxial).
- P/P (Afspil/Pause): Controls playback for USB or Bluetooth audio.
- FORRIGE (Forrige): Skips to the previous track for USB or Bluetooth audio.
- NÆSTE: Skips to the next track for USB or Bluetooth audio.
- MUSIC VOL: Adjusts the overall volume of the music playback.
- MAGT: Main power switch for the amplivligere.
- ECHO.VOL: Justerer ekkoeffektniveauet for mikrofoner.
- MIC.BASS: Justerer basniveauet for mikrofoner.
- MIC.TREBLE: Justerer diskantniveauet for mikrofoner.
- MIC1 / MIC2: 6.35 mm jack-indgange til kablede mikrofoner.
- MUSIC.BASS: Justerer basniveauet for musikafspilning.
- MUSIC.TREBLE: Justerer diskantniveauet for musikafspilning.
- SUB.VOL: Justerer lydstyrken for subwooferudgangen.
- USB: USB-port til afspilning af lyd files fra et USB-drev.
- Skærm: Shows current input mode, track information, or Bluetooth status.
4.2 Bagpaneltilslutninger

This image illustrates the rear panel of the amplifier, detailing the various audio input and output connections, speaker terminals, and power input. A wireless microphone receiver unit is also shown connected on top.
- COAXIAL: Digital lydindgang.
- INPUT (RCA): Analog audio input (Left/Right).
- UDGANG (RCA): Analog audio output (Left/Right).
- Double Bass (RCA): Dedicated output for enhanced bass signal.
- Speaker Connect (4-16 Ohms): Screw terminals for connecting passive speakers (Left/Right).
- Sub-woofer OUT: RCA-udgang til tilslutning af en aktiv subwoofer.
- POWER (~110V/60Hz): AC strømindgang.
- Wireless Mic Receiver (ANT-A, ANT-B): Antenna connections for wireless microphones.
- Wireless Mic Receiver (MIC-A+B OUTPUT): Audio output from the wireless microphone receiver to the amplivligere.
- Wireless Mic Receiver (POWER): DC power input for the wireless microphone receiver.
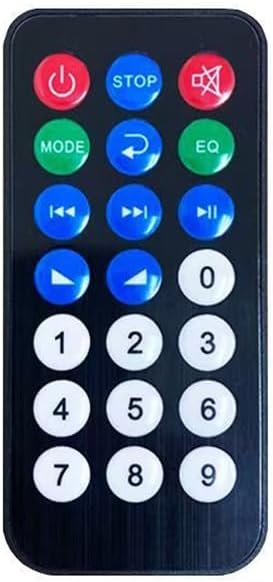
4.3 Fjernbetjening

The remote control provides convenient access to various functions of the amplifier på afstand.
- Power knap: Drejer amplivligere til eller fra.
- STOP: Stopper afspilning.
- STUM: Slår lyden fra eller til.
- KØRSELSVEJLEDNING: Skifter gennem inputkilder.
- Return/EQ: Returns to previous menu or cycles through equalizer presets.
- Forrige Næste: Springer spor over.
- Afspil/pause: Afspiller eller sætter lyd på pause.
- Lydstyrke op/ned: Justerer masterlydstyrken.
- Nummertastatur (0-9): For direct track selection (if supported by media).
5. Opsætningsvejledning
5.1 Tilslutning af højttalere
- Sørg for ampkøleren er slukket.
- Connect your passive stereo speakers (4-16 Ohms impedance) to the "Speaker Connect" terminals on the rear panel.
- Match the positive (+) terminal of the amplifier to the positive (+) terminal of your speaker, and the negative (-) terminal of the amplifier til den negative (-) terminal på din højttaler.
- Sørg for, at alle forbindelser er sikre for at forhindre kortslutninger.
5.2 Connecting a Subwoofer
- If you have an active subwoofer, connect its RCA input to the "Sub-woofer OUT" port on the ampliferens bagpanel.
- Adjust the subwoofer's volume and crossover frequency directly on the subwoofer unit, and fine-tune its level using the "SUB.VOL" knob on the ampliferens frontpanel.
5.3 Tilslutning af lydkilder
- RCA-indgang: Connect devices like DVD players, CD players, or TVs using RCA cables to the "INPUT (RCA)" ports.
- Koaksial indgang: Connect devices with a coaxial digital audio output (e.g., some TVs, Blu-ray players) to the "COAXIAL" port.
- USB-indgang: Insert a USB flash drive into the "USB" port on the front panel for direct audio playback.
5.4 Connecting Wireless Microphones (If Applicable)
- Connect the wireless microphone receiver's audio output (e.g., MIC-A+B OUTPUT) to one of the amplifier's RCA INPUT ports using an appropriate cable.
- Connect the power adapter to the wireless microphone receiver's power input.
- Ensure the antennas (ANT-A, ANT-B) are securely attached to the receiver for optimal signal reception.
5.5 Strømtilslutning
- After all audio and speaker connections are made, connect the amplifier's power cord to a standard 110V/60Hz AC outlet.
- Tænd for amplifier using the "POWER" switch on the front panel.
6. Betjeningsvejledning
6.1 Tænd/sluk
Press the "POWER" switch on the front panel to turn the amplifier on or off. The display screen will illuminate when the unit is powered on.
6.2 Indgangsvalg
Press the "INPUT" button on the front panel or the "MODE" button on the remote control to cycle through available audio sources: Bluetooth, USB, RCA, Coaxial. The selected input will be shown on the display.
6.3 Bluetooth -parring
- Select "Bluetooth" as the input source. The display will show "BLUE" and typically flash, indicating it's in pairing mode.
- Aktiver Bluetooth på din mobilenhed (smartphone, tablet osv.) og søg efter tilgængelige enheder.
- Select "SOBATTY" (or similar name) from the list of devices.
- Once paired, the display will show a steady "BLUE" indicator, and you can play audio from your device through the amplivligere.
6.4 USB-afspilning
- Indsæt et USB-flashdrev med lyd files into the front "USB" port.
- Vælg "USB" som inputkilde. ampLifier vil automatisk begynde at afspille lyd files.
- Use the "P/P", "PREV", and "NEXT" buttons on the front panel or remote control to manage playback.
6.5 Justering af lydstyrke og tone
- MUSIC VOL: Justerer den primære musiklydstyrke.
- MIC VOL: Justerer mikrofonens lydstyrke.
- SUB.VOL: Adjusts the subwoofer output volume.
- MUSIC.BASS / MUSIC.TREBLE: Adjusts the bass and treble frequencies for music playback.
- MIC.BASS / MIC.TREBLE: Adjusts the bass and treble frequencies for microphone input.
- ECHO.VOL: Controls the intensity of the echo effect for microphones.
6.6 Brug af mikrofon
Connect wired microphones to the MIC1 or MIC2 jacks on the front panel, or ensure your wireless microphone receiver is properly connected and powered on. Adjust "MIC VOL", "MIC.BASS", "MIC.TREBLE", and "ECHO.VOL" to achieve desired sound.
7. Vedligeholdelse
- Rensning: Brug en blød, tør klud til at rengøre ydersiden af ampBrug ikke flydende rengøringsmidler eller aerosoler.
- Opbevaring: When not in use for extended periods, disconnect the power cord and store the unit in a cool, dry place.
- Ventilation: Kontroller regelmæssigt, at ventilationsåbningerne er fri for støv og snavs.
8. Fejlfinding
| Problem | Mulig årsag | Løsning |
|---|---|---|
| Ingen strøm | Power cord not connected; Power switch off; Outlet malfunction | Ensure power cord is securely plugged in; Turn on power switch; Test outlet with another device. |
| Ingen lydudgang | Incorrect input selected; Volume too low; Speaker connections loose; Mute function active | Select correct input source; Increase MUSIC VOL; Check speaker wiring; Deactivate MUTE. |
| Forvrænget lyd | Volume too high; Poor audio source quality; Speaker impedance mismatch | Reduce volume; Try a different audio source; Ensure speakers are 4-16 Ohms. |
| Weak Bluetooth signal or disconnections | Enhed for langt væk; Forhindringer; Interferens | Flyt Bluetooth-enheden tættere på amplifier; Remove obstructions; Avoid other wireless devices. |
| Mikrofon virker ikke | Microphone not connected; MIC VOL too low; Wireless mic receiver off/unpaired | Ensure microphone is plugged in; Increase MIC VOL; Check wireless mic receiver power and pairing. |
9. Specifikationer
| Feature | Detalje |
|---|---|
| Produktdimensioner | 8.86" D x 13" B x 2.75" H (22.5 x 33 x 7 cm) |
| Varens vægt | 6.38 pund (2.89 kg) |
| Modelnummer | NS-21K-0TP8D |
| Mærke | SOBATTY |
| Forbindelsesteknologi | Bluetooth 5.0, USB |
| Controller type | Fjernbetjening |
| Speciel funktion | Indbygget Bluetooth |
| Kompatible enheder | Television, Personal Computer, Tablet, Smartphone |
| Connector Type | Coaxial, Optical (via adapter if needed), RCA, USB |
| Lydudgangstilstand | Stereo (2.1 kanal) |
| Surround Sound Kanalkonfiguration | 3 (Implies 2.1 channel with subwoofer) |
| Strømforsyning | ~ 110V / 60Hz |
| Nominel strømudgang | 100W (as per product image) |
10. Garanti og support
For warranty information and technical support, please refer to the documentation provided with your purchase or contact SOBATTY customer service through the retailer where the product was purchased. Keep your proof of purchase for warranty claims.