1. Introduktion
The QDSYLQ External CD/DVD Drive, Model XD 061, is a versatile optical drive designed for laptops and desktop computers. It offers high-speed data transfer, broad compatibility, and a user-friendly plug-and-play experience. This manual provides detailed instructions to help you get the most out of your device.
2. Produktfunktioner
- USB 3.0 High-Speed: Equipped with a USB 3.0 Type-C interface, offering data transfer speeds up to 5Gbps. Includes a 2-in-1 cable for power supply and data transfer, connecting directly to USB-A or USB-C ports.
- Plug & Play-funktionalitet: No external power supply or driver installation required. Simply connect the drive to your computer for automatic recognition.
- Kompatibilitet med flere systemer: Compatible with Windows 11/10/8/7/XP/2003/Linux/Vista and all versions of Mac 10 OS systems. Works with Apple MacBook Air/Pro, laptops, notebooks, PCs, and desktop computers.
- Stylish & Flexible Design: Features a wave-shaped appearance, lightweight, and shockproof construction. The flexible, pluggable data cable design prevents damage from frequent bending.
- Supports Multiple Disc Formats: Reads and writes DVD-ROM, DVD-Video, CD-R/RW, CD-ROM/XA, CD-Extra, CD-Text, DVD-R/+R, DVD-RW/+RW, DVD±R DL, and DVD-RAM. Delivers up to 8X DVD read/write speeds and up to 24X CD read/write speeds.
- Forbedret ydeevne: Built-in error correction, vibration reduction, and noise-reduction technology ensure smooth and stable operation.
3. Opsætningsvejledning
Follow these steps to connect and prepare your QDSYLQ External CD/DVD Drive for use.
- Pak enheden ud: Carefully remove the external CD/DVD drive and its USB cable from the packaging.
- Tilslut USB-kablet: The drive comes with a 2-in-1 USB cable. Connect the smaller end of the cable to the drive's USB port.
- Tilslut til computer: Plug the other end of the USB cable into an available USB-A or USB-C port on your laptop or desktop computer. Ensure a secure connection.
- Systemgenkendelse: Your operating system (Windows or macOS) should automatically detect and install the necessary drivers. No manual driver installation is typically required. A notification may appear indicating the device is ready for use.
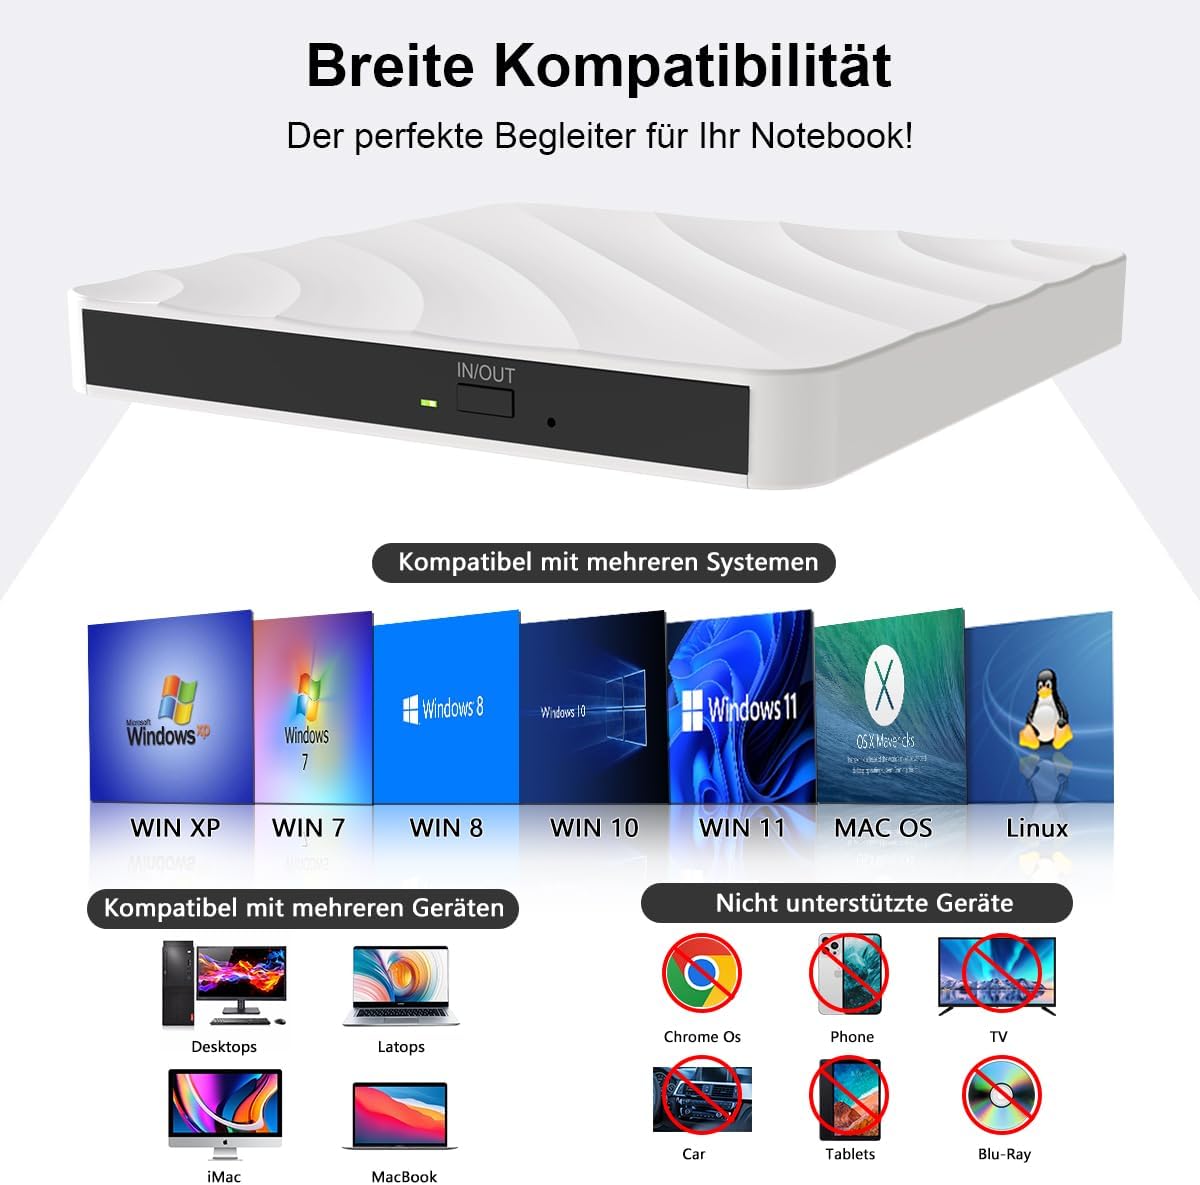
Image: The external CD/DVD drive connected to a laptop, illustrating the USB 3.0 Type-C connection.
Video: A demonstration of the QDSYLQ External Optical Drive's plug-and-play functionality and ease of connection.
4. Betjeningsvejledning
This section details how to use your external CD/DVD drive for reading and writing discs.
4.1 Indsættelse af en disk
- Ensure the drive is connected to your computer and recognized.
- Tryk på udskubningsknappen på forsiden af drevet for at åbne diskbakken.
- Carefully place your CD or DVD onto the tray, ensuring it is centered on the spindle. The label side should face upwards.
- Skub forsigtigt bakken tilbage i drevet, indtil den klikker på plads.

Image: A user inserting a disc into the drive's tray, demonstrating the proper method.
4.2 Playing Media and Accessing Files
Once a disc is inserted, your computer's operating system should prompt you with options to play media or open files. If not, navigate to 'This PC' (Windows) or 'Finder' (macOS) and select the optical drive icon to browse the disc content.

Image: A person enjoying media content on a laptop, facilitated by the external CD/DVD drive.
4.3 Afbrænding Files to Disc
To burn files, ensure you have a blank recordable CD-R/RW or DVD-R/+R/RW disc. Use your operating system's built-in burning software or a third-party application to select files and initiate the burning process. The drive supports up to 8X DVD and 24X CD write speeds.

Billede: A file transfer in progress, demonstrating the drive's capability to burn data to discs.
4.4 Udkastning af en disk
Press the eject button on the drive. Alternatively, right-click the drive icon in 'This PC' or 'Finder' and select 'Eject'.
5. Kompatibilitetsnoter
The QDSYLQ External CD/DVD Drive is designed for broad compatibility but has specific limitations:
- Understøttede systemer: Windows 11/10/8/7/XP/2003/Linux/Vista, and all versions of Mac 10 OS.
- Understøttede enheder: Apple MacBook Air/Pro, laptops, notebooks, PCs, and desktop computers.
- Unsupported Discs: This drive does ikke support Blu-ray discs.
- Unsupported Devices: Not compatible with TVs, tablets, iPads, Chromebooks, Xbox series, projectors, Surface Pro, or car players.

Image: Visual representation of the drive's wide compatibility with different operating systems and devices, alongside a clear list of unsupported items.
6. Vedligeholdelse
Proper maintenance ensures the longevity and optimal performance of your QDSYLQ External CD/DVD Drive.
- Rensning: Use a soft, dry cloth to wipe the exterior of the drive. Avoid liquid cleaners or abrasive materials.
- Diskhåndtering: Always handle discs by their edges to prevent fingerprints and scratches. Store discs in protective cases when not in use.
- Opbevaring: Store the drive in a cool, dry place away from direct sunlight and extreme temperatures. Utilize the flexible cable design to neatly store the cable when not in use.
- Undgå påvirkning: The drive is shockproof, but excessive force or drops can still cause damage. Handle with care.
7. Fejlfinding
If you encounter issues with your QDSYLQ External CD/DVD Drive, refer to the following common solutions:
| Problem | Mulig løsning |
|---|---|
| Drev ikke genkendt af computeren |
|
| Disc not reading or burning |
|
| Langsomme dataoverførselshastigheder |
|
| Drive makes unusual noises |
|
8. Specifikationer
| Feature | Detalje |
|---|---|
| Mærke | QDSYLQ |
| Modelnummer | XD 061 |
| Varens vægt | 12.7 ounce |
| Pakkedimensioner | 7.2 x 6.42 x 1.3 tommer |
| Hardware-interface | USB Type C |
| Kompatible enheder | Computer, Desktop, Laptop, Macbook, PC |
| DVD læse/skrivehastighed | Op til 8X |
| CD læse-/skrivehastighed | Op til 24X |
9. Garanti og support
QDSYLQ is committed to providing reliable products and excellent customer service.
- Livstids kvalitetsgaranti: The product is backed by a lifetime quality guarantee.
- Free Defective Replacement: In case of a defective product, a free replacement will be provided.
- Kundeservice: 7x24 customer service is available for any inquiries or support needs.
- Gennemsigtighed: Each item includes a unique code for verification, ensuring 100% original product authenticity.
For further assistance, please refer to the contact information provided with your product packaging or visit the official QDSYLQ webwebsted.