1. Introduktion
This manual provides detailed instructions for the installation, operation, and maintenance of your Generic Wireless Outdoor Security Camera System, model JP-NK05-9604-1TB. This system includes a 4-channel Network Video Recorder (NVR), four 1080P wireless bullet cameras, and a pre-installed Hard Disk Drive (HDD) for local storage. Designed for both indoor and outdoor use, it offers high-resolution surveillance, night vision, motion detection, and remote monitoring capabilities to enhance your property's security.

Figur 1.1: En overview of the complete security system, showing the Network Video Recorder (NVR), four wireless bullet cameras, and a hard disk drive (HDD).
2. Produktfunktioner
- High Resolution & Night Vision: The security cameras feature Full HD 1080P resolution with a high-sensitivity CMOS sensor, delivering clear and detailed images. Equipped with IR-CUT functionality, the cameras automatically switch between day and night modes, providing clear night vision up to 30 meters. The robust metal casing with an IP66 rating ensures durability against weather elements.
- Expandability & H.265 Compression: This system includes a 4-channel NVR, allowing for the addition of 1-2 extra cameras if needed. It utilizes H.265 high-efficiency video compression, which saves more than double the storage space compared to H.264. The pre-installed HDD supports 20-30 days of continuous recording, with an overwrite function for continuous 24/7 surveillance.
- Customizable Recording Modes & Alarms: The system defaults to continuous recording, but can be configured for scheduled recording or motion detection recording. Motion detection areas are editable to minimize false alarms. Three types of alarms are available: NVR buzzer, APP notifications, and E-mail notifications, providing comprehensive alert options whether you are home or away.
- Easy Setup & Remote Monitoring: Designed for simplicity, this wireless security camera system requires no complex wiring. It features plug-and-play technology; simply connect the NVR to a monitor and power, and the cameras will automatically pair and begin recording within seconds. The wireless signal range can reach up to 100 meters in open environments and 20-40 meters in wooden structures. For remote viewing, connect the NVR to your router via a LAN cable. You can then easily monitor your property from smartphones, tablets, or PCs, with support for multiple simultaneous viewers.
- Wired/Wireless Flexibility: While primarily wireless, individual cameras can be configured for a wired connection for enhanced stability. The product is PSE and Technical Conformity Mark certified, ensuring safety and compliance.

Figur 2.1: This image highlights key features: automatic recognition, no complex installation needed, expandability, inclusion of a WiFi extension antenna, Japanese language support, and a pre-installed HDD. It reiterates the easy setup with built-in WiFi and pre-pairing.

Figur 2.2: This graphic focuses on the individual camera's specifications: a 3.6mm wide-angle lens providing a 90° monitoring range, 200-megapixel resolution, durable metal IP66 casing suitable for indoor and outdoor use, and IR-CUT night vision for automatic day/night mode switching.
3. Opsætningsvejledning
3.1. Udpakning og komponentkontrol
Pak forsigtigt alle komponenter ud, og kontroller, at alle dele er til stede:
- Network Video Recorder (NVR) with pre-installed HDD
- Wireless Cameras (x4)
- Strømadaptere til NVR og kameraer
- USB-mus
- Ethernet kabel
- Monteringsskruer og -dybler
- Quick Start Guide (denne manual)
3.2. Initial System Connection
- Tilslut NVR til skærm: Brug et HDMI- eller VGA-kabel til at forbinde NVR'en til en skærm eller et tv.
- Connect NVR Power: Plug the NVR's power adapter into the NVR and then into a power outlet.
- Tilslut kameraets strøm: Plug each camera's power adapter into the camera and then into a power outlet.
- Systemopstart: The NVR will power on, and the cameras will automatically connect to the NVR within seconds. You should see the live camera feeds on your monitor.

Figur 3.1: This diagram illustrates the simple setup process. It shows a camera and the NVR, indicating that no network connection is required for initial use. The system features built-in WiFi and is pre-paired, requiring only power connection for operation and monitoring.
3.3. Network Connection for Remote Viewing
For at aktivere fjernbetjening viewing via smartphone or PC, the NVR must be connected to your home network:
- Tilslut NVR til router: Use the provided Ethernet cable to connect the LAN port on the NVR to an available LAN port on your internet router.
- Bekræft netværksstatus: On the NVR's monitor interface, navigate to Network Settings to ensure the NVR has obtained an IP address and is connected to the internet.
3.4. Installation af mobilapp
Download the dedicated mobile application from your smartphone's app store (e.g., App Store for iOS, Google Play Store for Android). Søg efter the app name provided in the NVR's interface or quick start guide. Follow the in-app instructions to register an account and add your NVR device using its unique ID or QR code.

Figur 3.2: The top section shows the repeater function, where cameras can extend the signal range by relaying it through other cameras (CH1 to CH2, etc.). The bottom section illustrates the WiFi signal range: approximately 20-40 meters through wooden walls and 100-150 meters in an environment with a clear line of sight.
4. Betjeningsvejledning
4.1. Lev View
Once the system is set up, the NVR will display live feeds from all connected cameras on the monitor. You can switch between single-camera view og multikameragitter view using the NVR's interface or the mobile app.
4.2. Optagelsesindstillinger
The NVR offers flexible recording options:
- Kontinuerlig optagelse: The system records 24/7 by default. This ensures constant surveillance.
- Optagelse af bevægelsesdetektering: Konfigurer specifikke områder inden for kameraets view for motion detection. When motion is detected, the system will start recording and can trigger alarms. Adjust sensitivity to prevent false triggers.
- Planlagt optagelse: Set specific time periods for recording, allowing you to customize surveillance based on your daily routine.

Figur 4.1: This image details the available recording methods: 1. Continuous Recording (24/7), 2. Motion Detection Recording (with editable detection areas and alarm options like a 120dB buzzer), and 3. Scheduled Recording (customizable time slots). It also shows how to back up recorded data using a USB memory stick connected to the NVR. An additional image depicts a person breaking into a house, triggering an alarm, illustrating the alarm types: buzzer, APP notification, and E-mail notification.
4.3. Afspilning og sikkerhedskopiering
Til review optaget footage, access the playback function on the NVR or through the mobile app. You can search by date, time, or event (e.g., motion detection). To back up important footage, connect a USB memory stick to the NVR's USB port and follow the on-screen instructions to transfer selected recordings.
4.4. Alarmindstillinger
Configure alarm responses in the NVR settings:
- NVR Buzzer: Enable or disable the audible alarm from the NVR unit.
- APP Notifications: Ensure the mobile app is configured to receive push notifications for alerts.
- E-mail Notifications: Set up your email address in the NVR settings to receive email alerts with snapshots of triggered events.
5. Vedligeholdelse
5.1. Rensning
Rengør regelmæssigt kameralinserne og huset med en blød klud.amp cloth to ensure clear image quality. Avoid using harsh chemicals or abrasive materials that could damage the lens or finish.
5.2. Forbindelsestjek
Periodically check all power and network cable connections to ensure they are secure and free from damage. For wireless cameras, ensure they are within effective range of the NVR.
5.3. Firmwareopdateringer
Tjek producentens website or your NVR's system settings for available firmware updates. Keeping your system's firmware up-to-date ensures optimal performance and security.
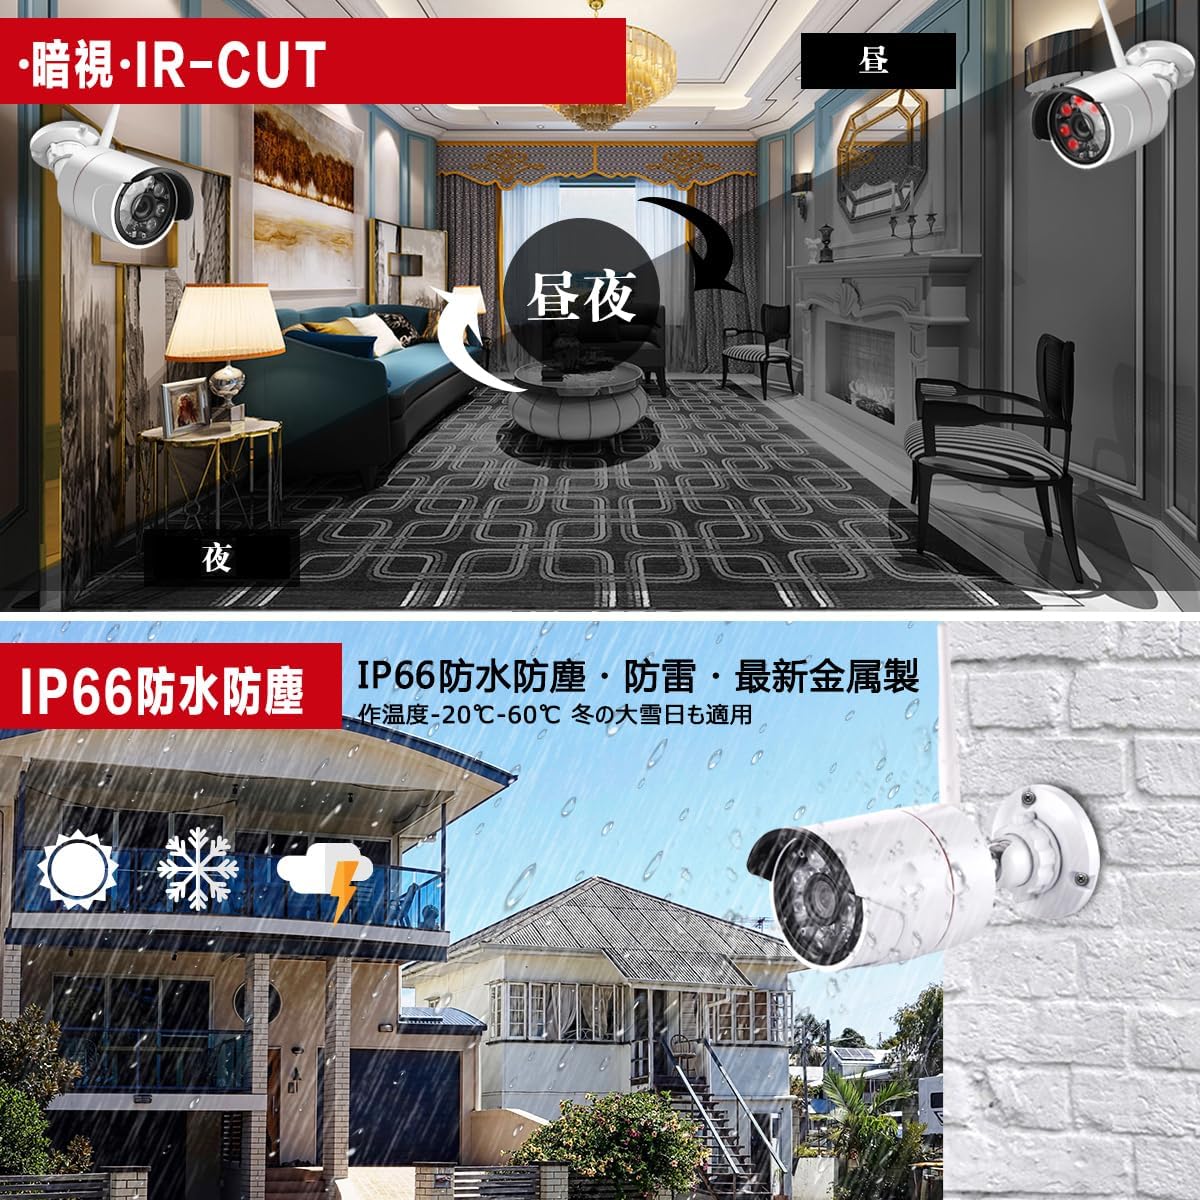
Figur 5.1: The top part of the image demonstrates the IR-CUT night vision function, showing how the camera automatically switches between day and night modes for clear visibility in darkness. The bottom part emphasizes the IP66 waterproof, dustproof, and lightning protection rating, illustrating the camera's durability in various outdoor weather conditions, including rain and snow, with an operating temperature range of -20°C to 60°C.
6. Fejlfinding
- Intet billede på skærmen:
• Check if the NVR and monitor are powered on.
• Verify HDMI/VGA cable connection.
• Ensure cameras are powered and within range. - Kameraer forbinder ikke:
• Ensure cameras are powered on.
• Check if cameras are too far from the NVR or if there are significant obstructions.
• Try re-pairing cameras if necessary (refer to NVR settings). - Ingen optagelse:
• Check NVR's recording settings (continuous, motion, schedule).
• Verify HDD status in NVR settings; ensure it's recognized and has free space. - Fjern Viewing problemer:
• Ensure NVR is connected to the internet via LAN cable.
• Check your router's internet connection.
• Verify app settings and NVR device ID. - Falske alarmer:
• Adjust motion detection sensitivity in NVR settings.
• Edit motion detection zones to exclude areas with frequent non-threatening movement (e.g., trees swaying).
7. Specifikationer
| Mærke | Generisk |
| Modelnummer | JP-NK05-9604-1TB |
| Produktdimensioner | 36 x 18.5 x 27 cm |
| Produktets vægt | 3.8 kg |
| Farve | Hvid |
| Inkluderet tilbehør | NVR, 4 Cameras, HDD, Power Adapters, USB Mouse, Ethernet Cable, Mounting Hardware |
| Opløsning | 1080P (200 Megapixels) |
| Night Vision Range | Op til 30 meter |
| Vandtæt vurdering | IP66 |
| Videokomprimering | H.265 |
| Wireless Range | Up to 100m (clear line of sight), 20-40m (through wooden walls) |
8. Garanti og support
For warranty information and customer support, please refer to the documentation provided with your purchase or contact the seller directly. Keep your purchase receipt as proof of purchase for any warranty claims.


