Indledning
Thank you for choosing the CONOPUPlus DH-CS10 Dehumidifier. This manual provides essential information for the safe and efficient operation, maintenance, and troubleshooting of your new appliance. Please read it thoroughly before use and retain it for future reference.
Sikkerhedsinstruktioner
- Sørg for, at affugteren er placeret på en stabil, plan overflade.
- Maintain a minimum distance of 20 cm (8 inches) from walls or furniture to allow proper airflow.
- Bloker ikke luftindtaget eller -udløbet.
- Do not operate the unit near flammable gases or liquids.
- Tag altid stikket ud af enheden, før du rengør eller udfører vedligeholdelse.
- Opbevares utilgængeligt for børn og kæledyr.
- Brug ikke enheden, hvis netledningen eller stikket er beskadiget.
Produkt overview
The CONOPUPlus DH-CS10 is a high-performance dehumidifier designed to remove up to 16 liters of moisture per day from spaces up to 60 m². It features intelligent humidity detection, an ultra-silent night mode, a 24-hour timer, and versatile drainage options.

Figur 1: Forside view of the CONOPUPlus DH-CS10 Dehumidifier, showing the control panel, air outlet, and visible water tank.
Nøglekomponenter og funktioner:
- Digital Mirage Display: Shows current humidity and settings.
- Integreret håndtag: For nem transport.
- Visual Water Tank: Allows easy monitoring of water level.
- Universalhjul: 360° swivel wheels for effortless movement.
- Vaskbart filter: Reusable air filter for easy maintenance.
- Intelligent Humidity Sensor: Automatically adjusts operation based on desired humidity levels.
- 3-Color Environmental Sensing Light Ring: Provides visual feedback on air quality (Blue <40%, Green 40-65%, Red >65%).
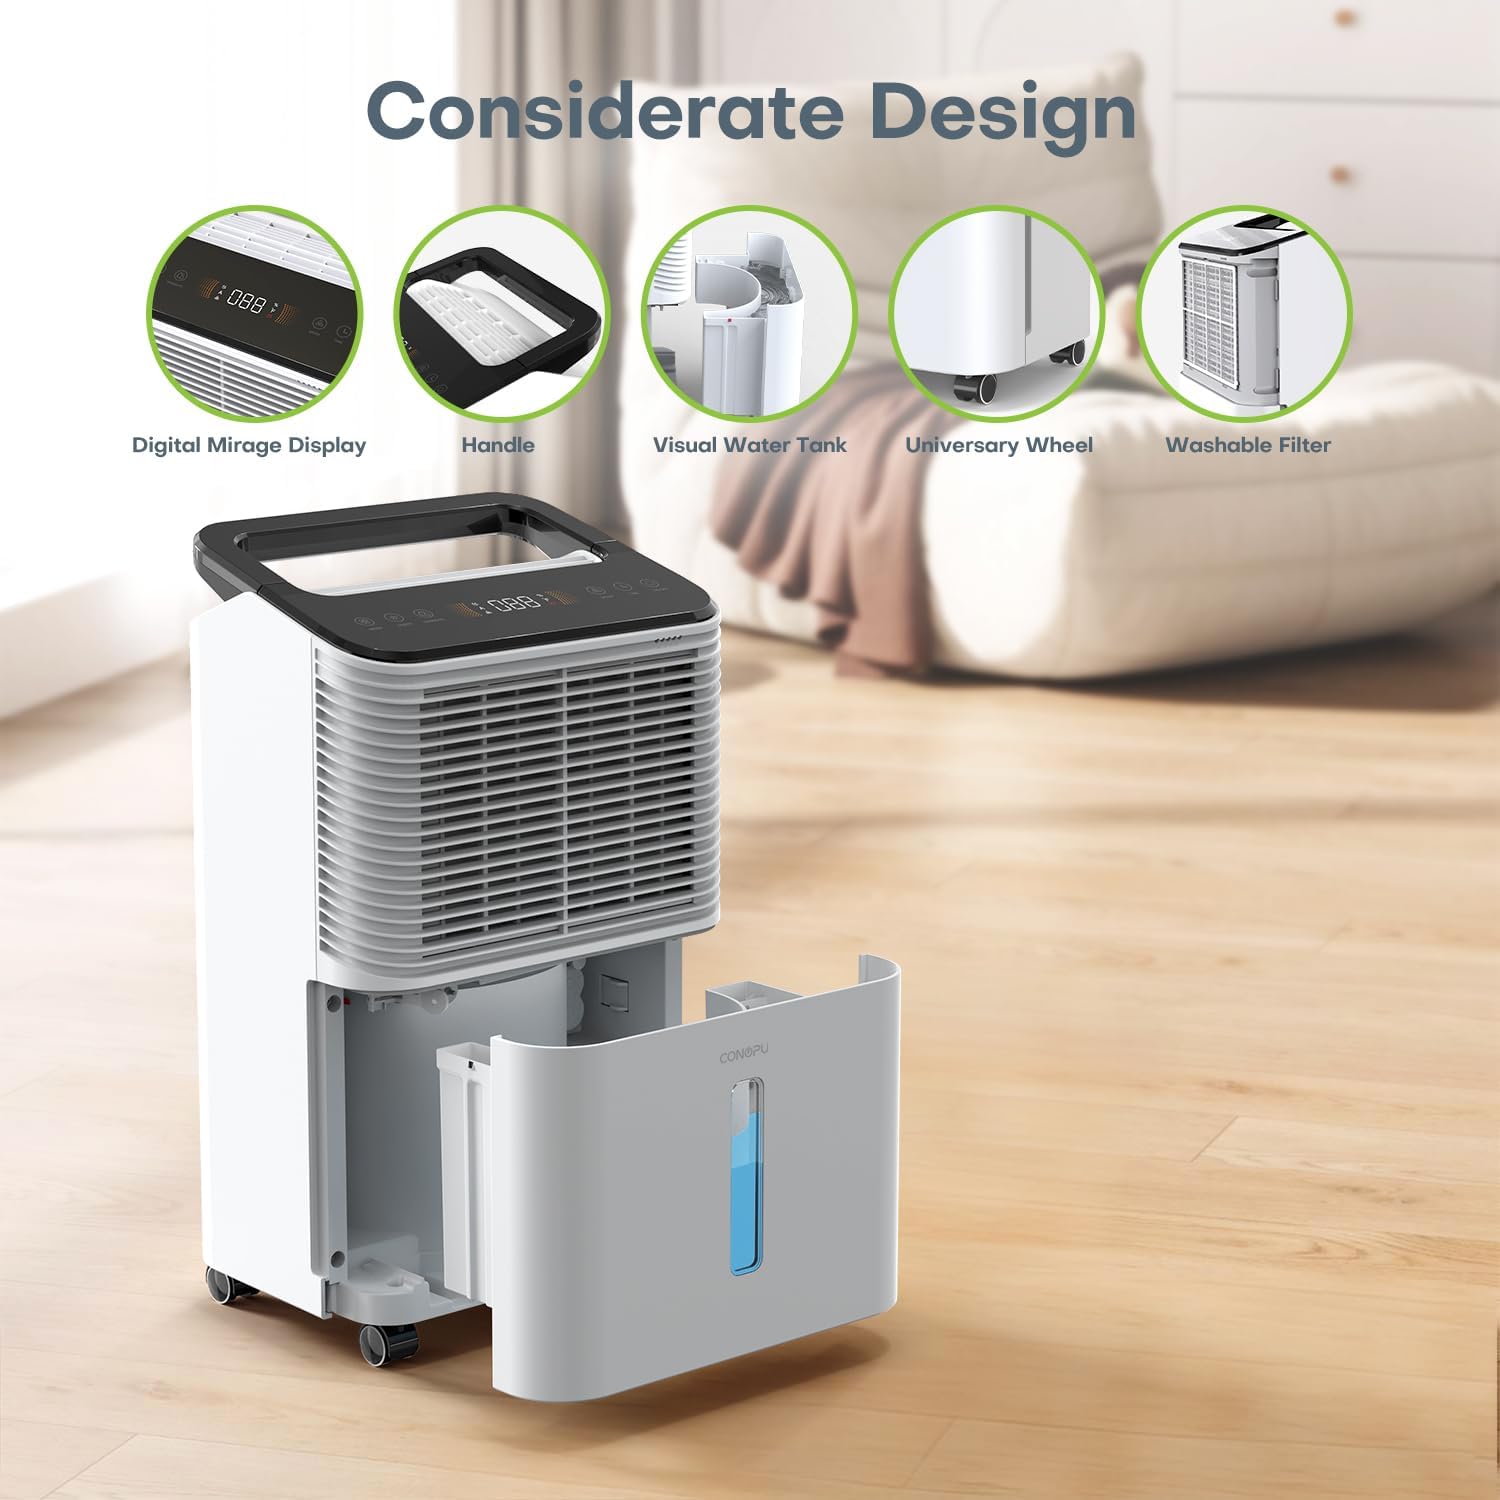
Figur 2: Detaljeret view of the dehumidifier's thoughtful design, highlighting the digital display, handle, visual water tank, universal wheels, and washable filter.
Opsætning
Udpakning:
- Tag forsigtigt affugteren ud af emballagen.
- Fjern alle emballagematerialer og beskyttelsesfilm.
- Undersøg enheden for eventuelle skader. Hvis den er beskadiget, må den ikke anvendes, og du skal kontakte kundesupport.
Placering:
- Place the dehumidifier in the desired location, ensuring it is on a firm, level surface.
- Ensure adequate space around the unit for proper air circulation (at least 20 cm from walls or furniture).
- For optimal ydeevne skal enheden placeres midt i rummet eller det område, der skal affugtes.
Strømtilslutning:
- Sæt netledningen i en jordet stikkontakt.
- Sørg for, at voltage matches the specifications listed on the unit's rating label.

Figur 3: Affugterens visningasing its Auto mode, Continuous mode, and 16L/day dehumidification capacity, indicating its readiness for operation.
Betjeningsvejledning
Kontrolpanel:
The control panel is located on the top of the unit and features a digital display and various touch buttons for operation.
Tænd/sluk:
- Tryk på Magt knappen for at tænde eller slukke for enheden.
Valg af tilstand:
Tryk på Mode knap til at gennemgå tilgængelige tilstande:
- AUTO-tilstand: The unit automatically maintains the preset humidity level.
- Kontinuerlig tilstand: The unit runs continuously, ideal for very damp forhold.
- Laundry Mode (Drying Clothes): Designed to assist in drying clothes indoors by continuously running the dehumidifier.

Figure 4: The dehumidifier operating in Laundry Mode, positioned near a washing machine and dryer, demonstrating its use for drying clothes indoors.
Fugtindstilling:
- I AUTO-tilstand skal du trykke på Fugtighedssæt button to adjust the desired humidity level (typically between 40% and 70%).
- The unit will operate to reach and maintain this target humidity.

Figure 5: The dehumidifier displaying its 24-hour timer and humidity setting capabilities, offering energy-saving options for users.
24-timers timer:
- Tryk på Timer button to set a delayed start or stop time (from 1 to 24 hours).
- Brug Op/Ned knapper for at justere den ønskede tid.
Nattilstand (dvaletilstand):
- Tryk på Sove button to activate Night Mode.
- In this mode, the unit operates at a reduced noise level (approximately 30 dB), and control panel lights (except the Night Mode indicator) are dimmed for undisturbed sleep.

Figure 6: The dehumidifier operating in a bedroom setting, illustrating its quiet performance with a noise level of 30-40 dB, suitable for night use.
Fugtighedsindikatorlampe:
- The integrated light ring changes color to indicate the current humidity level:
- Blå: Luftfugtighed under 40 %
- Grøn: Luftfugtighed mellem 40% og 65%
- Rød: Luftfugtighed over 65 %
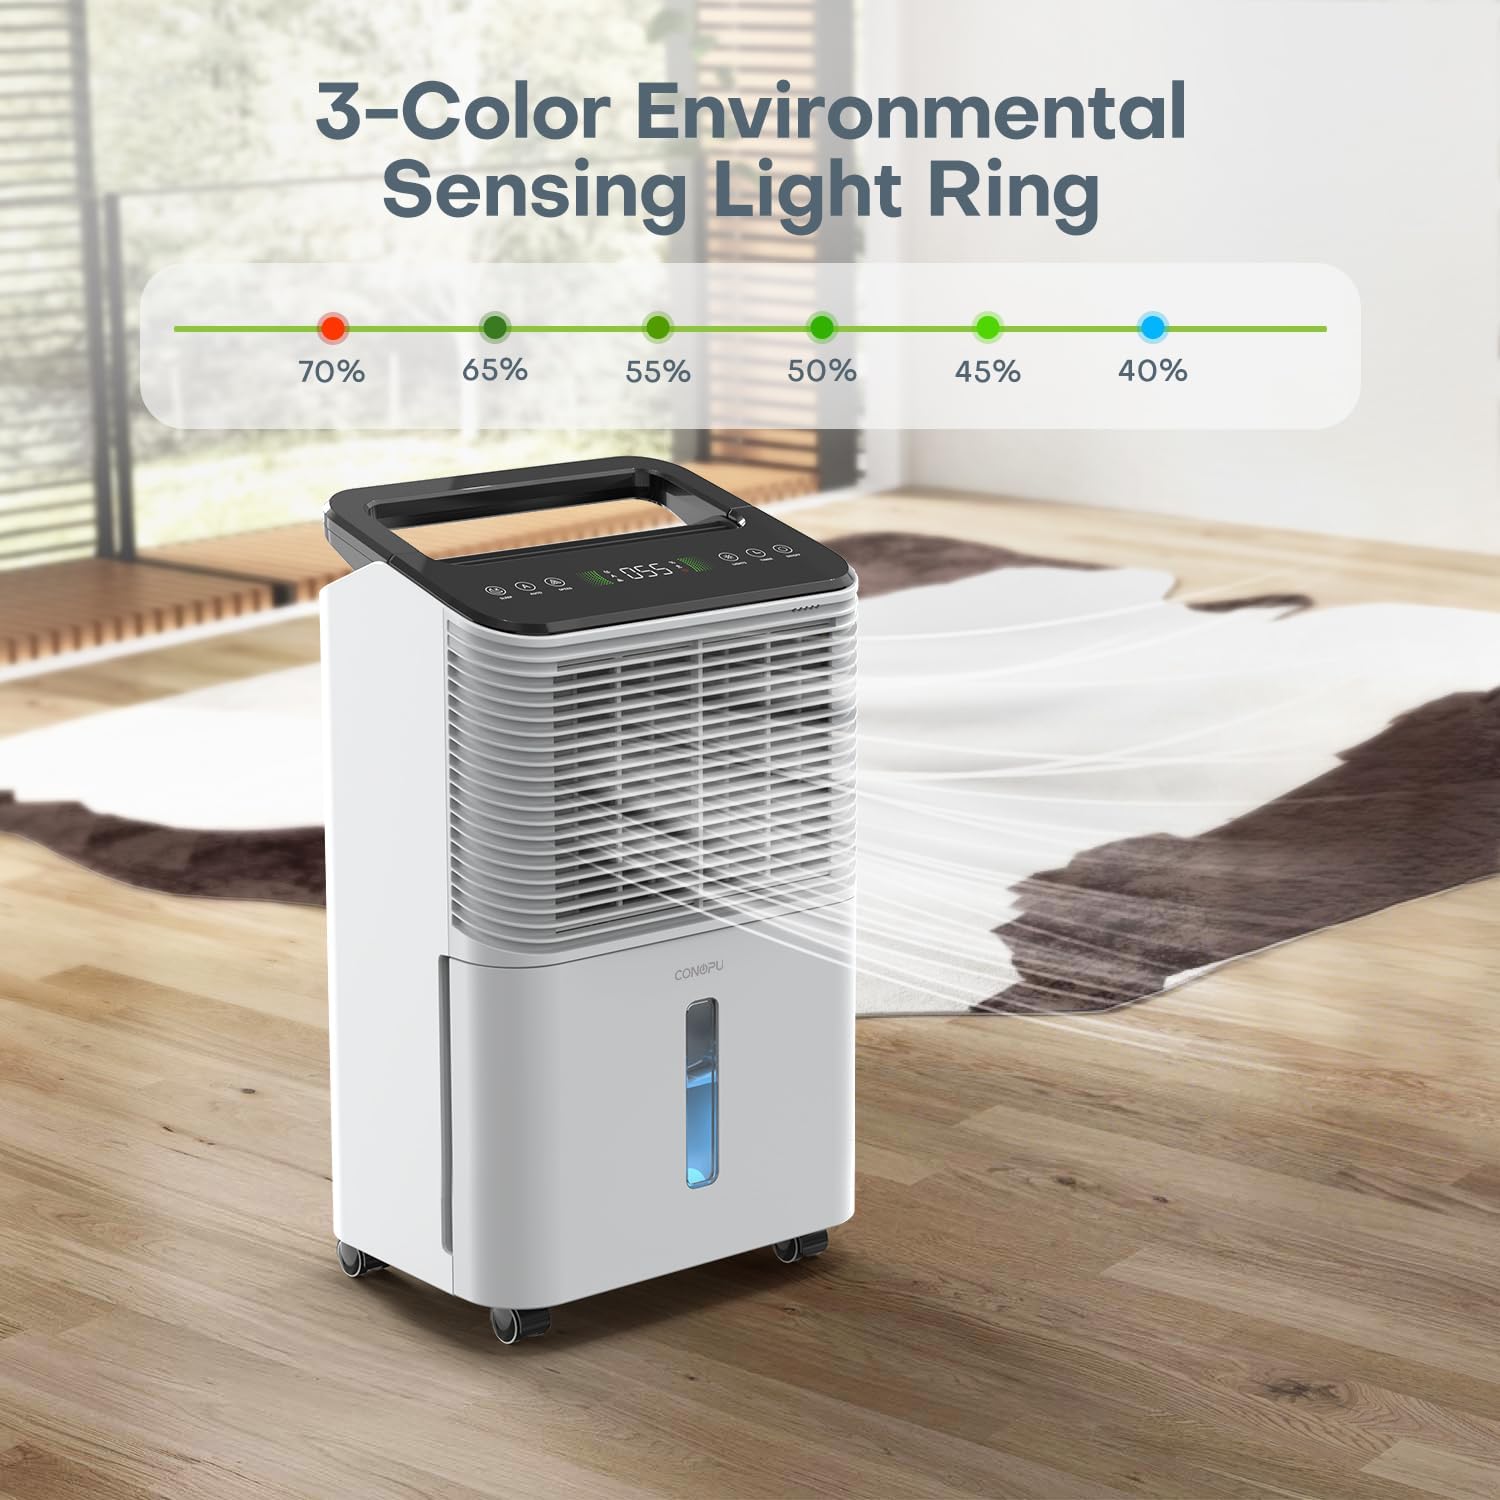
Figure 7: The dehumidifier displaying its 3-color environmental sensing light ring, which visually indicates the ambient humidity level.
Opretholdelse
Emptying the Water Tank (Manual Drainage):
- Når vandtanken er fuld, slukker enheden automatisk, og en indikatorlampe lyser.
- Træk forsigtigt vandtanken ud fra enhedens forside.
- Tøm det opsamlede vand.
- Slide the water tank back into place until it clicks securely. The unit will resume operation.
Opsætning af kontinuerlig dræning:
For continuous operation without needing to empty the tank, use the continuous drainage option.
- Locate the drainage outlet on the back of the unit.
- Connect the provided drainage hose (0.5m/1m) to the outlet.
- Sørg for, at slangen er rettet nedad mod et passende afløb eller en beholder, så tyngdekraften kan fremme vandgennemstrømningen.
- Ensure there are no kinks or blockages in the hose.

Figure 8: The dehumidifier illustrating its two drainage methods: manual emptying of the 2.5L water tank and continuous drainage via an included hose.
Rengøring af luftfilteret:
- Luftfilteret bør rengøres hver anden uge eller oftere afhængigt af brug og luftkvalitet.
- Tag stikket ud af stikkontakten.
- Remove the air filter from the back or side of the unit (refer to the diagram in the Product Overview afsnit).
- Wash the filter with clean water and a mild detergent.
- Skyl grundigt og lad den lufttørre helt, før den sættes i igen.
Opbevaring:
- Hvis enheden opbevares i en længere periode, skal du sørge for, at vandtanken er tom og ren.
- Rengør luftfilteret.
- Opbevar enheden et køligt, tørt sted, væk fra direkte sollys og ekstreme temperaturer.
Fejlfinding
| Problem | Mulig årsag | Løsning |
|---|---|---|
| Enheden tænder ikke | No power supply; Power cord not plugged in; Water tank full or not properly seated. | Kontroller strømtilslutningen; Tøm og sæt vandtanken på plads igen. |
| Ingen affugtning | Luftfilter tilstoppet; Rumtemperatur for lav; Luftfugtighedsindstillingen for høj. | Clean air filter; Ensure room temperature is above 5°C; Lower desired humidity setting. |
| Enheden er støjende | Enheden står ikke på en plan overflade; Luftfilteret er tilstoppet; Blokering i ventilatoren. | Placer på en plan overflade; Rengør luftfilteret; Kontroller for blokeringer. |
| Vand lækker | Water tank not properly seated; Continuous drainage hose loose or kinked. | Re-seat water tank; Check hose connection and ensure it's not kinked. |
| Humidity indicator light is red | High humidity level (>65%). | This is normal operation, indicating high humidity. The unit is working to reduce it. |
Hvis problemet fortsætter efter at have forsøgt disse løsninger, bedes du kontakte kundesupport.

Figure 9: The dehumidifier depicted in a room, illustrating how it addresses common humidity-related issues such as moisture stains on walls, respiratory allergy flare-ups, warped furniture, mold growth in closets, and unpleasant, stuffy air.
Specifikationer
| Feature | Specifikation |
|---|---|
| Mærke | CONOPUPlus |
| Modelnummer | DH-CS10 |
| Affugtningskapacitet | 16 liter/dag |
| Vandbeholdervolumen | 2.5 liter |
| Magt | 270 watt |
| Dimensioner (L x B x H) | 22 x 30 x 48 cm (8.66 x 11.81 x 18.9 tommer) |
| Varens vægt | 12.19 kg (26.87 lbs) |
| Materiale | Plast |
| Farve | Hvid |
| Driftstilstand | Automatisk |
| Dækningsområde | Op til 60 m² (645 kvm) |
Garanti og support
This CONOPUPlus product comes with a standard manufacturer's warranty. For specific warranty details, please refer to the warranty card included with your purchase or contact CONOPUPlus customer support.
For technical assistance, troubleshooting not covered in this manual, or to inquire about replacement parts, please contact CONOPUPlus customer service through the retailer where the product was purchased or via the official CONOPUPlus webwebsted.