
Indledning
This manual provides detailed instructions for the installation, operation, and maintenance of your MOUNTUP Freelift Dual Monitor Stand. Please read this manual thoroughly before installation to ensure correct setup and safe usage. Keep this manual for future reference.
Sikkerhedsoplysninger
ADVARSEL: Failure to read and follow all instructions may result in personal injury or damage to the product. Always ensure the monitor stand is securely installed and that the weight of your monitors does not exceed the specified load capacity.
- Do not install on tempered glass table tops.
- Ensure your desk thickness is within the specified range for the chosen mounting method.
- Verify that your monitors are compatible with VESA 75x75mm or 100x100mm mounting patterns.
- Spænd ikke skruerne for hårdt, da dette kan forårsage skader.
- Hold børn og kæledyr væk under installationen.
Pakkens indhold
Please check that all components are present and undamaged before beginning installation. If any parts are missing or damaged, contact MOUNTUP customer support.
Video: Freelift Dual Monitor Mount Installation Guide (0:04 - 0:07)
This segment shows the complete package contents laid out, including the monitor arms, pole, mounting bases, VESA plates, and various screws and tools.
Pakken indeholder:
- Monitorarme (2)
- Midterpol
- C-clamp Grundlag
- Grommet Base components
- VESA-plader (2)
- Hardware-sæt (skruer, skiver, unbrakonøgler)
- Kabelhåndteringsklip
Opsætningsinstruktioner
Trin 1: Vælg din monteringsmulighed
Your monitor stand supports two installation methods: C-clamp mounting and Grommet mounting. Select the method suitable for your desk.

Image: Two Mounting Options
This image illustrates the C-clamp mounting option on the right and the grommet mounting option on the left, showing the different desk thickness requirements for each.
C-clamp Installation:
- Fastgør C-clamp to the base of the pole using the provided bolts and tighten them securely.
- Secure the assembled stand to your desktop by tightening the C-clamp. Ensure your desk thickness is between 0.39'' - 2.76''.
Video: Freelift Dual Monitor Mount Installation Guide (0:10 - 0:30)
This segment demonstrates the step-by-step process of assembling and securing the C-clamp base to a desk.
Installation af tylle:
- Detach the clip plate from the C-clamp and install the long bolt to the base.
- Run the knob bolt through the bracket and the grommet hole to the base bottom. Tighten the bolt and install the decorative cover to the base. Ensure your desk thickness is between 0.39'' - 1.97'' and the hole diameter is 0.39'' - 2.36''.
Video: Freelift Dual Monitor Mount Installation Guide (0:33 - 0:47)
This video section illustrates how to convert the C-clamp to a grommet mount and install it through a desk hole.
Step 2: Install Monitor Arms
- Slide the monitor arms onto the center pole and secure them at your desired height using the provided Allen key.
- Attach the VESA plate to the back of your monitor using the appropriate screws and tighten them securely.
- Slide the monitor (with VESA plate attached) onto the head of the upper arm, then install the security bolt to prevent accidental detachment. Repeat for the second monitor.
Video: Freelift Dual Monitor Mount Installation Guide (0:48 - 1:16)
This video demonstrates how to install the monitor arms onto the pole, attach the VESA plate to the monitor, and then mount the monitor onto the arm.
Trin 3: Kabelstyring
Route your monitor cables through the integrated cable management channels on the arms and down the pole to maintain a tidy workspace.

Image: Cable Management
This image highlights the integrated cable management system within the monitor arm, showing how cables can be neatly routed.
Video: Freelift Dual Monitor Mount Installation Guide (1:17 - 1:20)
This segment shows how to use the cable management features on the monitor arm to organize cables.
Operating Your Monitor Stand
The MOUNTUP Freelift Dual Monitor Stand offers full motion adjustment for optimal viewkomfort.
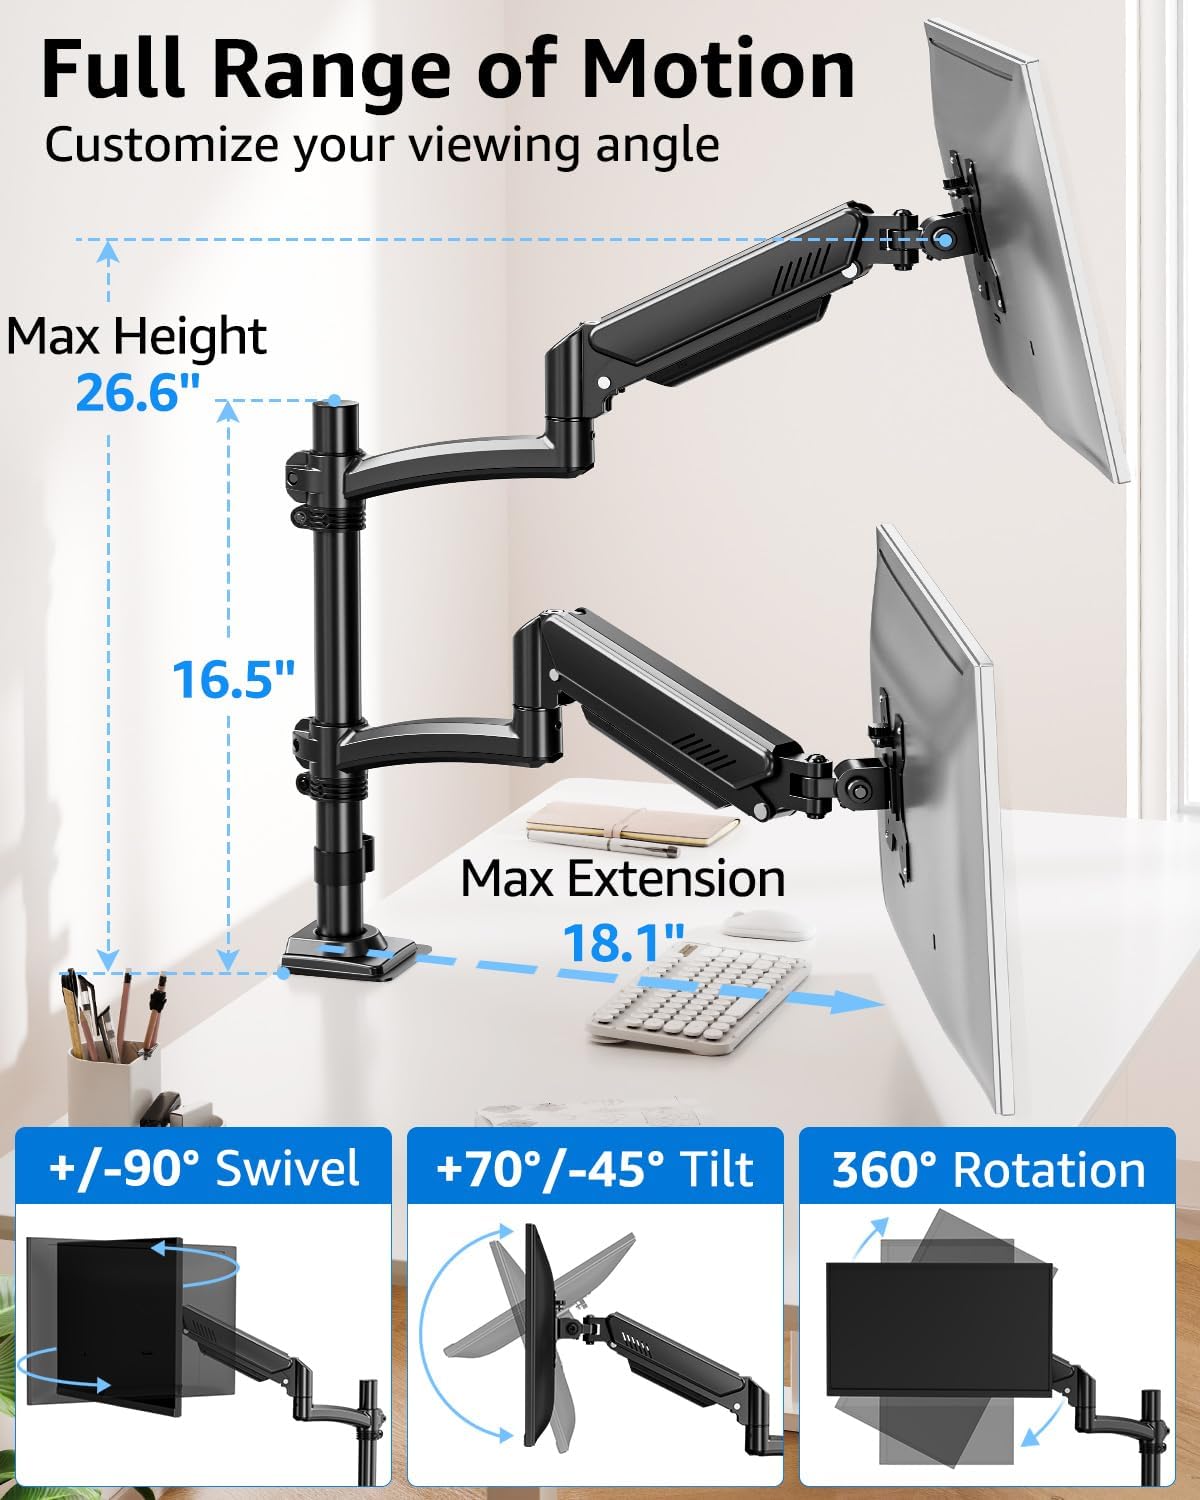
Image: Full Range of Motion
This image displays the various adjustment capabilities including height (up to 26.6 inches), extension (up to 18.1 inches), tilt (+70°/-45°), swivel (±90°), and 360° rotation.
Justeringer:
- Højdejustering: The gas spring arm allows for smooth vertical movement. Adjust the arm to your preferred height. The maximum height is 26.6 inches.
- Vip: Monitors can be tilted +70° to -45° to reduce glare and optimize viewing angles. Loosen the tilting bolt, adjust to your desired angle, then retighten.
- Drejelig: Each monitor can swivel ±90° for easy screen sharing or collaborative work. The arm itself can swivel ±180°.
- Rotation: Rotate your monitors 360° to switch between landscape and portrait modes.
- Udvidelse: The arms extend up to 18.1 inches, allowing you to position your monitors closer or further away from you.
Video: Freelift Dual Monitor Mount Function Display (0:04 - 0:56)
This video demonstrates the full range of motion and adjustment capabilities of the monitor stand, including tilt, rotation, swivel, height adjustment, and extension.
Justering af gasfjederspænding:
If the monitor arm falls down or rises up unexpectedly, you may need to adjust the gas spring tension. Keep the arm in a horizontal position during adjustment.
- Arm Falls Down (monitor too heavy): Turn the adjustment screw counter-clockwise (towards '+') to increase tension until the arm can stay as intended. Each turn needs to be a full 360°.
- Arm Rises Up (monitor too light): Turn the adjustment screw clockwise (towards '-') to decrease tension until the arm can stay as intended. Each turn needs to be a full 360°.
Opretholdelse
Regelmæssig vedligeholdelse sikrer din skærmstanders levetid og optimale ydeevne.
- Kontrollér regelmæssigt alle skruer og forbindelser for at sikre, at de er stramme.
- Rengør stativet med en blød, damp klud. Undgå slibende rengøringsmidler eller opløsningsmidler.
- Smør ikke gasfjedermekanismen.
Fejlfinding
If you encounter any issues, refer to the solutions below or contact customer support.
Almindelige problemer og løsninger:
- Issue: Monitor arm falls down.
Løsning: The gas spring tension is too low for the monitor's weight. Keep the arm in a horizontal position and turn the adjustment screw counter-clockwise (towards '+') to increase tension. Each turn should be a full 360°. - Issue: Monitor arm rises up.
Løsning: The gas spring tension is too high for the monitor's weight. Keep the arm in a horizontal position and turn the adjustment screw clockwise (towards '-') to decrease tension. Each turn should be a full 360°. - Issue: Monitor swivels loose or cannot swivel.
Løsning: The swivel tension may need adjustment. Use an Allen key to tighten or loosen the screw at the swivel joint until the desired tightness is achieved.
Video: Freelift Dual Monitor Mount Troubleshooting (0:04 - 0:20)
This video demonstrates how to adjust the gas spring tension when the monitor arm falls down due to insufficient tension.
Video: Freelift Dual Monitor Mount Troubleshooting (0:21 - 0:38)
This video shows the process of adjusting the gas spring tension when the monitor arm rises up due to excessive tension.
Video: Freelift Dual Monitor Mount Troubleshooting (0:51 - 1:05)
This segment demonstrates how to adjust the tightness of the swivel mechanism using an Allen key.
Specifikationer
| Monteringstype | Bordmontering (C-clamp eller Grommet) |
| Kompatibel skærmstørrelse | 13 - 32 inches (per monitor) |
| Belastningskapacitet | 4.4 - 22 lbs (per arm) |
| VESA-kompatibilitet | 75x75mm, 100x100mm |
| Bevægelsestype | Vip, roter, drej, højdejustering, fuld bevægelse |
| Tilt vinkel | +70° / -45° |
| Drejevinkel | ±90° (monitor), ±180° (arm) |
| Rotation | 360° |
| Maksimal højdejustering | 26.6 tommer |
| Maksimal armforlængelse | 18.1 tommer |
| Materiale | Legeret stål |
| Farve | Sort |
Garanti & Support
Garantioplysninger:
This MOUNTUP product comes with a 3 års garanti fra købsdatoen. Denne garanti dækker fabrikationsfejl og materialefejl ved normal brug. Den dækker ikke skader forårsaget af forkert installation, misbrug, ulykker eller uautoriserede ændringer.
Kundesupport:
For technical assistance, missing parts, or warranty claims, please contact MOUNTUP customer support. Refer to the contact information provided with your product packaging or visit the official MOUNTUP webwebsted for supportdetaljer.