
1. Introduktion
Thank you for choosing the Elac SUB1015 Powered Subwoofer. This high-performance subwoofer is engineered to deliver powerful and deep bass, enhancing your home audio experience. Featuring a 10-inch polypropylene cone, the SUB1015 handles low frequencies with clarity and precision. This manual provides essential information for proper setup, operation, and maintenance to ensure optimal performance and longevity of your subwoofer.
2. Pakkens indhold
Kontroller venligst, at alle varer er til stede i pakken:
- Elac SUB1015 Powered Subwoofer
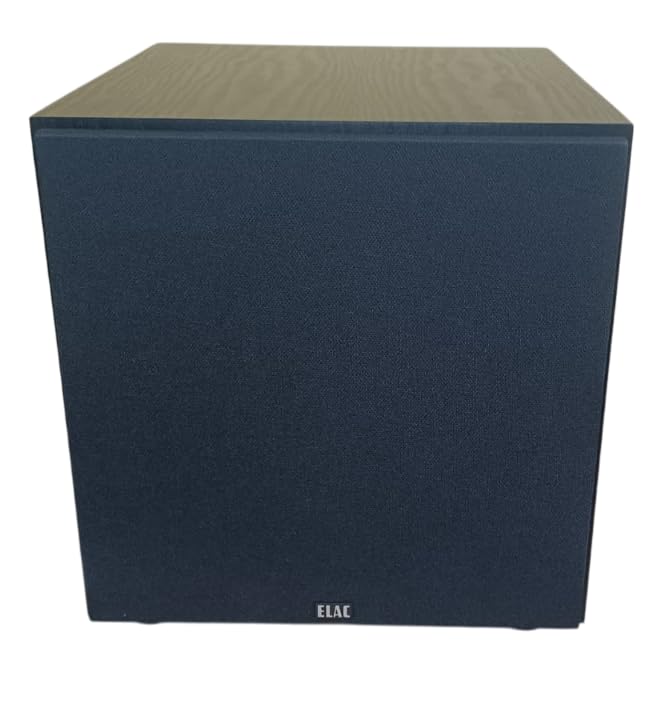
- Grille
- AC strømledning
3. Opsætning og forbindelser
Proper setup is crucial for achieving the best sound quality from your subwoofer. Follow these steps for installation:
3.1 Placering
The placement of your subwoofer significantly impacts its performance. Experiment with different locations in your room to find the optimal spot. Generally, placing the subwoofer in a corner can enhance bass output, but may also lead to boomy sound. Placing it along a wall or near your main speakers can provide a more balanced sound. Ensure there is adequate ventilation around the unit.
3.2 Tilslutning af subwooferen
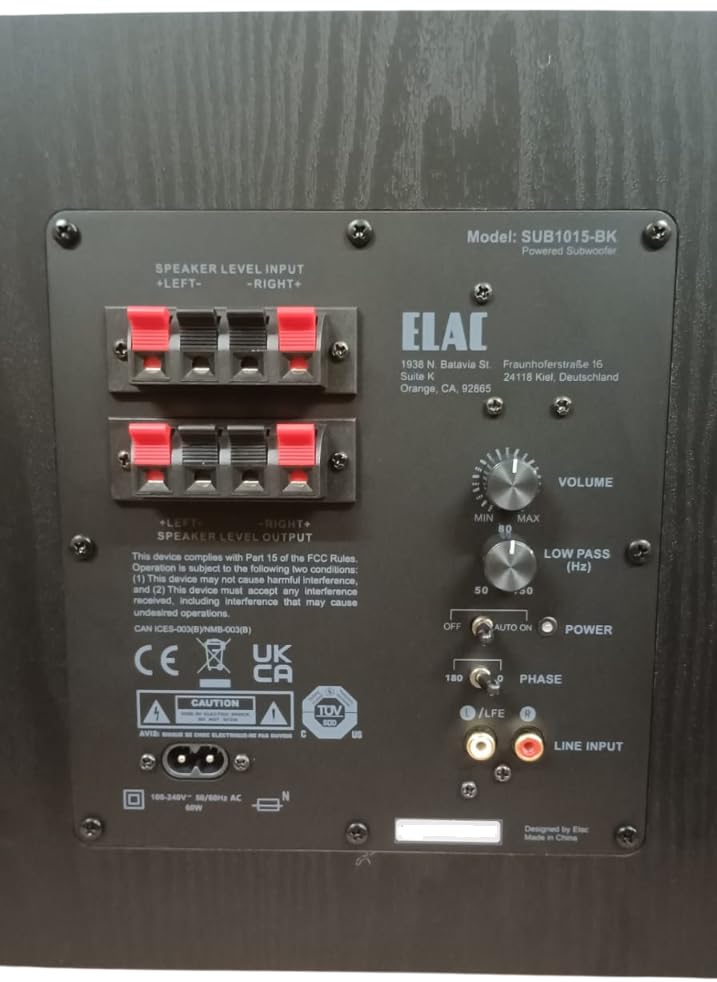
The SUB1015 offers both RCA line-level and speaker-level inputs for compatibility with various audio systems.
RCA Line-Level Input (Recommended)
If your AV receiver or pre-amplifier has a dedicated subwoofer output (often labeled LFE, Sub Out, or Pre-Out Sub), use an RCA cable to connect this output to the LINE INPUT (LFE) on the subwoofer's rear panel. This method typically provides the best performance and control.
Indgang på højttalerniveau
Hvis din modtager eller amplifier does not have a dedicated subwoofer output, you can connect the subwoofer using the speaker-level inputs. Connect the speaker outputs from your amplivligere til HØJTTALERNIVEAU INPUT terminals on the subwoofer. Ensure correct polarity (positive to positive, negative to negative). You can then connect your main speakers to the HØJTTALERNIVEAU OUTPUT terminals on the subwoofer, or directly to your amplifier if your main speakers are full-range.
3.3 Strømtilslutning
Once all audio connections are made, connect the supplied AC power cord to the subwoofer's power inlet and then to a suitable wall outlet. The subwoofer is designed for 230 Volts input.
4. Betjeningsvejledning
After connecting your subwoofer, use the controls on the rear panel to fine-tune its performance.
4.1 kontroller overview
- BIND: Justerer subwooferens samlede udgangsniveau. Start med en lav indstilling og øg gradvist, indtil bassen blandes problemfrit med dine hovedhøjttalere.
- LOW PASS (Hz): Controls the upper frequency limit of the subwoofer. This setting determines where the subwoofer takes over from your main speakers. A common starting point is 80 Hz, but adjust based on your main speakers' low-frequency capabilities.
- MAGT: Denne kontakt har tre positioner:
- OFF: Turns the subwoofer off.
- PÅ: Keeps the subwoofer continuously on.
- BIL: The subwoofer will automatically turn on when an audio signal is detected and enter standby mode after a period of inactivity. This mode consumes less than 0.5W in standby.
- FASE: Adjusts the phase of the subwoofer's output relative to your main speakers. Set to 0° or 180°. Experiment with both settings to find which provides the most coherent and impactful bass in your listening position.
5. Fejlfinding
If you encounter issues with your Elac SUB1015 subwoofer, refer to the following common problems and solutions:
- Ingen lyd:
- Ensure the power cord is securely connected and the subwoofer is plugged into a live outlet.
- Tjek MAGT switch position. If set to AUTO, ensure an audio signal is present.
- Verify all audio cables (RCA or speaker-level) are correctly and securely connected.
- Forøg BIND control on the subwoofer.
- Check your receiver/amplifier settings to ensure the subwoofer output is enabled and volume is not muted.
- Svag eller forvrænget bas:
- Juster BIND control on the subwoofer.
- Juster LOW PASS (Hz) control. If set too low, you might not hear enough bass.
- Eksperimenter med FASE switch (0° or 180°) to see if it improves bass integration.
- Check subwoofer placement. Moving it to a different location, especially closer to a wall or corner, might improve bass response.
- Ensure speaker wires are connected with correct polarity (+ to +, - to -).
- Summende eller summende støj:
- Prøv at tilslutte subwooferen til en anden stikkontakt.
- Sørg for, at alle lydkabler er korrekt afskærmede og ikke løber parallelt med strømkabler.
- If using RCA connections, try a different RCA cable.
- Disconnect all audio inputs from the subwoofer. If the hum disappears, the issue is likely with the source equipment or cabling.
6. Specifikationer
Detailed technical specifications for the Elac SUB1015 Powered Subwoofer:
| Feature | Specifikation |
|---|---|
| Mærke | Elac |
| Modelnummer | SUB1015-BK |
| Højttaler type | Drevet subwoofer |
| Woofer Driver Diameter | 10 tommer (polypropylenkegle) |
| Amplivligere Type | Klasse D |
| Strømhåndtering (RMS/Peak) | 60W RMS / 120W Peak |
| Frekvensrespons | 36 Hz til 150 Hz |
| Forbindelsesteknologi | RCA, kabelforbundet |
| Lydudgangstilstand | Mono |
| Input bindtage | 230 volt |
| Lavt standby-strømforbrug | Mindre end 0.5W |
| Kabinet finish | Sort Ask |
| Varedimensioner (D x B x H) | 36.8D x 31B x 32.5H Centimeter |
| Varens vægt | 9.8 kilo |
| Oprindelsesland | USA |
7. Vedligeholdelse
To maintain the appearance and performance of your subwoofer:
- Rensning: Brug en blød, tør klud til at tørre kabinettet af. Undgå at bruge slibende rengøringsmidler, voks eller opløsningsmidler.
- Placering: Hold subwooferen væk fra direkte sollys, varmekilder og overdreven fugtighed.
- Ventilation: Ensure the rear panel and any vents are not obstructed to allow for proper heat dissipation.
8. Produktet er slutview Video
Se denne video for et visuelt overblikview of the Elac SUB1015 Powered Subwoofer and its key features.
9. Garanti og support
The Elac SUB1015 Powered Subwoofer comes with a 1 års producentgaranti.
Producentoplysninger:
ELAC Americas Inc.
1938 N. Batavia St. Suite K
Orange, CA 92865
Importer Contact Information (India):
Kripa Electronics (india) Pvt.Ltd
Gala No 4 5 6, Building No. C, Shreeram Complex,
Village Dapoda, Bhiwandi Thane-421032