
1. Introduktion
This manual provides comprehensive instructions for the installation, operation, and programming of your DieseRC Wireless Roller Shutter Remote Control Switch. This device is designed to wirelessly control AC motors, enabling forward, reverse, and stop functions for applications such as garage doors, electric gates, and roller shutters. Please read this manual carefully before use to ensure proper functionality and safety.
2. Pakkens indhold
- 1 x Relay Receiver Board
- 2 x Transmitters (battery included)
- 1 x Produktmanual
3. Specifikationer
| Feature | Specifikation |
|---|---|
| Receiver Working Voltage | AC 90V~250V |
| Stillegående strøm | <10 mA |
| Maks. Strøm | 3A (induktiv belastning), 10A (resistiv belastning) |
| RF-frekvens | 433 MHz |
| Driftstemperatur | -30°C til +80°C |
| Modtagelse af følsomhed | > 97 dBm |
| Number of Storable Remotes | Op til 20 |
| Kodningsstøtte | 1527 Learning-Code |
| RF-driftstilstand | ASK Superheterodyne Wireless Reception |
| Modtagelsesområde | Approx. 20 ~ 50 meters (open area) |
| Driftstilstande | Momentary / Toggle / Latched Mode |
| Sender batteri | 2 x CR2016 (inkluderet) |
| Kompatible enheder | Garage door, electric curtain, electric gate, roller door |
4. Opsætning
4.1 Sikkerhedsforanstaltninger
- Sørg for, at strømmen er afbrudt, før der foretages nogen form for ledningsføring.
- Wiring should be performed by a qualified electrician if you are unsure.
- Verify correct polarity (Live, Neutral) to avoid damage or short circuits.
4.2 Tilslutning af modtageren
Connect the receiver to your AC motor and power supply according to the diagram below. The receiver supports AC 90V-250V input. Ensure secure connections for all wires.

Image: Receiver dimensions and wiring diagram. Note the 'Up' and 'Down' motor connections and AC 90-250V power input.
The receiver features large screw ports for easy installation and metal clips for secure wiring. A transparent flip cover allows for circuit adjustment.

Billede: Detaljeret view of the receiver's screw terminals and cable compatibility.
4.3 Indledende opstart
After wiring, apply power to the receiver. The indicator light on the receiver will illuminate, indicating it is ready for operation or programming.
4.4 Produkt overview Video
Video: Denne video giver et visuelt overblikview of the DieseRC 2201COM receiver and KT03 remote control, highlighting their design and features.
5. Driftstilstande
The DieseRC remote control switch supports three main operating modes: Momentary, Toggle, and Latched. All products are set to Toggle mode before shipment. If you wish to change the operating mode, you must first reset the receiver (see Section 6.2).
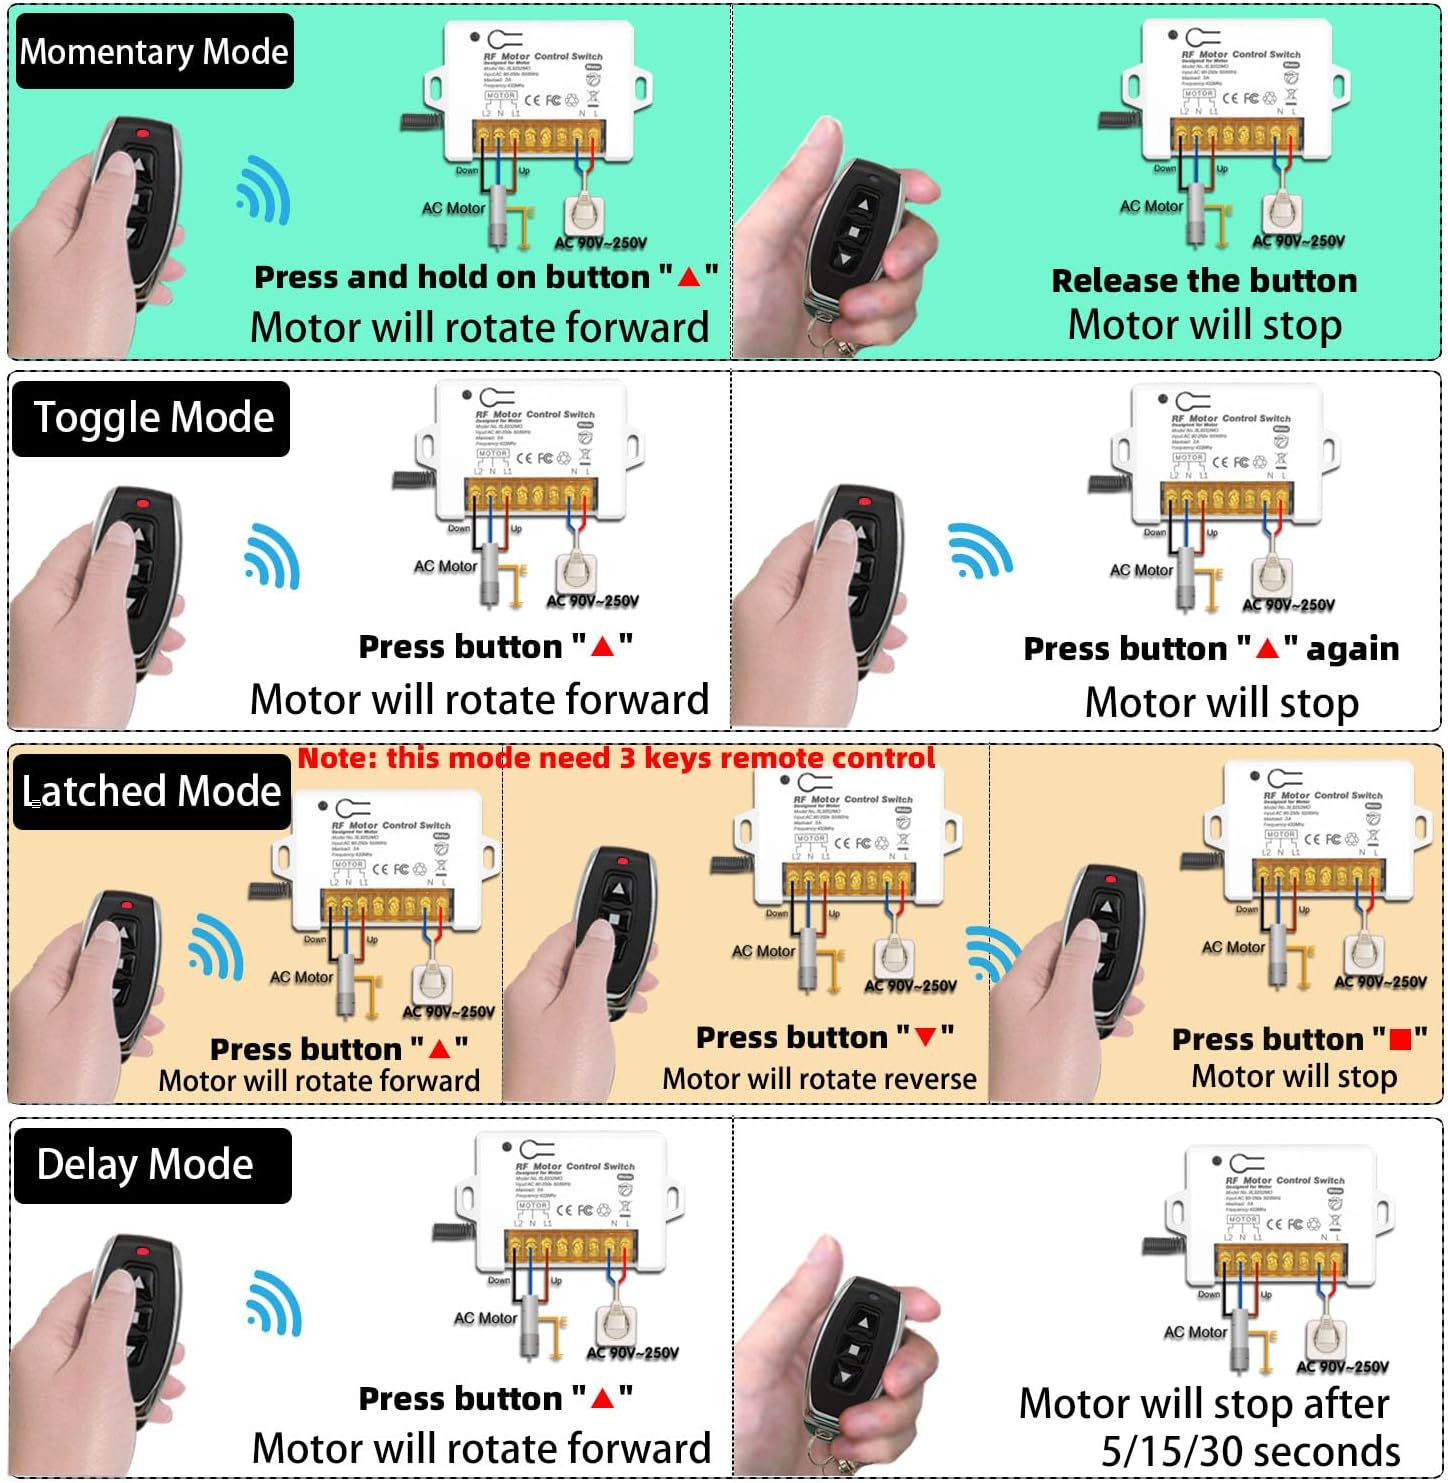
Image: Visual representation of Momentary, Toggle, Latched, and Delay operating modes.
5.1 Momentantilstand
- Tryk og hold nede "▲" button: The motor rotates forward.
- Release the button: The motor stops.
5.2 Skift tilstand
- Tryk på "▲" button once: The motor rotates forward.
- Tryk på "▲" button again: The motor stops.
5.3 Låst tilstand
- Tryk på "▲" button: The motor rotates forward.
- Tryk på "▼" button: The motor rotates backward.
- Tryk på "■" button: The motor stops.
5.4 Ansøgning Eksamples

Billede: Eksample of the remote control switch used for a garage door.
Video: This video demonstrates various applications of the DieseRC Wireless Roller Shutter Remote Control Switch, showcasing its functionality in controlling different types of AC motors.
6. Programmering af fjernbetjeninger
The receiver can store up to 20 transmitters. Follow these steps to program your remote control to the desired operating mode.

Image: Step-by-step programming instructions for different modes.
6.1 Learning a Remote Control
- Press the learning button on the receiver:
- Trykke 1 gang for Momentary Mode.
- Trykke 2 gange for Toggle Mode.
- Trykke 3 gange for Latched Mode.
- Tryk på "▲" button on your remote control. Wait 3 seconds.
- Tryk på "▼" button on your remote control. The programming is successful.
Note: For Latched Mode, the remote control requires 3 keys (Forward, Reverse, Stop).
6.2 Resetting the Receiver
Sådan sletter du alle programmerede fjernbetjeninger fra receiverens hukommelse:
- Press the learning button on the receiver 8 gange.
Important: After resetting, all previously programmed remote controls will no longer work and must be re-programmed.
6.3 Programming Demonstration Video
Video: A step-by-step video guide on how to program the DieseRC 2201COM receiver, covering the different operating modes and remote control pairing.
7. Vedligeholdelse
7.1 Udskiftning af senderbatteri
The remote control transmitters use 2 x CR2016 batteries. If the remote's range decreases or it becomes unresponsive, replace the batteries. Refer to the transmitter image for visual guidance.

Image: DieseRC remote control transmitter.
7.2 Rengøring
Wipe the receiver and transmitters with a dry, soft cloth. Do not use abrasive cleaners or solvents.
7.3 Miljøforhold
Avoid exposing the device to extreme temperatures, high humidity, or direct sunlight. Ensure the receiver is installed in a location with adequate ventilation.
8. Fejlfinding
- Fjernbetjeningen reagerer ikke:
- Check the battery in the transmitter. Replace if necessary.
- Sørg for, at modtageren har strøm.
- If the receiver was recently reset, re-program the remote control (see Section 6.1).
- Ensure the remote is within the effective operating range (20-50 meters).
- Motoren bevæger sig ikke:
- Kontroller, at alle ledningsforbindelser er sikre og korrekte (se afsnit 4.2).
- Check the power supply to the receiver and motor.
- Sørg for, at selve motoren fungerer korrekt.
- Interferens:
- While multiple remote control sets can be used in the same area without interference (except in Momentary mode), strong local RF interference might affect performance. Try relocating the receiver if possible.
9. Garanti og support
DieseRC products are manufactured to high-quality standards. For specific warranty information, please refer to the product packaging or contact your retailer. If you encounter any issues or require technical assistance, please reach out to DieseRC customer support through the vendor's contact information provided at the point of purchase.