
1. Introduktion
Thank you for choosing the ORIA Kids Alarm Clock Model 8825. This device is designed to assist with sleep training for children, featuring an 'OK to Wake' function, customizable RGB night lights, dual alarms, and various adjustable settings for brightness and volume. Please read this manual carefully to ensure proper use and to fully utilize all features.

Billede: Forside view of the ORIA Kids Alarm Clock displaying time and colorful ambient light.
2. Produktet er slutview
Familiarize yourself with the clock's buttons and display icons.

Image: Diagram showing the control buttons and display indicators on the ORIA Kids Alarm Clock.
- TID SET: Tryk og hold for at gå ind i tidsindstillingstilstand.
- SUN/MOON ON/OFF: Activates/deactivates the sleep reminder and wake-up light function.
- TUNES: Short press to cycle through music tracks. Long press to activate/deactivate child lock.
- SKÆRM: Justerer skærmens lysstyrke.
- OP (+): Increases values, adjusts ambient light brightness.
- NED (-): Decreases values, adjusts ring level.
- Alarm 1/Alarm 2 Icons: Indicate active alarms.
- Børnelås-ikon: Angiver, at børnesikringen er aktiv.
- Sun/Moon Icon: Indicates sleep/wake light function is active.
3. Opsætning
3.1 Strømtilslutning
The ORIA Kids Alarm Clock operates via a Type-C charging cable (included). Connect the cable to the clock and plug the other end into a suitable USB power adapter (not included). The clock must be plugged in for full functionality.
A button battery (not included) can be installed to retain time settings during power outages, but it will not power the screen or other functions.
3.2 Tidsindstilling
- Tryk længe på TIDSINDSTILLING button until the digits on the display start flashing.
- Brug OP (+) or NED (-) knapper for at justere værdien.
- Kort tryk TIDSINDSTILLING to move to the next setting. The setting order is: 12/24H format > Year > Month > Day > Hour > Minute.
- Når alle indstillinger er færdige, skal du trykke på TIDSINDSTILLING again to exit, or wait a few seconds for it to exit automatically.

Image: Visual guide for setting the time, date, and 12/24H format.
4. Betjeningsvejledning
4.1 Sleep Reminder & Wake-up Function (OK to Wake)
This function uses light cues to help children understand when it's time to sleep and wake up.
- Tryk på SUN/MOON ON/OFF button to activate this feature. The Sun/Moon icon will appear on the display.
- Sengetid: At the set sleep time, the ambient light will turn red (default) and automatically turn off after one hour, signaling bedtime.
- Pre-Wake: 20 minutes before the set alarm time, the ambient light will turn yellow (default).
- Vågn op: When the alarm sounds, the ambient light will turn green (fixed color), indicating it's time to wake up.
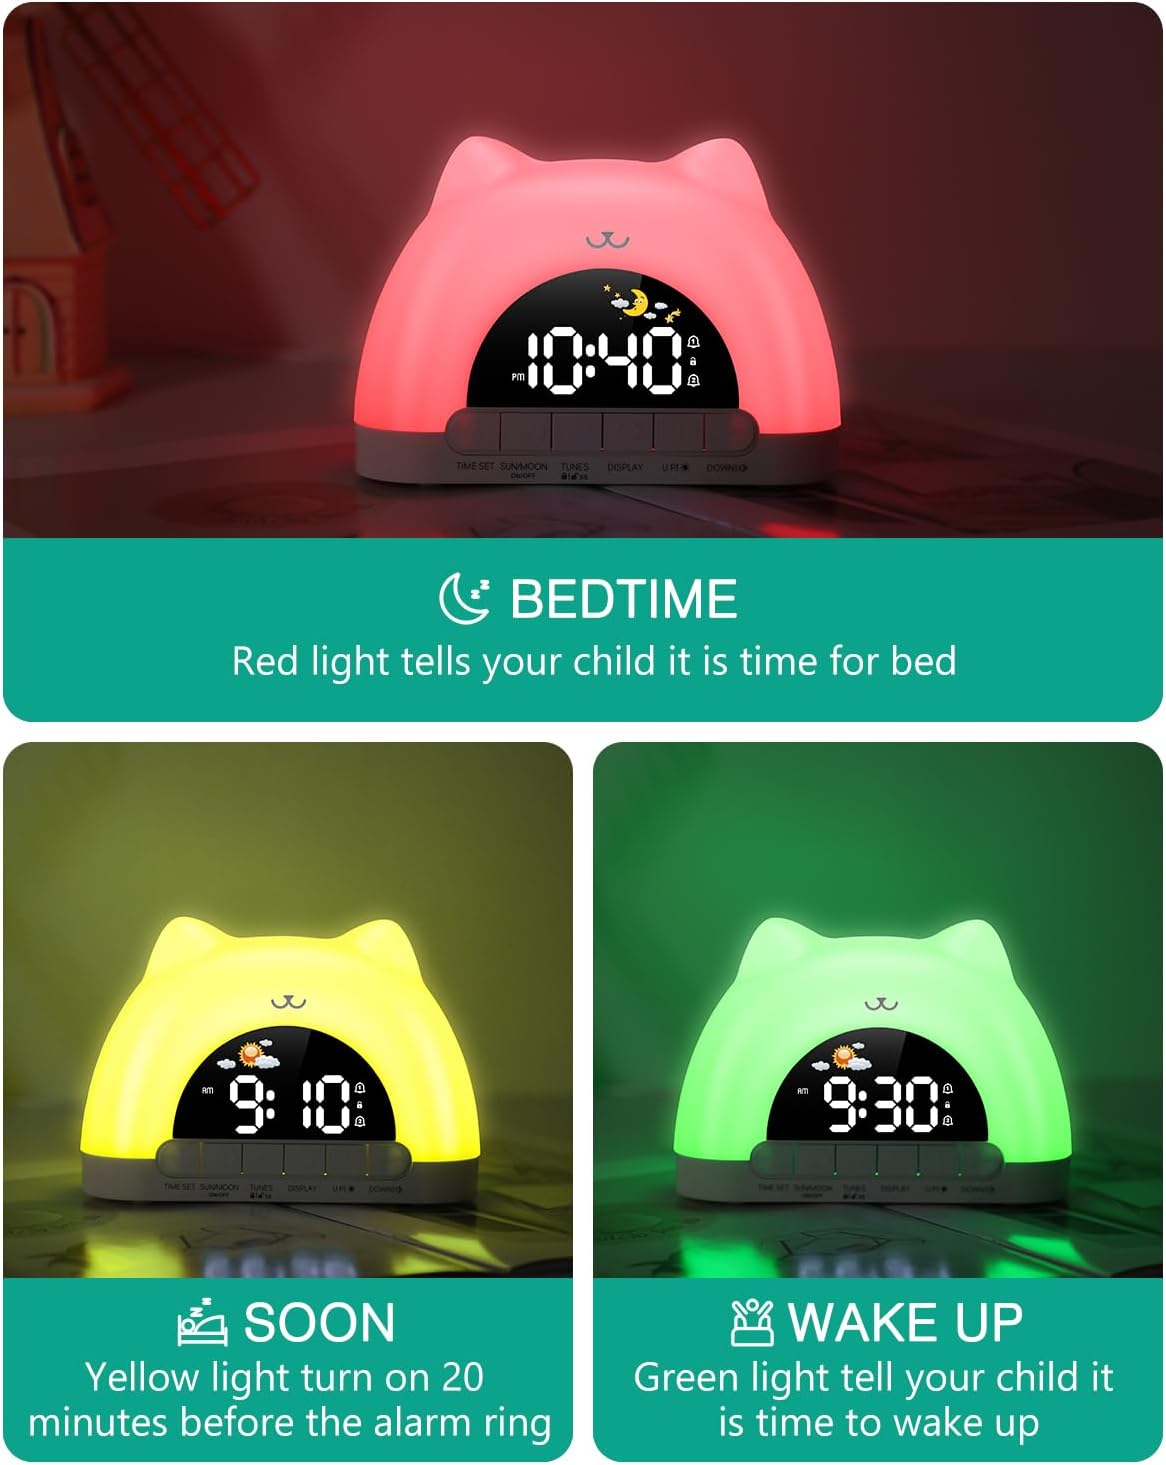
Image: Visual representation of the sleep reminder and wake-up light sequence.
4.2 Natlysfunktion
The clock features an ambient night light with multiple color and brightness options.
- Aktivering: In time display mode, simply touch the top of the clock to turn on the ambient light.
- Farvetilstande: The clock offers 11 color modes, including 7 solid colors (White, Red, Yellow, Green, Cyan, Blue, Purple) and 4 dynamic RGB changing modes.
- Justering af lysstyrke: The ambient light has 3 brightness levels (high, medium, low). Use the OP (+) or NED (-) knapper for at justere.
- Slukker: To turn off the ambient light, press and hold the top of the product for 3 seconds.
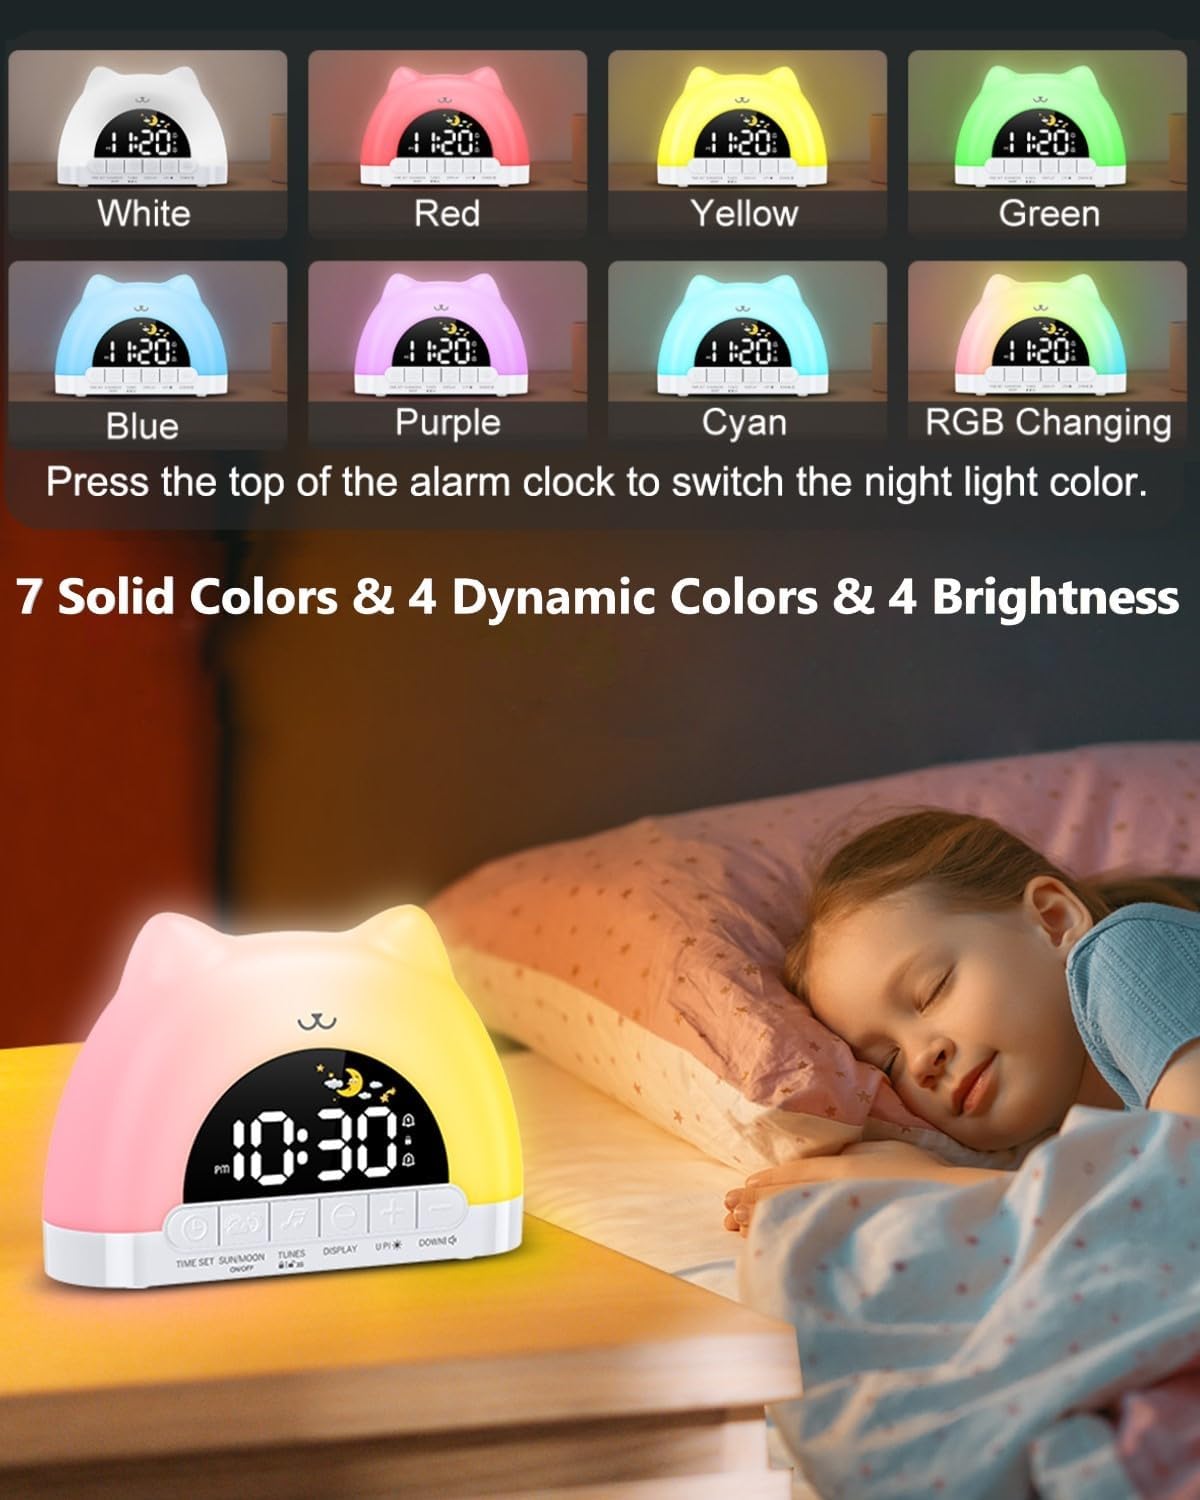
Billede: Eksamples of the 11 available night light colors.
Video: Demonstration of the smart clock's night light and dual alarm features.
4.3 Alarm Settings (Dual Alarms)
The clock supports two independent alarms with customizable settings.
- Aktiver alarm: Tryk kort på TIDSINDSTILLING button to turn on/off Alarm 1 or Alarm 2. The corresponding alarm icon will appear/disappear on the screen.
- Indstil alarmtid: Tryk længe på TIDSINDSTILLING knappen for at gå ind i alarmindstillingstilstand. Timecifrene blinker.
- Brug OP (+) or NED (-) buttons to adjust the hour, then short press TIDSINDSTILLING at flytte til minutter.
- Weekday Alarm Settings: After setting the time, you can choose from 4 weekday alarm settings: Single day (1-1), Monday to Friday (1-5), Monday to Sunday (1-7), and Saturday to Sunday (6-7).
- Vågnelyde: Select from 12 different wake-up sounds.
- Lydstyrkeniveauer: Adjust the alarm volume with 4 levels using the NED (-) knap.
- Snooze-funktion: When an alarm sounds, press the top of the clock to activate a 5-minute snooze.

Image: Display showing dual alarm settings and the snooze feature.

Image: Visual guide to selecting from 12 wake-up sounds and 4 volume levels.
4.4 Børnelåsfunktion
The child lock prevents accidental changes to important settings.
- Aktivering/Deaktivering: Tryk længe på TUNES button to turn the child lock on or off. A lock icon will appear on the display when active.
- Locked Buttons: When child lock is on, all buttons except the snooze button are locked.
- Allowed Functions: Children can still control the snooze button, switch between 10 music tracks, and adjust the ambient light color.

Image: The child lock function in use, showing the lock icon on the display.
4.5 Displayets lysstyrke
Juster skærmens lysstyrke efter dine præferencer.
- The display has 5 brightness levels. Press the VISE knappen for at bladre gennem dem.
- The final brightness level turns off the screen for a resting state.
- Night Brightness Function: The clock features automatic brightness adjustment at night for optimal viewing.

Image: Illustration of the 5-level screen brightness and automatic night brightness adjustment.
4.6 Musikafspilning
Enjoy 10 different music tracks for relaxation or as part of the sleep routine.
- Tryk kort på TUNES button to cycle through the 10 available music tracks.
- Juster lydstyrken ved hjælp af NED (-) knap.

Image: The clock displaying its music enjoyment feature.
4.7 USB-udgangsport
The built-in USB output port allows you to charge other small electronic devices.
- Locate the USB output port on the back of the clock.
- Connect your device's charging cable to this port to begin charging.

Image: The clock featuring both Type-C input and a standard USB output port for charging.
5. Vedligeholdelse
To ensure the longevity and optimal performance of your ORIA Kids Alarm Clock, follow these maintenance guidelines:
- Rensning: Wipe the clock with a soft, dry cloth. Do not use abrasive cleaners, solvents, or strong chemicals, as these may damage the surface.
- Placering: Place the clock on a stable, flat surface away from direct sunlight, excessive heat, and moisture.
- Undgå vand: Denne enhed er ikke vandtæt. Undgå kontakt med vand eller andre væsker.
- Håndteres med forsigtighed: Undgå at tabe uret eller udsætte det for hårde stød.
6. Fejlfinding
If you encounter any issues with your ORIA Kids Alarm Clock, please refer to the following common problems and solutions:
- Enheden tænder ikke:
Ensure the Type-C charging cable is securely connected to both the clock and a working USB power adapter. Verify the power outlet is functional. - Alarm Not Sounding/Inconsistent:
Check that the alarm is activated (Alarm 1 or Alarm 2 icon visible). Verify the alarm time and weekday settings are correct. Ensure the volume level is not set to zero. If the ambient light function is active, ensure it is not interfering with the alarm's operation; try deactivating the ambient light temporarily to test the alarm. - Difficulty Setting Time/Alarms:
Refer to Section 3.2 (Time Setting) and Section 4.3 (Alarm Settings) for detailed, step-by-step instructions. Ensure you long-press the TIME SET button to enter setting mode and short-press to confirm each step. - Ambient Light Not Turning Off:
To turn off the ambient light, press and hold the top of the product for 3 seconds. If the sleep reminder function is active, the light will turn off automatically after one hour at bedtime. - Knapper reagerer ikke:
Check if the Child Lock function is active (lock icon on display). If so, long-press the TUNES button to deactivate it. Only the snooze button, music selection, and ambient light color adjustment are available when child lock is on.
7. Specifikationer
| Mærke | ORIA |
| Modelnummer | 8825 |
| Display Type | LED |
| Strømkilde | Ledningsbaseret elektrisk (USB-C) |
| Produktdimensioner | 6.63 cm B x 4.1 cm H |
| Materiale | Plast |
| Særlige funktioner | Adjustable Brightness, Adjustable Volume, OK to Wake, RGB Night Lights, Snooze, Dual Alarms, Child Lock, Music Playback, USB Output Port |
| Værelsestype | Bedroom, Kid's Room |
8. Garanti og support
ORIA is committed to providing high-quality products and excellent customer service.
- 1-års garanti: Your ORIA Kids Alarm Clock is covered by a 1-year warranty from the date of purchase.
- 90-Day Free Replacements: Enjoy free replacements for eligible issues within 90 days of purchase.
- 30 dages gratis returnering: You may return the product for free within 30 days of purchase.
- 24/7 kundesupport: Our customer support team is available 24 hours a day, 7 days a week to assist you.
- Livsvarig teknisk support: Receive lifetime technical support for your ORIA product.
For further assistance, please contact ORIA customer service through your purchase platform or visit the official ORIA webwebsted.