1. Introduktion
This manual provides comprehensive instructions for the safe and effective operation, setup, maintenance, and troubleshooting of your HITBOX MIG200III 6-in-1 Multi-Process Welder. Please read this manual thoroughly before using the equipment and retain it for future reference.
The HITBOX MIG200III is a versatile welding machine designed for various applications, offering six welding processes: Gas MIG, Gasless Flux Core MIG, Stick (MMA), Lift TIG, Spot Welding, and Spool Gun compatibility. It features synergic control, digital welding technology, and a large LED display for ease of use.

Image 1.1: HITBOX MIG200III Welder and included accessories.
2. Sikkerhedsoplysninger
ADVARSEL: Svejsning kan være farligt. Følg altid sikkerhedsforanstaltningerne for at forhindre personskade eller død.
- Elektrisk stød kan dræbe: Do not touch live electrical parts. Wear dry welding gloves and protective clothing. Ensure the workpiece is properly grounded.
- Dampe og gasser kan være farlige: Keep your head out of the fumes. Use enough ventilation, exhaust at the arc, or both, to keep fumes and gases away from your breathing zone.
- Lysbuestråler kan brænde øjne og hud: Brug en svejsehjelm med et passende filter for at beskytte dit ansigt og dine øjne. Brug passende beskyttelsestøj for at beskytte din hud.
- Brand- og eksplosionsfare: Fjern alt brandbart materiale inden for 10 meter fra svejseområdet. Hav en brandslukker i nærheden.
- Varme dele kan forårsage alvorlige forbrændinger: Allow welding equipment to cool before touching.
- Magnetiske felter: Pacemakerbrugere bør konsultere deres læge inden operation.
- Always ensure the machine is connected to a properly rated power supply (110V or 220V) and that the power cord is in good condition.
3. Produktet er slutview
3.1 Nøglefunktioner
- 6-in-1 Multi-Process Welding: Supports Gas MIG, Gasless Flux Core MIG, Stick (MMA), Lift TIG, Spot Welding, and Spool Gun (TIG torch and spool gun sold separately).
- Synergisk kontrol: Automatically adjusts recommended current and wire feed speed based on selected wire diameter and gas type, simplifying setup.
- Digital Welding Technology: Equipped with MCU control and IGBT inverter for improved stability and performance. Includes burn-back adjustment, pre-flow/post-flow, and 2T/4T settings.
- Large LED Digital Display: Provides clear and accurate data visibility for easy operation.
- Dual Voltage Evne: Fungerer på både 110V og 220V strømforsyninger.
- Forbedret sikkerhed: Features VRD (Voltage Reduction Device), overcurrent, overvoltage, overload, and overheat protection.

Image 3.1: Multi-Process Capabilities of the HITBOX MIG200III.
3.2 Components (Typical)
The HITBOX MIG200III typically includes:
- MIG200III Welding Machine
- MIG Torch (with graphene tube enhancement)
- Jord Clamp
- Electrode Holder (for Stick welding)
- Flux Core Wire Spool
- Contact Tips and Nozzles
- Power Cord (110V/220V compatible)
Note: Additional accessories such as a TIG torch, spool gun, and gas regulator are sold separately.

Image 3.2: Internal components and safety features.
4. Opsætning
4.1 Strømtilslutning
- Ensure the welder is turned off.
- Connect the power cord to a suitable 110V or 220V AC power outlet. The machine automatically detects the voltage.
- Verify the power source meets the welder's requirements.
4.2 Trådinstallation (MIG/Flux-kerne)
- Åbn trådboksrummet.
- Placer trådspolen på spoleholderen, og sørg for, at den roterer frit.
- Feed the welding wire through the guide tube and into the drive roller mechanism.
- Luk drivrullens spændingsarm, og juster spændingen i forhold til tråddiameteren.
- Connect the MIG torch to the front panel.
- Press and hold the wire feed button (often integrated with the gas save function) to feed the wire through the torch liner until it exits the contact tip.
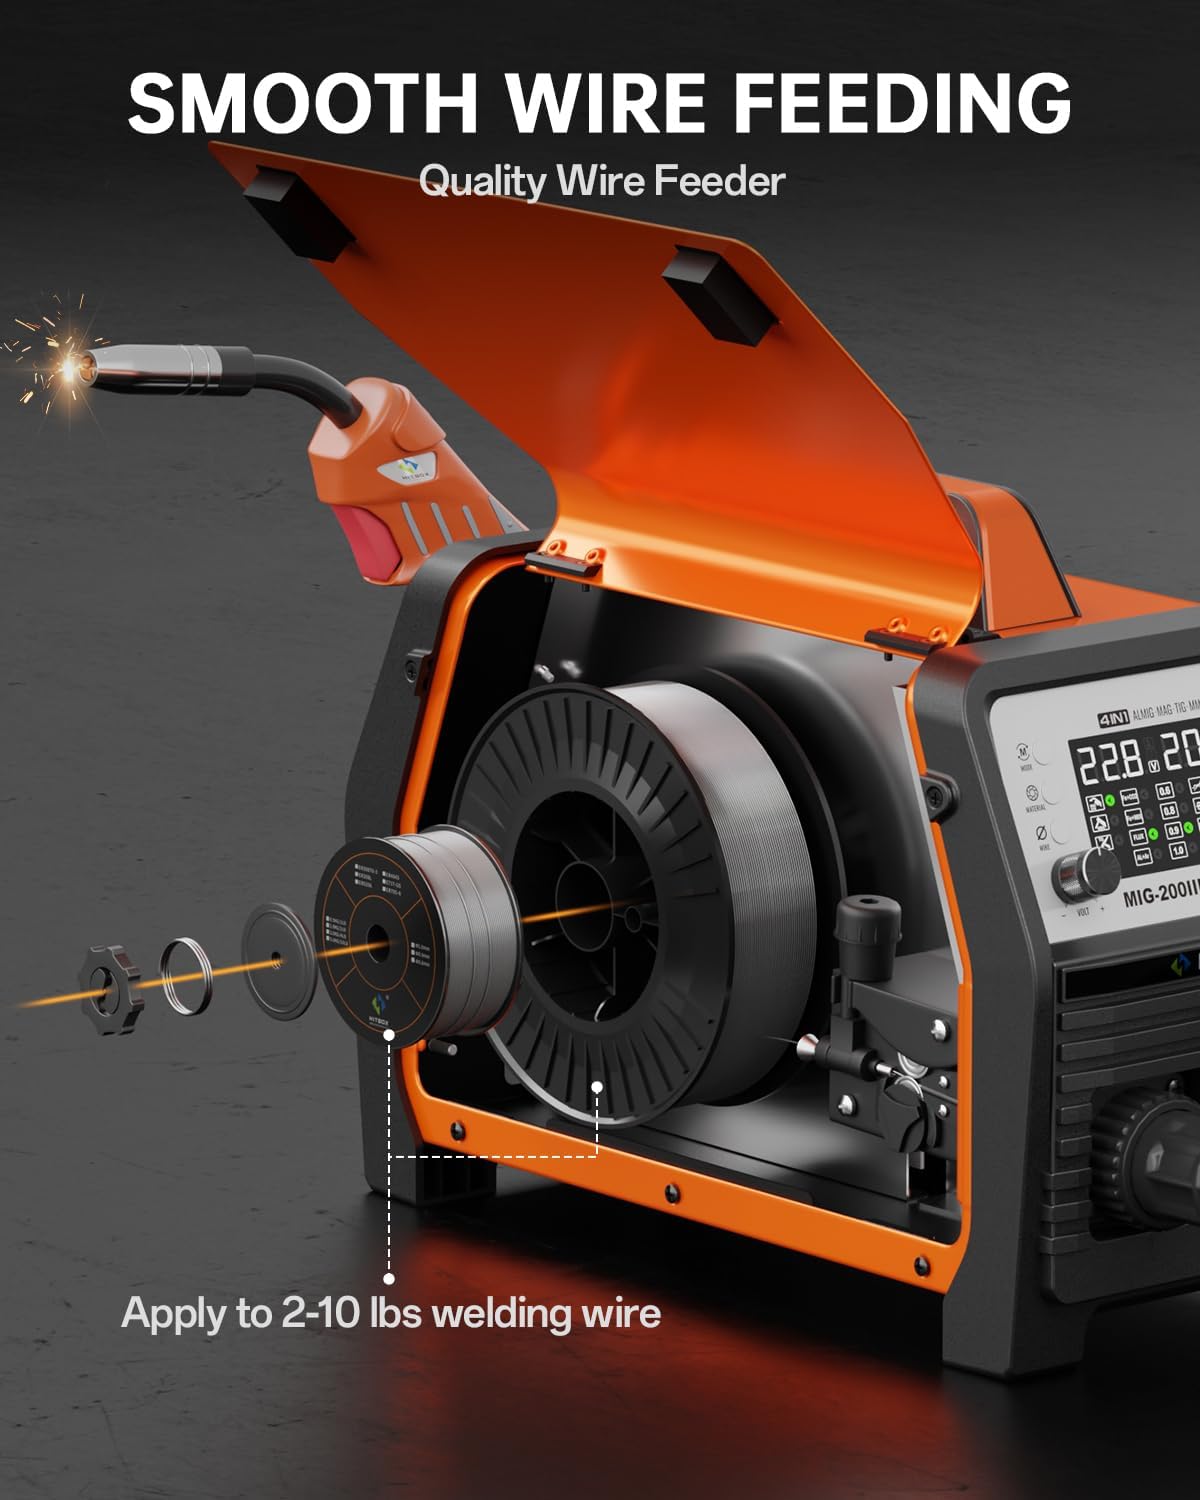
Image 4.1: Wire Spool Installation.
4.3 Gas Connection (for Gas MIG)
- Attach the gas hose from your shielding gas cylinder regulator to the gas inlet connector on the rear of the welder.
- Sørg for, at alle forbindelser er tætte for at forhindre gaslækager.
- Open the gas cylinder valve and adjust the flow rate on the regulator as required for your welding process.
4.4 Brænder og jordforbindelseamp Forbindelse
- Tilslut MIG-brænderen til det relevante stik på frontpanelet.
- Tilslut jorden clamp cable to the designated terminal on the front panel. For Flux Core MIG, the ground clamp is typically connected to the positive (+) terminal, and for Gas MIG, it's typically connected to the negative (-) terminal. Refer to the machine's specific polarity markings.
- Fastgør jordforbindelsen sikkertamp til emnet eller svejsebordet, og sørg for god elektrisk kontakt.
Video 4.1: Demonstrates connecting the MIG torch, feeding welding wire, and adjusting settings on the digital display.
5. Betjeningsvejledning
5.1 Tænd/sluk og valg af tilstand
- Tænd svejsemaskinen ved hjælp af hovedafbryderen.
- Use the control panel to select the desired welding process (MIG, MMA, TIG, etc.).
5.2 Synergic Control (MIG)
The synergic control simplifies MIG welding setup:
- Vælg SYN tilstand på displayet.
- Vælg Materiale Type (e.g., Fe+CO2 for carbon steel with CO2, Fe+MIX for carbon steel with mixed gas, FLUX for flux core, AL+Ar for aluminum with Argon).
- Vælg Tråddiameter (e.g., 0.8mm, 0.9mm, 1.0mm).
- The machine will automatically suggest optimal voltage and wire feed speed. Fine-tune these settings using the voltage og amperage/wire feed speed knobs if necessary.

Image 5.1: Synergic Control Interface.
5.3 Specific Welding Modes
Gas MIG / Flux Core MIG:
- Select the appropriate MIG mode (Gas or Flux).
- Adjust parameters using synergic control or manually.
- Bruge 2T/4T function: 2T (Two-Touch) for short welds, 4T (Four-Touch) for longer welds without holding the trigger.
- Pre-Gas/Post-Gas: Adjust the duration of gas flow before and after welding to protect the weld puddle.
Stick (MMA) Welding:
- Vælg MMA-tilstand.
- Connect the electrode holder to the appropriate terminal and the ground clamp til den anden.
- Tilpasse amperage based on electrode type and material thickness.
- Features include Hot Start, Arc Force, and Anti-stick for improved arc stability and performance.
Løft TIG-svejsning:
- Vælg TIG-tilstand. (Requires separate TIG torch, not included).
- Tilslut TIG-brænderen og jordforbindelsenamp.
- Initiate arc by gently touching the tungsten electrode to the workpiece and lifting slightly.
Punktsvejsning:
- Select Spot Welding mode.
- Adjust spot welding time as needed.
Spool Gun Welding:
- Connect a compatible spool gun. (Spool gun sold separately).
- Ideal for welding aluminum and other soft wires.

Image 5.2: Stick & Lift TIG Welding Parameters.
5.4 Gas Management Functions
- Gas Save: Press and hold the knob to feed wire without gas, useful for initial wire feeding or testing.
- Gaskontrol: Use this function to check the proper supply and flow of shielding gas before welding.

Image 5.3: Gas Save and Gas Check Functions.
6. Vedligeholdelse
Regular maintenance ensures optimal performance and longevity of your welding machine.
- Rensning: Regularly clean the exterior of the machine with a dry, soft cloth. Ensure ventilation openings are free from dust and debris. Use compressed air to clear internal dust periodically, ensuring the machine is unplugged.
- Trådfremfører: Inspect the drive rollers and wire liner for wear or blockages. Clean any metal dust or debris from the wire path. Ensure proper tension on the drive rollers.
- Brænder og kabler: Check the MIG torch nozzle, contact tip, and diffuser for spatter buildup and wear. Replace worn parts as needed. Inspect all cables (MIG torch, ground clamp, electrode holder, power cord) for cuts, cracks, or loose connections.
- Opbevaring: Opbevar svejsemaskinen i et rent, tørt miljø, væk fra for meget støv, fugt og ætsende materialer.
7. Fejlfinding
Dette afsnit omhandler almindelige problemer, du kan støde på. Kontakt kundesupport, hvis du har problemer, der ikke er nævnt her.
- Ingen strøm:
Mulig årsag: Power cord not connected, circuit breaker tripped, machine switch off.
Løsning: Check connections, reset breaker, ensure power switch is ON. - No Arc / Weak Arc:
Mulig årsag: Poor ground connection, incorrect settings, worn contact tip, wrong polarity, wire feed issue.
Løsning: Sørg for jordrensningamp has good contact. Verify welding parameters (voltage, amperage, wire speed). Replace contact tip. Check polarity for the selected welding process. Inspect wire feeder for blockages or incorrect tension. - Wire Feeding Problems (Wire bunched up, inconsistent feed):
Mulig årsag: Incorrect drive roller tension, clogged liner, wrong drive roller size, spatter in nozzle/tip.
Løsning: Adjust drive roller tension. Clean or replace the torch liner. Ensure drive rollers match wire diameter. Clean nozzle and replace contact tip if necessary. - Overophedningsbeskyttelse aktiveret:
Mulig årsag: Overskredet driftscyklus, dårlig ventilation.
Løsning: Allow the machine to cool down. Ensure adequate airflow around the welder. Reduce welding time or current. - Forkert Amperage Display:
Mulig årsag: Calibration variance.
Løsning: While the display provides a guide, experienced users may need to adjust settings based on visual weld quality. This is a known characteristic for some units and does not necessarily indicate a malfunction if welding performance is satisfactory.
8. Specifikationer
| Specifikation | Værdi |
|---|---|
| Mærke | HITBOX |
| Modelnummer | MIG200III |
| Varens vægt | 31.8 pund |
| Pakkedimensioner | 20.2 x 15.2 x 12.8 tommer |
| Strømkilde | AC (110V/220V Dual Voltage) |
| Inkluderede komponenter | MIG Welder (MIG200III) |
| Batterier påkrævet? | Ingen |
9. Garanti og support
For warranty information, technical support, or service inquiries, please contact HITBOX customer service directly. Refer to the product packaging or the official HITBOX webhjemmeside for de seneste kontaktoplysninger.
Please have your model number (MIG200III) and purchase date available when contacting support.