
1. Produktet er slutview
The HUANANZHI X99-AD4 V2.0 is an ATX motherboard designed for high-performance computing, supporting LGA2011-3 processors and DDR4 memory. This manual provides essential information for the installation, operation, and maintenance of your motherboard, ensuring optimal performance and longevity.

Image 1.1: The HUANANZHI X99-AD4 V2.0 motherboard shown with its retail packaging. This image provides a general view of the product and its box.
2. Nøglefunktioner
The X99-AD4 V2.0 motherboard incorporates several features designed for enhanced performance and connectivity:
- Uovertruffen præstation: Designed for LGA2011-3 processors with DDR4 memory slots accommodating up to 128GB (2400/2133/1866 MHz) for robust processing power.
- Avancerede tilslutningsmuligheder: Features 4 USB 3.0 and 6 USB 2.0 ports on the back panel, 6 SATA 3.0 (6Gbps) and 2 SSATA 3.0 interfaces, and 2 PCI-E x16 slots.
- Highly Flexible Memory Support: Includes 4 DDR4 slots supporting both ECC and non-ECC memory in a four-channel architecture for maximum data bandwidth.
- Enhanced Expansion Features: Equipped with dual M.2 slots (one NVME PCIe x4 32Gbps and one NGFF SATA 3.0 6Gbps) for swift data storage. Features a 10-layer PCB and 6-phase power supply.
- Integrated Cooling and Audio: Onboard silent cooling fans and power/reset buttons. 5.1 channel audio with ALC662 chip and gigabit LAN for stable network connections.

Billede 2.1: Top-down view of the HUANANZHI X99-AD4 V2.0 motherboard, highlighting the CPU socket, DDR4 memory slots, PCI-E slots, and M.2 interfaces.
3. Opsætningsvejledning
Før installationen påbegyndes, skal du sørge for, at dit system er slukket og frakoblet strømkilden. Hold bundkortet i kanterne for at undgå statisk elektricitet.
3.1. CPU-installation
- Find LGA2011-3-soklen på bundkortet.
- Åbn CPU-fastholdelsesmekanismen ved at trykke ned og ud på håndtaget/håndtagene.
- Carefully align the CPU with the socket, ensuring the gold triangle on the CPU matches the indicator on the socket. Do not force the CPU into place.
- Sænk forsigtigt CPU'en ned i soklen.
- Close the retention mechanism by pushing the lever(s) back into their locked position.
- Påfør et tyndt, jævnt lag termisk pasta på CPU'ens integrerede varmefordeler (IHS).
- Installer CPU-køleren i henhold til producentens anvisninger.
3.2. RAM-installation
- Find de fire DDR4-hukommelsespladser.
- Åbn klipsene i begge ender af hukommelsespladsen.
- Juster hukommelsesmodulet med stikket, og sørg for, at hakket på modulet passer til nøglen i stikket.
- Tryk godt ned i begge ender af hukommelsesmodulet, indtil klipsene klikker på plads.
3.3. Installation af M.2 SSD
- Identify the M.2 slots (one NVME PCIe x4, one NGFF SATA 3.0).
- Remove the M.2 standoff screw from the motherboard.
- Indsæt M.2 SSD'en i slotten i en 30-graders vinkel.
- Tryk forsigtigt SSD'en ned, og fastgør den med afstandsskruen.
3.4. Tilslutning af SATA-enhed
- Tilslut den ene ende af et SATA-datakabel til en SATA 3.0-port på bundkortet.
- Connect the other end of the SATA data cable to your storage device (HDD/SSD).
- Tilslut et SATA-strømkabel fra din strømforsyning til lagerenheden.
3.5. Installation af PCI-E-kort
- Locate the desired PCI-E x16 or PCI-E x1 slot.
- Fjern det tilsvarende dæksel til udvidelsesslotten fra pc'ens kabinet.
- Align the PCI-E card with the slot and press down firmly until it is seated correctly.
- Secure the card to the case with a screw or retention clip.
3.6. Tilslutning af strømforsyning
- Tilslut 24-bens ATX-strømstikket fra din strømforsyning til hovedstrømstikket på bundkortet.
- Connect the 8-pin (or 4+4-pin) CPU power connector to the CPU power socket near the CPU.
3.7. Tilslutninger til frontpanel
Connect the front panel cables (Power LED, HDD LED, Power Switch, Reset Switch, USB, Audio) from your PC case to the corresponding headers on the motherboard. Refer to the motherboard diagram for exact pin assignments.
3.8. I/O-panelforbindelser
Connect your peripherals (keyboard, mouse, monitor, network cable, audio devices) to the appropriate ports on the motherboard's rear I/O panel.
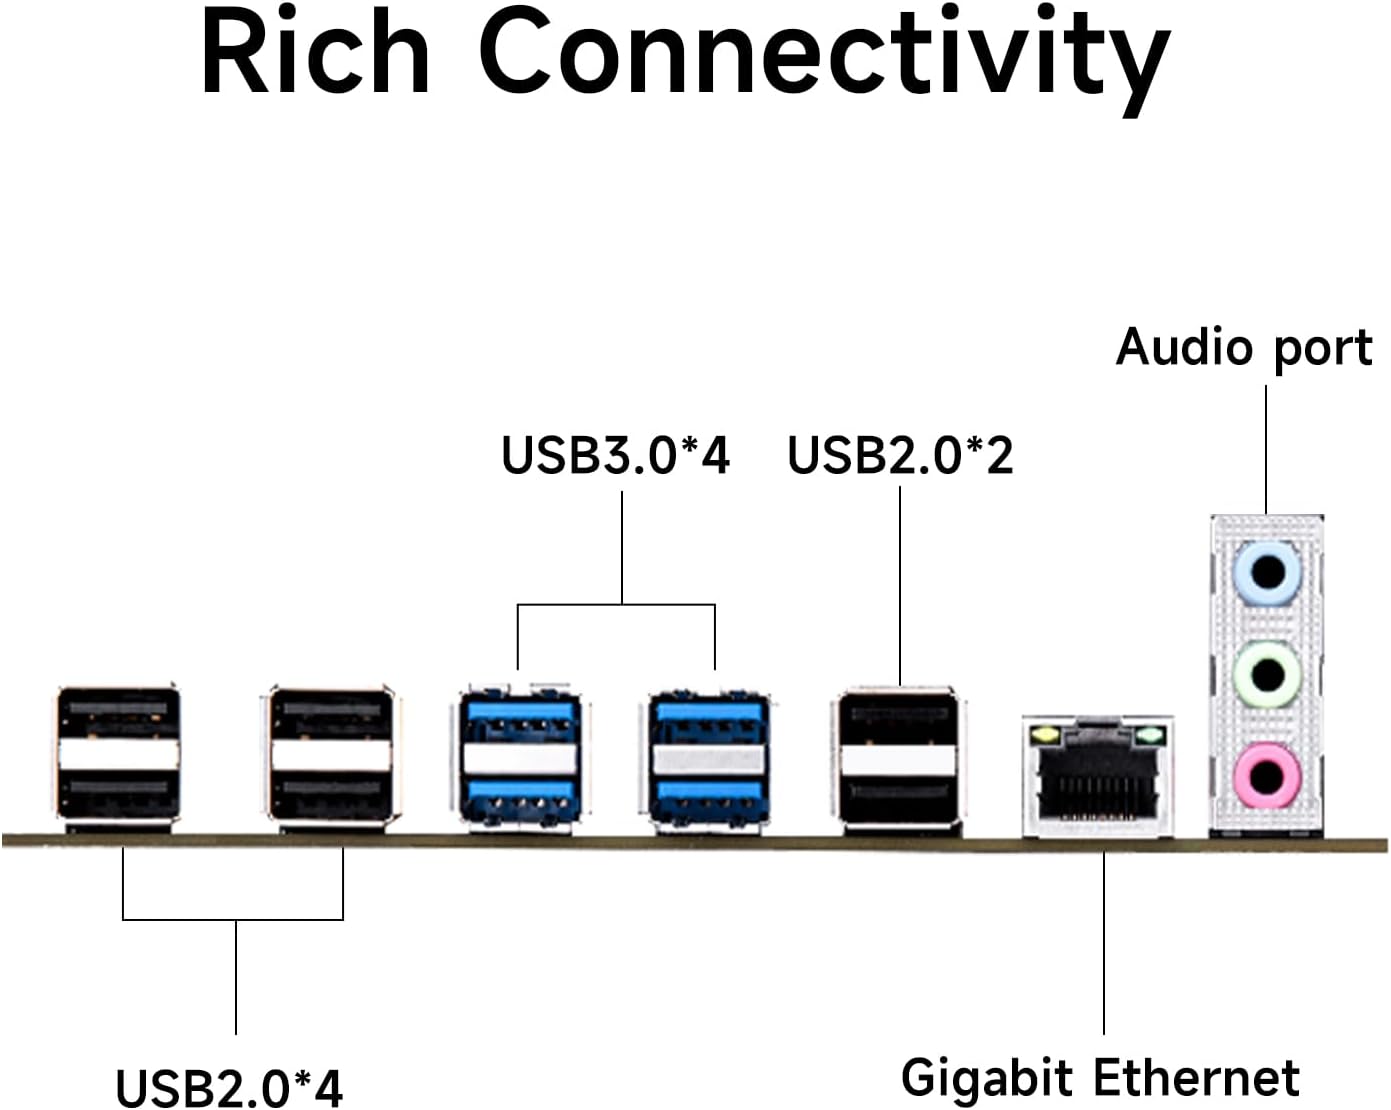
Billede 3.1: En detaljeret view of the rear I/O panel, illustrating the various connectivity options including USB 3.0, USB 2.0, Gigabit Ethernet, and 5.1 channel audio ports.
4. Betjeningsvejledning
4.1. Første opstart
After completing all hardware installations, connect your monitor, keyboard, and mouse. Power on your system. The system should display the BIOS/UEFI splash screen. If not, refer to the Troubleshooting section.
4.2. BIOS/UEFI-konfiguration
For at åbne BIOS/UEFI-opsætningen skal du trykke på DEL or F2 key during the boot process. Within the BIOS/UEFI, you can configure various system settings, including:
- Boot order for storage devices.
- Indstillinger for dato og klokkeslæt.
- CPU- og hukommelsesindstillinger (f.eks. XMP profiles til RAM).
- Perifere konfigurationer.
Gem ændringerne, før du afslutter BIOS/UEFI.
4.3. Driver installation
After installing your operating system, it is crucial to install the necessary drivers for the motherboard's components. These typically include:
- Chipset-drivere.
- LAN (Ethernet) drivere.
- Lyddrivere.
- USB drivers (if not automatically detected by OS).
Drivere kan normalt findes på producentens website or an included driver CD/USB drive.
4.4. Installation af operativsystem
Insert your operating system installation media (USB drive or DVD) and set it as the primary boot device in the BIOS/UEFI. Follow the on-screen instructions to install your preferred operating system.
5. Vedligeholdelse
Regelmæssig vedligeholdelse er med til at sikre stabiliteten og levetiden for dit bundkort og system.
5.1. Rensning
- Rengør bundkortet og komponenterne for støv med jævne mellemrum med trykluft.
- Ensure all fans (CPU cooler, case fans) are free of dust to maintain optimal cooling.
- Sluk altid for systemet og tag stikket ud af stikkontakten inden rengøring.
5.2. BIOS/UEFI-opdateringer
Check the HUANANZHI website for the latest BIOS/UEFI updates. Updating the BIOS/UEFI can improve system stability, add support for new hardware, or fix bugs. Follow the manufacturer's instructions carefully when performing a BIOS/UEFI update to avoid system damage.
5.3. Forbindelsestjek
Occasionally, verify that all cables (power, data, front panel) are securely connected to the motherboard and peripherals.
6. Fejlfinding
Dette afsnit omhandler almindelige problemer, du kan støde på.
6.1. Ingen strøm
- Ensure the power supply is connected to the motherboard (24-pin ATX and 8-pin CPU power).
- Kontroller, at strømforsyningsafbryderen er i 'ON'-positionen.
- Kontroller, at kablet til strømafbryderen på frontpanelet er korrekt tilsluttet bundkortets header.
- Test strømforsyningen med et andet system eller en strømforsyningstester.
6.2. Ingen visning
- Ensure the monitor is connected to the graphics card (not the motherboard, as this board does not have integrated graphics).
- Verify the graphics card is properly seated in its PCI-E slot and has adequate power connected.
- Genindsæt RAM-moduler. Forkert isat RAM er en almindelig årsag til manglende visning.
- Clear the CMOS (Complementary Metal-Oxide-Semiconductor) by removing the CMOS battery for 5-10 seconds or using the clear CMOS jumper.
- Test med en enkelt RAM-stick i forskellige slots.
6.3. Systemustabilitet / Nedbrud
- Tjek CPU- og GPU-temperaturerne. Overophedning kan forårsage ustabilitet.
- Sørg for, at alle drivere er opdaterede.
- Kør hukommelsesdiagnosticeringsværktøjer for at kontrollere for defekt RAM.
- Bekræft strømforsyningens watttage er tilstrækkeligt for alle komponenter.
6.4. Boot Issues
- Check the boot order in BIOS/UEFI to ensure the correct drive is selected.
- Verify that the operating system is installed correctly on the boot drive.
- Ensure SATA or M.2 cables are securely connected.
7. Specifikationer
The following table details the technical specifications of the HUANANZHI X99-AD4 V2.0 Motherboard:

Image 7.1: The HUANANZHI X99-AD4 V2.0 motherboard displayed alongside a table summarizing its key specifications.
| Feature | Detalje |
|---|---|
| Modelnavn | X99-AD4 V2.0 |
| Mærke | HUANANZHI |
| CPU socket | LGA 2011-3 |
| Kompatible processorer | LGA2011-3 CPUs |
| RAM-hukommelsesteknologi | DDR4 |
| Hukommelsessokler | 4 x DDR4 (Quad Channel) |
| Maksimal hukommelseskapacitet | 128 GB |
| Hukommelses urhastighed | 2400 MHz (understøtter 2400/2133/1866 MHz) |
| Chipsættype | C612 |
| Lagergrænseflade | 6 x SATA 3.0 (6Gbps), 2 x SSATA 3.0 |
| M.2 Slots | 1 x NVME PCIe x4 32Gbps, 1 x NGFF SATA 3.0 6Gbps |
| Udvidelsesslots | 2 x PCI-E x16, 1 x PCI-E x1 |
| USB-porte (bagside) | 4 x USB 3.0, 6 x USB 2.0 |
| Lyd | 5.1 Channel (ALC662) |
| LAN | Gigabit Ethernet |
| Formfaktor | ATX |
| Produktdimensioner | 14.57 x 11.42 x 4.33 tommer |
| Varens vægt | 3.75 pund |
8. Garanti og support
For warranty information and technical support, please refer to the documentation provided with your purchase or visit the official HUANANZHI webGarantibetingelserne kan variere afhængigt af region og forhandler.
For further assistance, you may contact your point of purchase or the manufacturer's customer service channels.