1. Introduktion
This manual provides essential information for the safe operation, maintenance, and troubleshooting of your Generic TIDLI206681 Compact Brushless Cordless Impact Drill. Please read this manual thoroughly before using the tool to ensure proper function and to prevent injury.
The Generic TIDLI206681 is a versatile 20V cordless impact drill designed for various drilling and fastening applications. It features a brushless motor for enhanced efficiency and durability, a high maximum torque, and multiple speed and torque settings for precise control.
2. Produktet er slutview
Familiarize yourself with the components of your impact drill before operation.
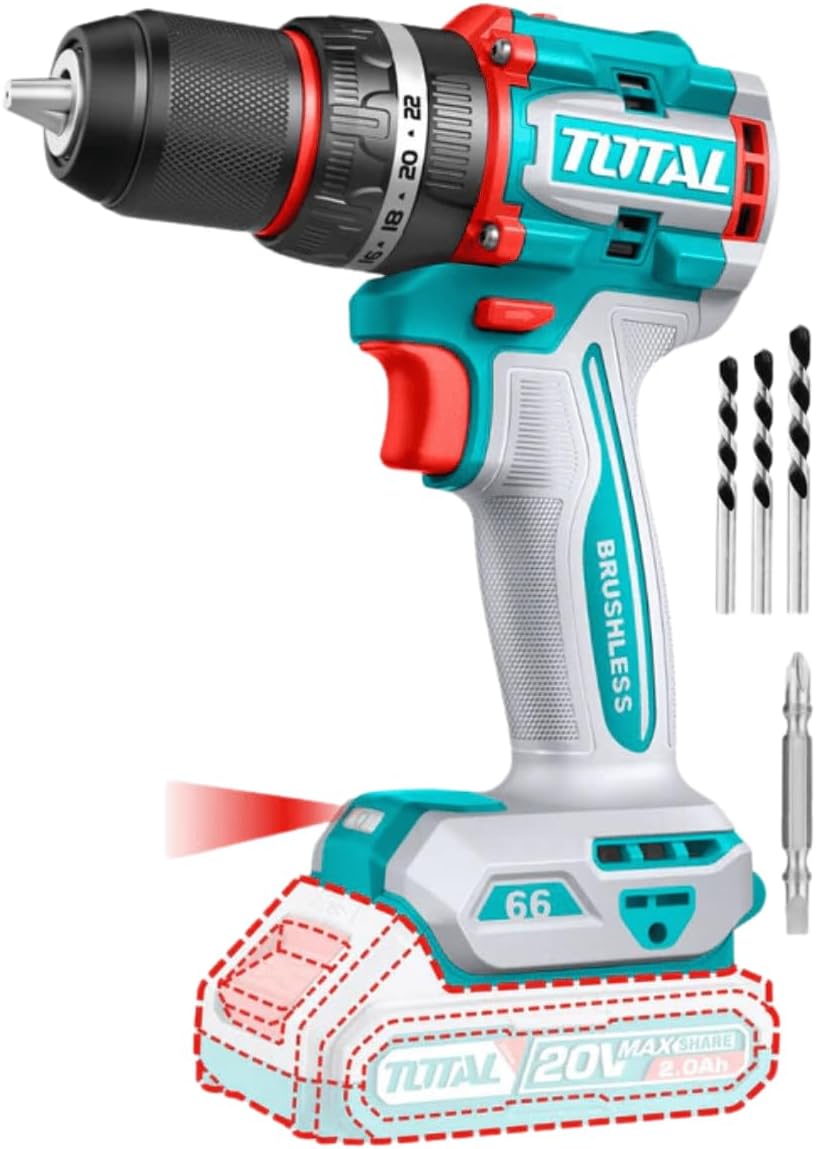
Figur 1: Generic TIDLI206681 Compact Brushless Cordless Impact Drill. This image displays the drill unit along with a Cr-V 65mm bit and three masonry drill bits. The battery and charger are not shown as they are sold separately.

Figur 2: Key features of the Generic TIDLI206681 Impact Drill. This image highlights the P20S platform, impact function (66Nm), compact brushless design, spindle lock, and indicates that the battery and charger are sold separately.
Nøglefunktioner:
- Børsteløs motor: Provides increased efficiency, longer runtime, and extended tool life.
- 20V strøm: Operates on a 20-volt battery system (battery and charger sold separately).
- Højt drejningsmoment: Maximum torque of 66Nm for demanding applications.
- Variabel hastighed: Two mechanical speed gears (0-500rpm and 0-2000rpm) for optimal control.
- Impact Function: Max impact rate of 30000bpm for efficient drilling in masonry.
- Metal Chuck: Durable 13mm chuck capacity for various drill bits.
- Momentindstillinger: 22+1+1 settings for precise torque control and impact drilling.
- Spindellås: For easy bit changes.
- Integreret LED-arbejdslys: Oplyser arbejdsområdet for forbedret udsyn.
3. Specifikationer
| Feature | Specifikation |
|---|---|
| Modelnummer | TIDLI206681 / TRHLI202081 |
| Voltage | 20V |
| Motortype | Børsteløs |
| Hastighed uden belastning | Gear 1: 0-500rpm, Gear 2: 0-2000rpm |
| Maks. påvirkningsrate | 30000bpm |
| Max drejningsmoment | 66 Nm |
| Chuck kapacitet | 13mm (Metal Chuck) |
| Momentindstillinger | 22+1+1 |
| Mechanical Gears | 2-trins |
| Vægt | 5 kg (tool only, approximate) |
| Dimensioner (L x B x H) | 22 x 7 x 15 cm (omtrentligt) |
| Inkluderet tilbehør | 1 Pcs Cr-V 65mm bit, 3 Pcs masonry drill bits |
| Strømkilde | Battery Powered (Battery and Charger sold separately) |
| Materiale | Metal |
4. Opsætning
4.1 Installation og fjernelse af batteri
This tool requires a 20V Lithium-Ion battery and a compatible charger, both sold separately.
- Sådan installeres: Align the battery pack with the battery port on the base of the drill handle. Slide the battery into the port until it clicks securely into place. Ensure it is fully seated.
- For at fjerne: Press the battery release button (usually located on the battery pack itself) and slide the battery pack out of the tool.
4.2 Opladning af batteriet
Refer to the instruction manual provided with your 20V Lithium-Ion battery charger for proper charging procedures. Always use a compatible charger for your battery pack.
4.3 Montering og afmontering af bor/tilbehør
- Sådan installeres: Rotate the chuck counter-clockwise to open the chuck jaws. Insert the drill bit or accessory fully into the chuck. Rotate the chuck clockwise to tighten the jaws securely around the bit. For best grip, ensure the bit is centered.
- For at fjerne: Drej spændepatronen mod uret for at løsne kæberne og fjerne boret.
5. Betjening
5.1 Tænd/sluk
The drill is activated by pressing the trigger switch. The speed is variable depending on the pressure applied to the trigger. Release the trigger to turn the drill off.
5.2 Fremad-/bagudrotation
A forward/reverse selector switch is located above the trigger. Push the switch to the left for forward rotation (drilling/fastening) and to the right for reverse rotation (removing screws/bits). Ensure the switch is in the center position to lock the trigger and prevent accidental startup.
5.3 hastighedsvalg
The drill features a 2-speed mechanical gear selector switch, typically located on top of the drill housing.
- Gear 1 (lav hastighed, højt drejningsmoment): For heavy-duty drilling, driving large fasteners, or when maximum torque is required (0-500rpm).
- Gear 2 (High Speed, Low Torque): For fast drilling in wood, plastic, or light metal, and for smaller fasteners (0-2000rpm).
Always select the appropriate speed before starting the drill. Do not change gears while the drill is running.
5.4 Valg af moment og tilstand
The torque adjustment collar is located behind the chuck. Rotate the collar to select the desired torque setting or operating mode.
- Momentindstillinger (1-22): For driving screws. Select a lower setting for smaller screws or softer materials, and a higher setting for larger screws or harder materials.
- Drill Mode (Drill Bit Icon): For general drilling without impact.
- Slagboremaskine-tilstand (hammerikon): For drilling into masonry or concrete, utilizing the impact function (30000bpm).
5.5 LED arbejdslys
The integrated LED work light automatically illuminates when the trigger is pressed, providing visibility in dimly lit work areas.
6. Vedligeholdelse
6.1 Rengøring
- Frakobl altid batteripakken, før du udfører rengøring eller vedligeholdelse.
- Brug en blød, damp klud til at rengøre værktøjets yderside. Brug ikke skrappe kemikalier eller slibende rengøringsmidler.
- Hold ventilationsåbningerne fri for støv og snavs for at forhindre overophedning. Brug trykluft om nødvendigt.
6.2 Opbevaring
- Store the drill and battery pack in a cool, dry place, away from direct sunlight and moisture.
- Ensure the battery is partially charged (around 50%) before long-term storage.
- Opbevares utilgængeligt for børn.
7. Fejlfinding
| Problem | Mulig årsag | Løsning |
|---|---|---|
| Boremaskinen starter ikke | Batteriet er ikke installeret korrekt Batteri afladet Frem/tilbage-kontakt i midterste (låst) position | Geninstaller batteriet sikkert Oplad batteriet Flyt kontakten til fremad- eller bakposition |
| Reduceret effekt eller hastighed | Lavt batteri Overbelaste Forkert hastighedsindstilling | Oplad batteriet Reducer trykket eller brug et skarpere bor Switch to a higher speed gear if appropriate |
| Chuck holder ikke boret | Spændepatronen er ikke tilstrækkeligt strammet Bitskaftet er snavset eller beskadiget | Spænd borepatronen godt fast Rengør eller udskift bit |
| Overdreven vibration | Bøjet eller beskadiget bor Improperly installed bit | Udskift bit Re-install bit correctly |
8. Sikkerhedsoplysninger
Overhold altid grundlæggende sikkerhedsforanstaltninger, når du bruger elværktøj, for at reducere risikoen for brand, elektrisk stød og personskade.
- Sikkerhed på arbejdsområdet: Hold dit arbejdsområde rent og godt oplyst. Rodede eller mørke områder inviterer til ulykker.
- Elektrisk sikkerhed: Undgå kropskontakt med jordforbundne overflader. Udsæt ikke elværktøj for regn eller våde forhold.
- Personlig sikkerhed: Always wear eye protection. Use hearing protection when operating impact tools. Dress properly; avoid loose clothing or jewelry. Secure long hair.
- Brug og pleje af værktøj: Tving ikke elværktøjet. Brug det korrekte elværktøj til din opgave. Frakobl batteriet, før du foretager justeringer, skifter tilbehør eller opbevarer elværktøj.
- Brug og vedligeholdelse af batteriværktøj: Genoplad kun med den oplader, der er angivet af producenten. Brug kun elværktøj med specifikt beregnede batteripakker.
9. Garanti og support
For warranty information or technical support, please refer to the documentation provided at the point of purchase or contact your retailer. Keep your purchase receipt as proof of purchase.


