
1. Introduktion
The Xvive XV1-R is a compact and versatile portable stereo audio recorder designed for musicians, podcasters, filmmakers, and anyone requiring high-quality audio capture. It features 32-bit float recording, X/Y stereo microphones, and supports both WAV and AAC formats. This manual provides comprehensive instructions for setting up, operating, maintaining, and troubleshooting your XV1-R recorder.

This image displays the Xvive XV1-R portable audio recorder from the front, highlighting its ergonomic design, integrated X/Y stereo microphones at the top, and the central control panel with a monochrome display and various function buttons.
2. Produktet er slutview
Nøglefunktioner
- 32-bit Float Recording: Captures audio with an extended dynamic range, preventing clipping and preserving detail without manual gain adjustment.
- High-Quality X/Y Microphones: Integrated directional microphones capable of capturing clear audio up to 130 dB SPL without distortion.
- Versatile Recording Formats: Supports high-fidelity WAV (32-bit float or 24-bit PCM) and efficient AAC formats.
- USB Microphone Functionality: Connects to PC, Mac, iOS, and Android devices via USB-C for use as an external microphone.
- Bærbart design: Compact and lightweight, suitable for various recording scenarios with features like auto-record, pre-record, and noise reduction.
Understanding 32-bit Float Recording
The 32-bit float recording capability ensures that your audio is captured with a vast dynamic range, making it virtually impossible to clip or distort the signal. This eliminates the need for precise gain staging during recording, simplifying the process and ensuring high-quality results.

This graphic explains 32-bit float lossless recording. It shows how 32-bit float can scale up low gain audio and scale down high gain audio without clipping or noise, unlike 16/24-bit float which can lose detail or distort.
X/Y Microphone Configuration
The integrated X/Y stereo microphones are designed to capture a wide and accurate stereo image, ideal for recording live performances, ambient sounds, or interviews. Their high SPL handling ensures clean recordings even in loud environments.

An image showing the Xvive XV1-R recorder placed on a stand in front of a person playing an acoustic guitar, illustrating its use for capturing high-quality audio with its X/Y directional microphones in a musical setting.
WAV vs. AAC Formats
The XV1-R offers flexibility with two primary recording formats:
| Feature | WAV-format | AAC Format |
|---|---|---|
| Lydkvalitet | Lossless, Highest Fidelity | Compressed, Clear Sound |
| File Størrelse | Larger (More storage required) | Smaller (Optimized for storage) |
| Sample Takststøtte | Up to 96 kHz, 48 kHz, 44.1 kHz | 48 kHz, 24 kHz |
| Brug Cases | Music production, professional recording | Meetings, voice memos, everyday use |

A comparison table outlining the differences between WAV and AAC recording formats available on the Xvive XV1-R.
3. Kom godt i gang (opsætning)
3.1 Pakkens indhold
Ensure your package contains the Xvive XV1-R recorder and 2 AA batteries.
3.2 Batteriinstallation
- Locate the battery compartment on the back of the XV1-R.
- Åbn dækslet til rummet.
- Isæt to AA-batterier, og sørg for at polariteten (+/-) vender korrekt.
- Luk batterirummets dæksel forsvarligt.
3.3 Indsættelse af et MicroSD-kort
The XV1-R records directly to a MicroSD card. Supported card types include MicroSDHC (up to 32GB) and MicroSDXC (up to 128GB).
- Find MicroSD-kortstikket på siden af enheden.
- Indsæt forsigtigt MicroSD-kortet med kontakterne nedad, indtil det klikker på plads.
- For at fjerne det skal du skubbe kortet let ind, indtil det springer ud.
3.4 Tænd/sluk
- To power on, press and hold the Power button (often integrated with the Play button) until the display illuminates.
- For at slukke skal du trykke på og holde tænd/sluk-knappen nede, indtil enheden lukker ned.
3.5 Betjeningselementer og porte overview
Familiarize yourself with the layout of the XV1-R's controls and ports:
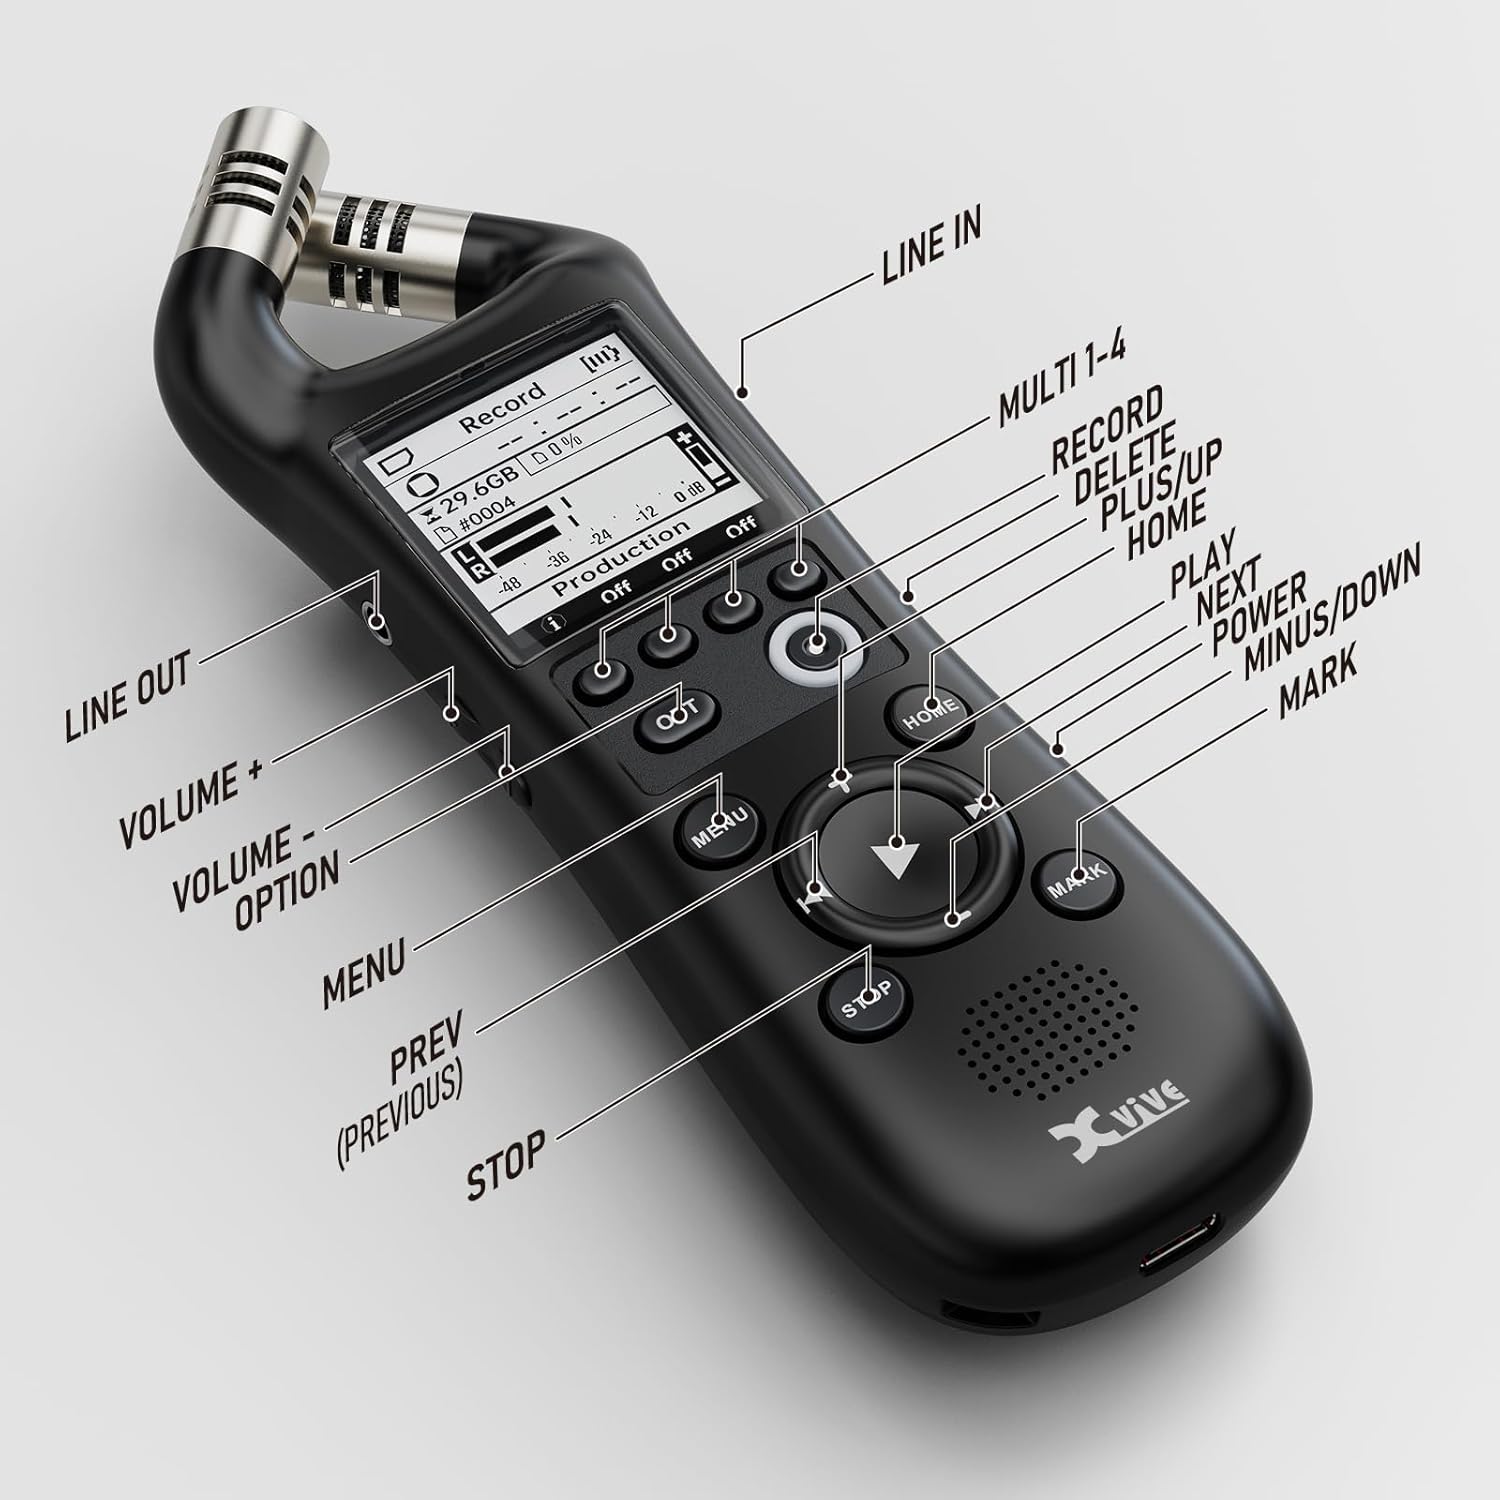
A close-up image of the Xvive XV1-R recorder with labels pointing to each button and port, including Line In, Line Out, Volume controls, Menu, Home, Play, Stop, Mark, and the Multi 1-4 buttons for record, delete, plus, and up functions.
- X/Y Microphones: Top-mounted stereo microphones.
- Skærm: Shows recording status, menu options, and settings.
- Multi 1-4 Buttons: Context-sensitive buttons for Record, Delete, Plus, and Up functions.
- OPT-knap: Option button for specific settings.
- MENU knap: Åbner hovedmenuen.
- HJEM knap: Returns to the main recording screen.
- Navigation Pad (Up/Down/Left/Right/Play): Used for menu navigation and playback control.
- STOP knap: Stopper optagelse eller afspilning.
- MARK knap: Adds markers during recording or playback.
- Linjeindgang (3.5 mm): Ekstern lydindgang.
- Line Out (3.5 mm): Audio output for headphones or external speakers.
- USB-C-port: For data transfer and USB microphone functionality.
4. Betjeningsvejledning
4.1 Grundlæggende optagelse
- Ensure a MicroSD card is inserted and batteries are charged.
- Tænd for enheden.
- Fra startskærmen skal du trykke på Optage button (often labeled as one of the Multi buttons or a dedicated record button). The recording indicator will illuminate.
- Tryk på for at stoppe optagelsen STOP knap.
- Recordings are saved automatically to the MicroSD card.
4.2 Afspilning
- From the home screen, use the navigation pad to select a recorded file.
- Tryk på Spil button (center of the navigation pad) to begin playback.
- Use the navigation pad to fast forward, rewind, or skip tracks.
- Adjust playback volume using the dedicated Volume buttons.
- Tryk på STOP knappen for at afslutte afspilningen.
4.3 USB Microphone Functionality
The XV1-R can function as a high-quality USB microphone for your computer or mobile device.
- Connect the XV1-R to your computer or compatible mobile device using a USB-C cable.
- The device will prompt you to select a mode (e.g., USB Audio, Card Reader). Select USB-lyd.
- On your computer/device, select the XV1-R as the audio input device in your recording software or system settings.
- The XV1-R will now function as an external microphone with a fixed samphastighed på 48 kHz.

The Xvive XV1-R recorder is shown connected to a laptop via a USB-C cable, demonstrating its functionality as a high-quality USB microphone for computer-based audio tasks like streaming or online meetings.
4.4 Avancerede optagelsesfunktioner
- Auto-Record: Configures the recorder to start recording automatically when an audio signal above a set threshold is detected.
- Foroptagelse: Captures a few seconds of audio before the record button is pressed, ensuring you don't miss the beginning of an event.
- Støjreduktion: Applies digital processing to reduce unwanted background noise during recording or playback.
These features can be accessed and configured through the device's MENU settings. Refer to the on-screen menu for detailed options and adjustments.
5. Vedligeholdelse
5.1 Rengøring
- Use a soft, dry cloth to clean the exterior of the recorder.
- Brug ikke flydende rengøringsmidler eller opløsningsmidler, da de kan beskadige overfladen eller de indvendige komponenter.
- Keep the microphone grilles free of dust and debris.
5.2 Opbevaring
- Når de ikke er i brug i længere perioder, skal batterierne fjernes for at forhindre lækage.
- Opbevar optageren et køligt, tørt sted væk fra direkte sollys og ekstreme temperaturer.
- Protect the device from impacts and excessive vibration.
6. Fejlfinding
Fælles problemer og løsninger
- Enheden tændes ikke:
- Kontroller, om batterierne er isat korrekt med den korrekte polaritet.
- Udskift med friske AA-batterier.
- Sørg for, at batterirummet er forsvarligt lukket.
- If using USB power, ensure the cable and power source are functional.
- No audio during recording:
- Verify that the microphones are not obstructed.
- Check recording settings in the menu to ensure input levels are appropriate.
- Ensure a MicroSD card is properly inserted and has sufficient free space.
- Dårlig lydkvalitet:
- Ensure the recording environment is suitable (minimize background noise).
- Check microphone placement relative to the sound source.
- Consider enabling noise reduction if applicable.
- Verify the selected recording format and sample rate meet your quality requirements.
- Device not recognized as USB microphone:
- Ensure the XV1-R is set to 'USB Audio' mode after connecting to your computer/device.
- Check your computer's sound settings to select the XV1-R as the input device.
- Prøv et andet USB-C-kabel eller en anden port.
7. Specifikationer
| Specifikation | Detalje |
|---|---|
| Modelnummer | XVR1 |
| Produktdimensioner | 5.9 x 2 x 2 tommer |
| Varens vægt | 6.4 ounce |
| Optagelsesformat | WAV (32-bit float, 24-bit PCM), AAC |
| Sample Sats | Up to 96 kHz (WAV), 48 kHz (AAC, USB Audio) |
| Mikrofoner | High-Quality X/Y Directional |
| Max SPL | 130 dB |
| Lagermedier | MicroSDHC (up to 32GB), MicroSDXC (up to 128GB) |
| Strømkilde | 2 AA batterier (medfølger) |
| Forbindelse | USB-C, 3.5mm Line In, 3.5mm Line Out |
8. Garanti og support
Xvive products are designed for reliability and performance. For warranty information, technical support, or service inquiries, please refer to the official Xvive webwebstedet eller kontakt deres kundesupport direkte. Gem din købskvittering som købsbevis i tilfælde af garantikrav.
For yderligere hjælp, besøg venligst Xvive Store on Amazon.