
1. Introduktion
This manual provides essential information for setting up, operating, and maintaining your Orange Pi 4A Single Board Computer. The Orange Pi 4A is a high-performance single board computer featuring the Allwinner T527 octa-core ARM Cortex-A55 processor, a HiFi4 Audio DSP, and a RISC-V co-processor. It includes a 2TOPS NPU for AI acceleration, 2GB LPDDR4/4X memory, and supports various operating systems including Ubuntu, Debian, and Android 13. Its rich interfaces and powerful processing capabilities make it suitable for a wide range of applications from intelligent industrial control to edge computing.
2. Produktet er slutview og komponenter
The Orange Pi 4A is designed with a compact form factor (89mm*56mm*1.6mm) and weighs approximately 52g. It offers a comprehensive set of interfaces for versatile connectivity and expansion.
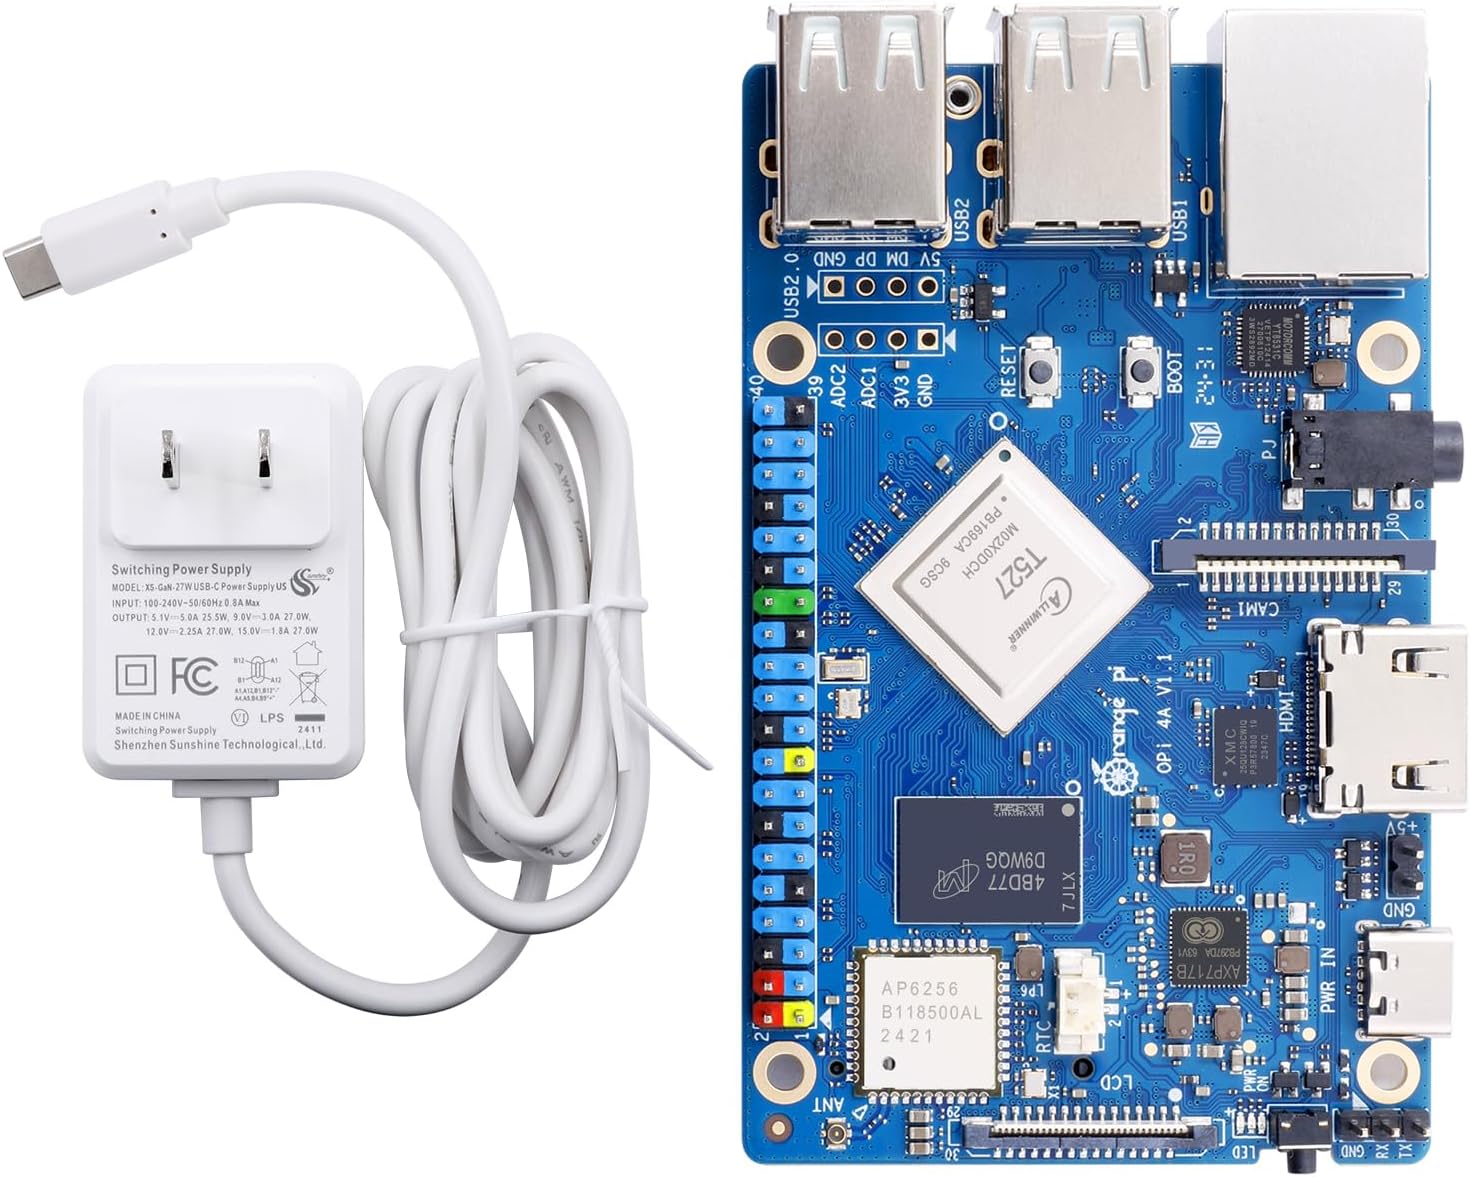

Nøglekomponenter:
- Processor: Allwinner T527, 8-core ARM Cortex-A55 @ 1.8GHz, HIFI4 Audio DSP @ 600MHz, RISC-V @ 200MHz.
- GPU: G57 MC1.
- NPU: 2TOPS for AI acceleration.
- Hukommelse: 2GB LPDDR4/4X.
- Opbevaring: uSD card slot (up to 128GB), M.2 M-KEY socket (PCIe2.0 NVMe SSD), optional eMMC module (16GB/32GB/64GB/128GB), SPI flash (128Mb default, 256Mb optional).
- Forbindelse: Wi-Fi 5.0 + BT 5.0 (BLE), 10/100/1000Mbps Ethernet.
- Vise: 1x HDMI TX 2.0 (up to 4K@60fps), 1x 4-lane MIPI-DSI, 1x eDP1.3.
- Kamera: 1x 2-lane MIPI-CSI, 1x 4-lane MIPI-CSI.
- USB: 1x USB Type-A 2.0, 3x USB Type-A 2.0 HOST, 1x USB 2.0 HOST (reserved for expansion).
- Lyd: 3.5mm headphone jack (input/output).
- Udvidelse: 40-pin function expansion interface (GPIO, UART, I2C, SPI, PWM), 4-pin ADC connector.
- Strømforsyning: Type-C 5V 5A DCIN.
- Understøttet OS: Ubuntu, Debian, Android 13.
3. Specifikationer
Detailed technical specifications for the Orange Pi 4A Single Board Computer are provided below:
| Feature | Specifikation |
|---|---|
| Processor | Allwinner T527, 8-core ARM Cortex-A55 @ 1.8GHz |
| GPU | Mali-G57 MC1 |
| NPU | 2 TOPS |
| VÆDDER | 2GB LPDDR4/4X |
| Opbevaringsmuligheder | uSD card slot (up to 128GB), M.2 M-KEY (PCIe2.0 NVMe SSD), Optional eMMC (16GB/32GB/64GB/128GB), SPI flash (128Mb/256Mb) |
| Trådløs forbindelse | Wi-Fi 5.0 (802.11ac) + Bluetooth 5.0 (BLE) |
| Ethernet | 10/100/1000 Mbps Gigabit Ethernet |
| Video output | 1x HDMI TX 2.0 (4K@60fps), 1x 4-lane MIPI-DSI, 1x eDP1.3 |
| Kameragrænseflade | 1x 2-lane MIPI-CSI, 1x 4-lane MIPI-CSI |
| USB-porte | 1x USB Type-A 2.0, 3x USB Type-A 2.0 HOST, 1x USB 2.0 HOST (reserved) |
| Lyd | 3.5mm headphone jack (input/output) |
| Expansion Headers | 40-pin (GPIO, UART, I2C, SPI, PWM), 4-pin ADC |
| Knapper | BOOT, RESET, PWR ON |
| Strømindgang | Type-C 5V 5A DCIN |
| Dimensioner | 89 mm x 56 mm x 1.6 mm |
| Vægt | 52 g |
| Understøttede operativsystemer | Ubuntu, Debian, Android 13 |
4. Opsætningsvejledning
Follow these steps to set up your Orange Pi 4A:
4.1. Tilslutning af strømforsyning
Connect the provided 5V 5A Type-C power adapter to the USB Type-C power interface on the Orange Pi 4A board. Ensure the power source is stable and provides sufficient current for optimal performance.
4.2. Storage Preparation
The Orange Pi 4A supports booting from a uSD card or an optional eMMC module. For initial setup, a uSD card is commonly used.
- Prepare a uSD Card: Obtain a high-quality uSD card (Class 10 or higher recommended) with sufficient capacity (e.g., 16GB or more).
- Download OS Image: Download your preferred operating system image (Ubuntu, Debian, or Android 13) from the official Orange Pi webwebsted.
- Flash OS Image: Use a disk imaging tool (e.g., BalenaEtcher, PhoenixCard for Android images) to write the downloaded OS image to the uSD card. Follow the specific instructions provided by the OS image creator for the flashing process.
- Insert uSD Card: Carefully insert the prepared uSD card into the uSD card slot on the Orange Pi 4A board.
4.3. Perifere forbindelser
Connect necessary peripherals before powering on the device:
- Vise: Connect a monitor or display to the HDMI TX 2.0 port using an HDMI cable.
- Inputenheder: Tilslut et USB-tastatur og en mus til de tilgængelige USB Type-A-porte.
- Netværk (valgfrit): For wired network access, connect an Ethernet cable to the Gigabit Ethernet port. For wireless, ensure the Wi-Fi antenna is properly connected.
- Lyd (valgfrit): Connect speakers or headphones to the 3.5mm audio jack if needed.
5. Betjeningsvejledning
5.1. Første opstart
After connecting all necessary peripherals and the power supply, the Orange Pi 4A should automatically power on and begin the boot process. The red LED will illuminate during booting. The initial boot may take longer as the system configures itself.
5.2. Operating System Usage
Once the operating system has successfully booted, you can interact with it using your connected keyboard and mouse. Refer to the specific documentation for your chosen OS (Ubuntu, Debian, or Android 13) for detailed usage instructions.
5.3. Netværkskonfiguration
- Kabelforbundet Ethernet: If an Ethernet cable is connected, the system should automatically detect and configure the wired network connection.
- Wi-Fi: For Wi-Fi connectivity, navigate to the network settings within your operating system. Select your desired Wi-Fi network, enter the password, and connect.
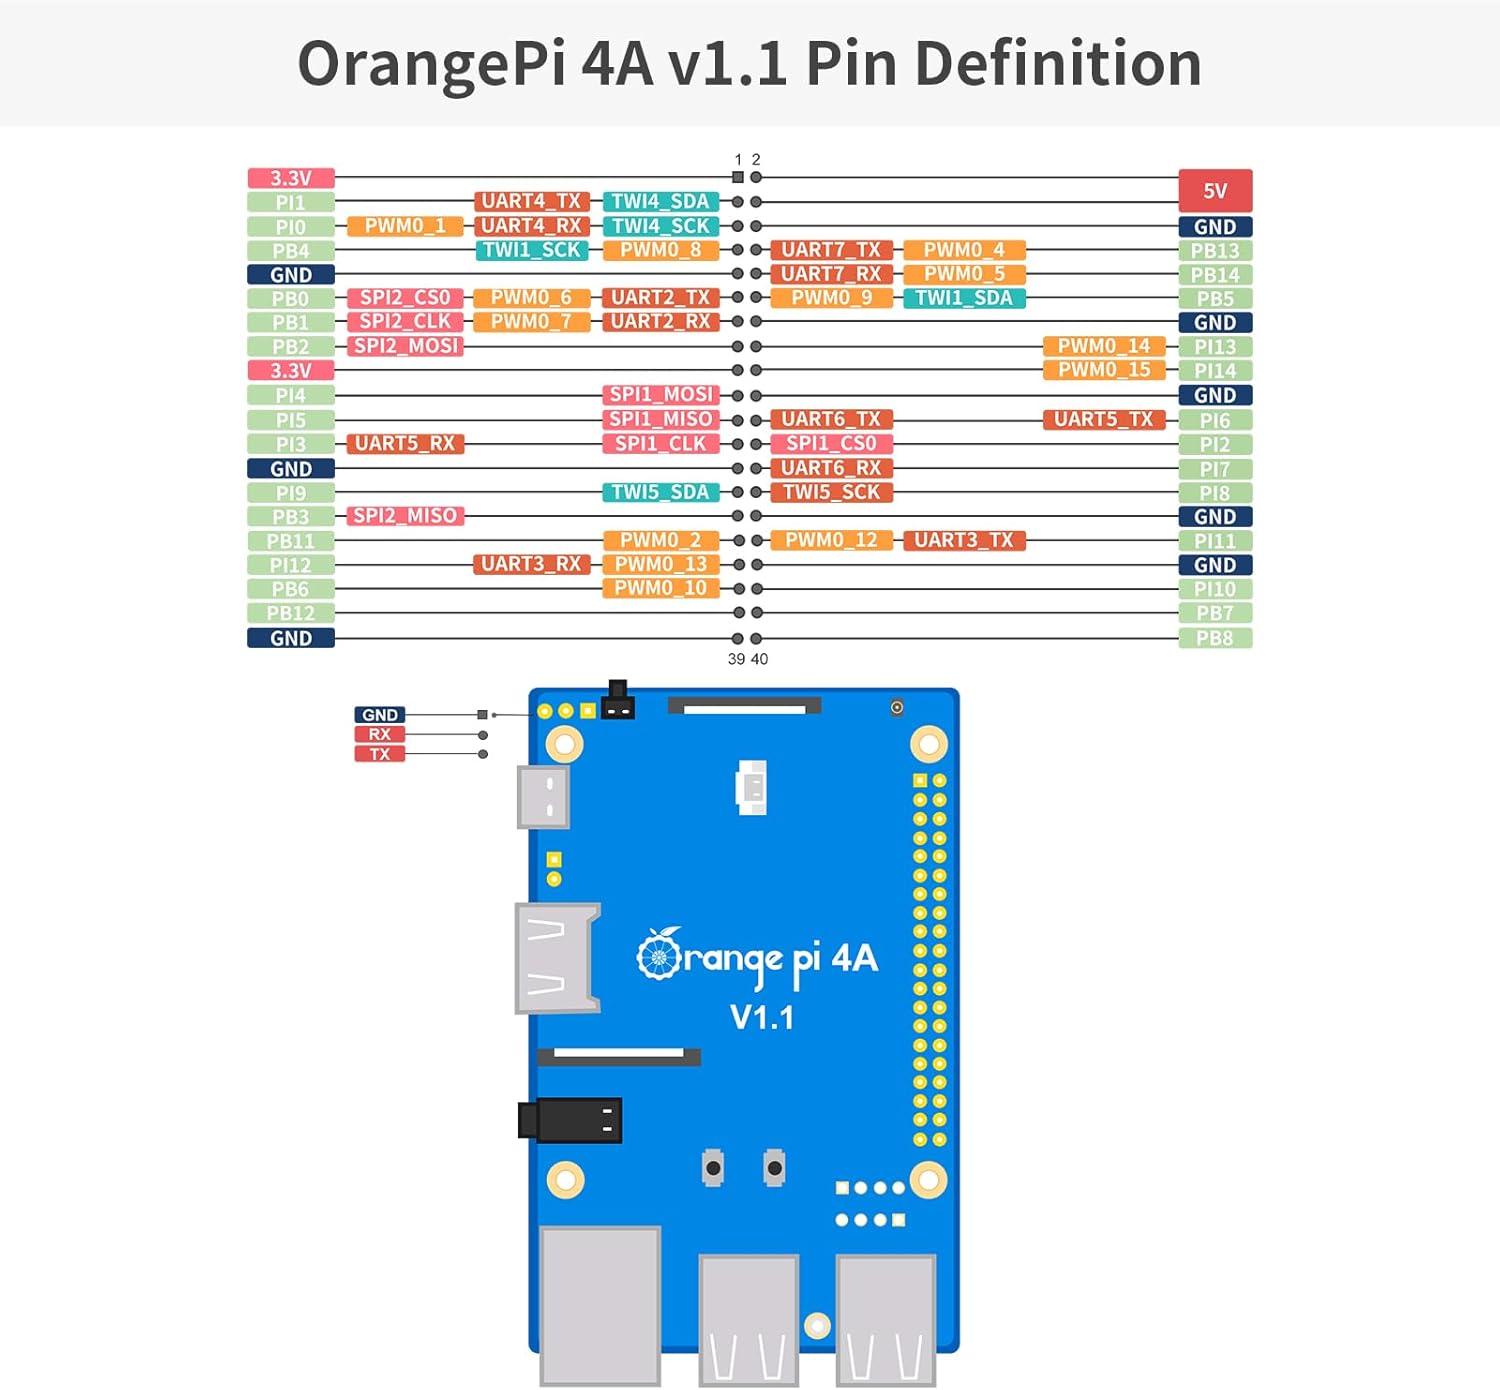
5.4. GPIO and Expansion
The 40-pin expansion header provides access to various interfaces like GPIO, UART, I2C, SPI, and PWM. These can be used for connecting sensors, actuators, and other custom hardware. Consult the Orange Pi 4A documentation for detailed pinout diagrams and programming guides for these interfaces.
6. Vedligeholdelse
To ensure the longevity and stable operation of your Orange Pi 4A, consider the following maintenance tips:
- Hold det køligt: Ensure adequate ventilation around the board. For intensive tasks, consider adding a heatsink or fan to prevent overheating.
- Renhed: Keep the board free from dust and debris. Use compressed air or a soft brush for cleaning. Avoid using liquids.
- Softwareopdateringer: Regularly update your operating system and installed software to benefit from performance improvements, security patches, and new features.
- Korrekt nedlukning: Always shut down the operating system gracefully before disconnecting power to prevent data corruption on your storage device.
- Håndteres med forsigtighed: Avoid static discharge by handling the board on an anti-static mat or by grounding yourself. Do not apply excessive force to connectors or components.
7. Fejlfinding
If you encounter issues with your Orange Pi 4A, refer to the following common troubleshooting steps:
- Ingen strøm/Ingen opstart:
- Ensure the 5V 5A Type-C power supply is correctly connected and functioning.
- Verify that the OS image is properly flashed to the uSD card or eMMC module. Try re-flashing the image.
- Check if the uSD card is fully inserted into its slot.
- Ingen skærmoutput:
- Confirm the HDMI cable is securely connected to both the Orange Pi 4A and the monitor.
- Sørg for, at skærmen er indstillet til den korrekte inputkilde.
- Prøv et andet HDMI-kabel eller en anden skærm, hvis det er muligt.
- Problemer med netværksforbindelse:
- Ved kabelforbindelser skal du kontrollere Ethernet-kablets og routerens status.
- For Wi-Fi, verify the network name (SSID) and password. Ensure the Wi-Fi antenna is connected.
- Restart the Orange Pi 4A and your network router.
- Periferiudstyr ikke fundet:
- Ensure USB devices are properly connected to the USB ports.
- Test peripherals on another device to confirm they are working.
- Some operating systems may require specific drivers for certain peripherals.
8. Garanti og support
For warranty information, please refer to the purchase documentation or contact your retailer. For technical support, software downloads, and community forums, visit the official Orange Pi webwebsted. Gem din købsbevis i tilfælde af garantikrav.