Acekool 5000BTU
Acekool 5000 BTU Window Air Conditioner User Manual
Model: 5000BTU | Brand: Acekool
Indledning
This manual provides comprehensive instructions for the safe and efficient operation, installation, and maintenance of your Acekool 5000 BTU Window Air Conditioner. Designed for compact rooms up to 150 square feet, this unit offers quick and efficient cooling with user-friendly mechanical controls and a reusable filter. Please read this manual thoroughly before use and retain it for future reference.

Figure 1: Acekool 5000 BTU Window Air Conditioner Unit
Hvad er der i æsken
Ved udpakning skal du sørge for, at alle nedenstående varer er til stede og ubeskadigede:
- 1 x Window Air Conditioner Unit
- 1 x Window Bracket
- 1 x Installation Kits (includes Filler Panels, Lock Frame & Sash Lock, Window Sash Seal, Insulation Strips, Screws, Top Mounting Rail)
- 2 x brugervejledninger

Figure 2: Included Installation Kit Components
Opsætning og installation
The Acekool 5000 BTU Window Air Conditioner is designed for easy installation in standard windows. Follow these steps for proper setup:
- Forbered vinduet: Ensure your window is clean and free of obstructions. The unit requires a vertical clearance of at least 14.5 inches and a width between 23-34 inches.
- Attach Top Mounting Rail: Secure the top mounting rail to the top of the air conditioner unit using the provided screws. Ensure the screw hole on the rail faces outwards, as this will be used to secure the window.
- Installer harmonikapaneler: Attach the expandable accordion panels to both sides of the air conditioner unit. These panels are labeled "Left" and "Right" and slide into the designated guides on the unit. Stretch them out to their full length.
- Placer enheden: Carefully lift the air conditioner and place it into the window opening. Ensure the bottom lip of the unit rests securely on the window sill and the top mounting rail is positioned against the upper window frame.
- Sikr vinduet: Lower the window sash firmly against the top mounting rail of the air conditioner.
- Extend and Secure Side Panels: Pull out the accordion side panels to fill the remaining gap in the window opening. Secure these panels to the window frame using the provided screws.
- Apply Insulation Strips: Use the provided insulation strips to seal any remaining gaps around the unit and panels to prevent air leakage and improve efficiency.
- Install Lock Frame & Sash Lock: For added security, install the lock frame and sash lock as per the instructions in the installation kit to prevent the window from being opened from the outside.
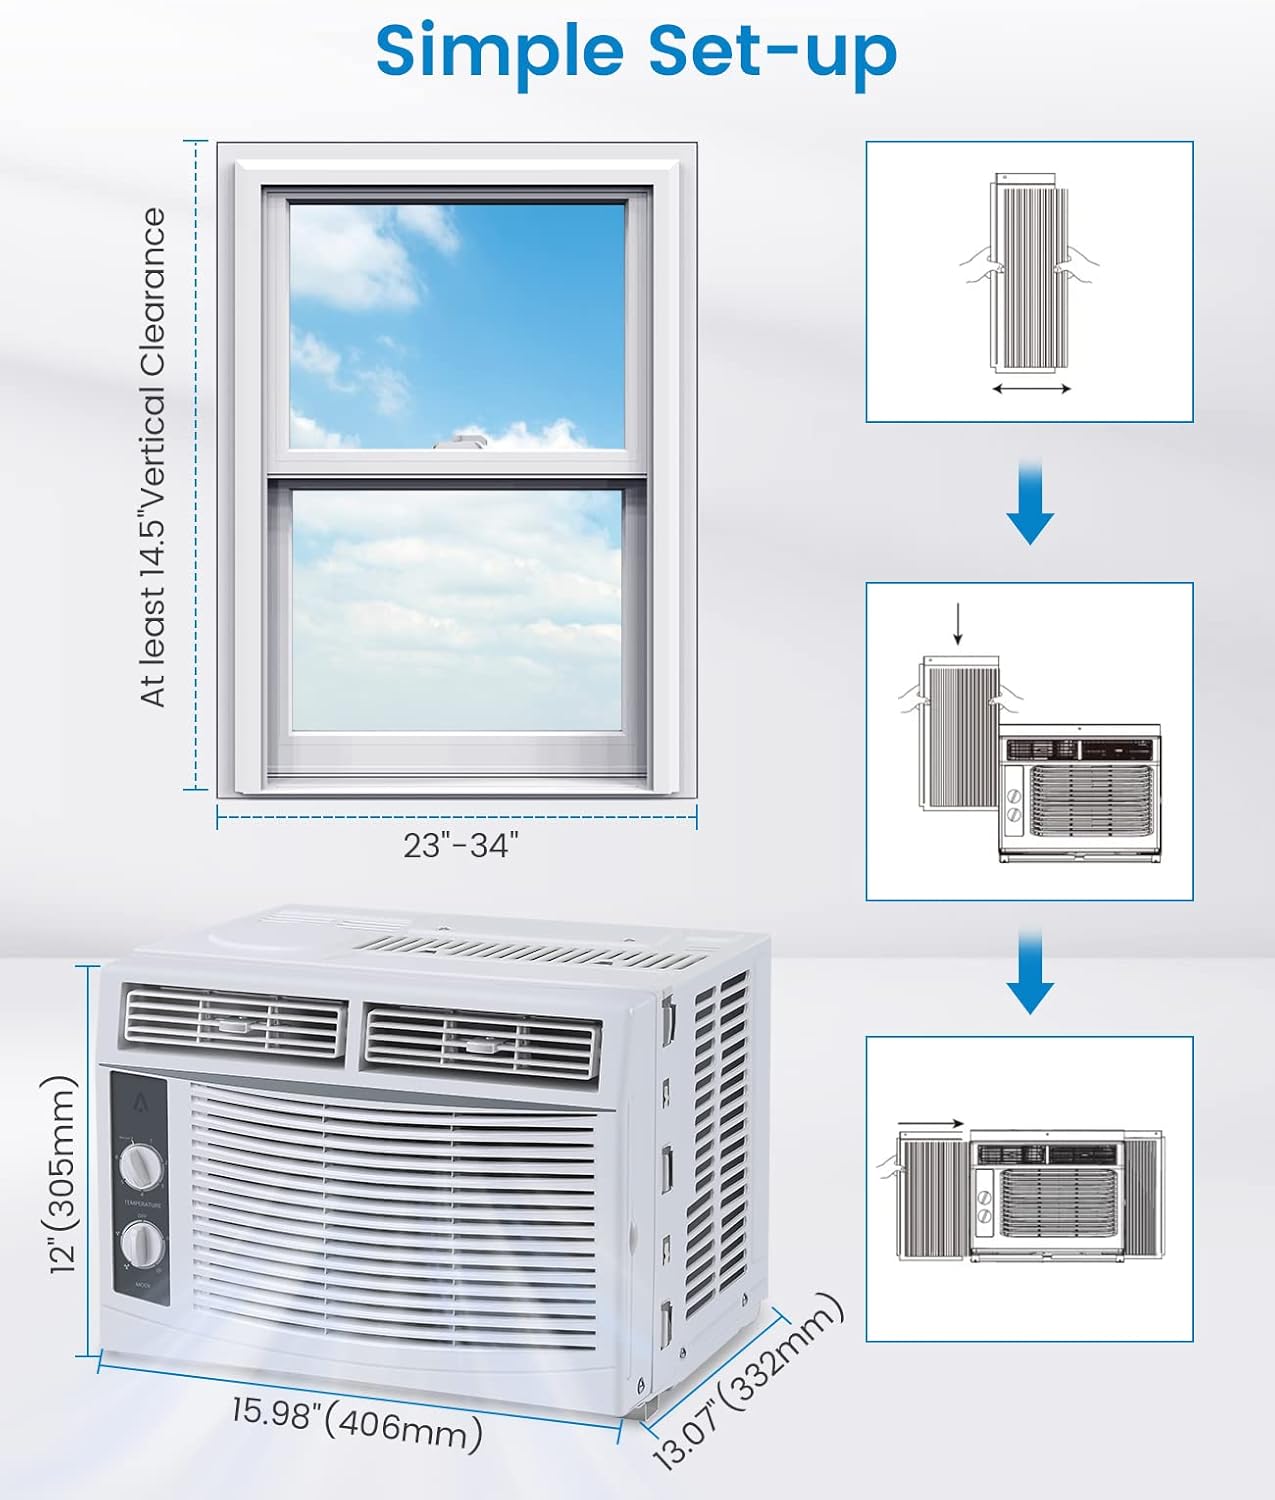
Figure 3: Visual Guide for Simple Setup
Betjeningsvejledning
Your Acekool air conditioner features easy-to-use mechanical controls for optimal comfort.

Figure 4: Temperature and Mode Control Knobs

Figure 5: Adjustable Air Direction Vents
Temperaturkontrolskive:
- The top dial controls the temperature setting from 1 (warmest) to 7 (coldest).
- Turn the dial towards 7 for maximum cooling.
Mode Control Dial:
- OFF: Slukker enheden.
- FAN ONLY (Low/High): Operates the fan without cooling. Use for air circulation.
- KØLIG (Lav/Høj): Activates the cooling function.
- Lav køling: Provides gentle cooling with lower fan speed.
- Høj køling: Provides powerful cooling with higher fan speed.
Luft retning:
- Adjust the horizontal and vertical louvers on the front of the unit to direct the airflow as desired.
Opretholdelse
Regelmæssig vedligeholdelse sikrer optimal ydeevne og levetid for dit klimaanlæg.
Rengøring af luftfilteret:
The reusable air filter should be cleaned regularly (every two weeks or more often depending on usage and air quality) to maintain cooling efficiency.
- Locate the filter on the right side of the unit.
- Gently pull the filter out from its slot.
- Skyl filteret under rindende vand for at fjerne støv og snavs. Brug et mildt rengøringsmiddel til meget snavs.
- Lad filteret lufttørre helt, før du sætter det i enheden igen.

Figure 6: Removing the Reusable Air Filter for Cleaning
Generel rengøring:
- Tør ydersiden af enheden af med en blød, damp klæde. Brug ikke skrappe kemikalier eller slibende rengøringsmidler.
- Ensure the unit is unplugged before any cleaning or maintenance.
Specifikationer
| Feature | Detalje |
|---|---|
| Mærkenavn | Acekool |
| Model info | 5000 BTU |
| Varens vægt | 36.4 pund |
| Produktdimensioner | 13.07 x 15.98 x 12 tommer |
| Oprindelsesland | Kina |
| Kapacitet | 30 pints |
| Årligt energiforbrug | 1 kilowatttimer pr. år |
| Støjniveau | 50 dB |
| Installationstype | Vindue |
| Særlige funktioner | 4 Way Swing, Fast Cooling |
| Farve | Hvid |
| Voltage | 115.0V |
| Kølekraft | 5000 britiske termiske enheder |
Fejlfinding
If you encounter issues with your Acekool air conditioner, please refer to the following common troubleshooting steps:
- Enheden tænder ikke:
- Sørg for, at netledningen er tilsluttet korrekt til en jordet stikkontakt.
- Tjek din boligs afbryder.
- Verify the mode dial is not set to "OFF".
- Utilstrækkelig køling:
- Check if the air filter is dirty and needs cleaning.
- Ensure windows and doors in the room are closed to prevent warm air from entering.
- Verify the temperature setting is set to a colder level (e.g., 7).
- Ensure the unit is appropriately sized for the room (up to 150 sq.ft for 5000 BTU).
- Usædvanlig støj:
- En svag brummende lyd fra kompressoren er normalt.
- Check for any loose parts or obstructions around the fan.
- Ensure the unit is installed level to prevent rattling.
- Vandlækage:
- Ensure the unit is slightly tilted outwards to allow condensate to drain properly.
- Check for any blockages in the drainage area.
Hvis problemerne fortsætter efter at have forsøgt disse trin, bedes du kontakte kundesupport.
Garanti & Support
Acekool is committed to providing excellent customer service and product quality. Your product comes with:
- Email Support within 12 hours
- 30 days Unreasonable Return policy
- 12 Months Free Maintenance and Technology Supports
For further assistance, please refer to the contact information provided with your purchase or visit the official Acekool webwebsted.

Figure 7: Acekool Customer Support Details
Ask a question about this manual
Ask about setup, troubleshooting, compatibility, parts, safety, or missing instructions. Manuals+ will review the question and use this page’s manual context to help answer it.