Sifely Sifely Model O Deadbolt
Sifely Fingerprint Smart Deadbolt with Keypad - Model O Instruction Manual
Brand: Sifely | Model: Sifely Model O Deadbolt
1. Introduktion
This manual provides detailed instructions for the installation, operation, and maintenance of your Sifely Fingerprint Smart Deadbolt with Keypad, Model O. This smart lock offers multiple access methods including fingerprint, keypad code, mobile app, fob, and physical key, enhancing security and convenience for various environments such as homes, apartments, offices, and rental properties.
2. Hvad er der i æsken
Kontroller venligst, at alle komponenter er til stede, før installationen påbegyndes:
- Front Panel (Exterior Keypad)
- Back Panel (Interior Lock)
- Monteringsplade
- Dødbolt
- Slagplade
- Fysiske nøgler (2)
- Nøglering (2)
- Installation Screws (various sizes for different steps)
- Hurtig startmanual
- Installationsmanual
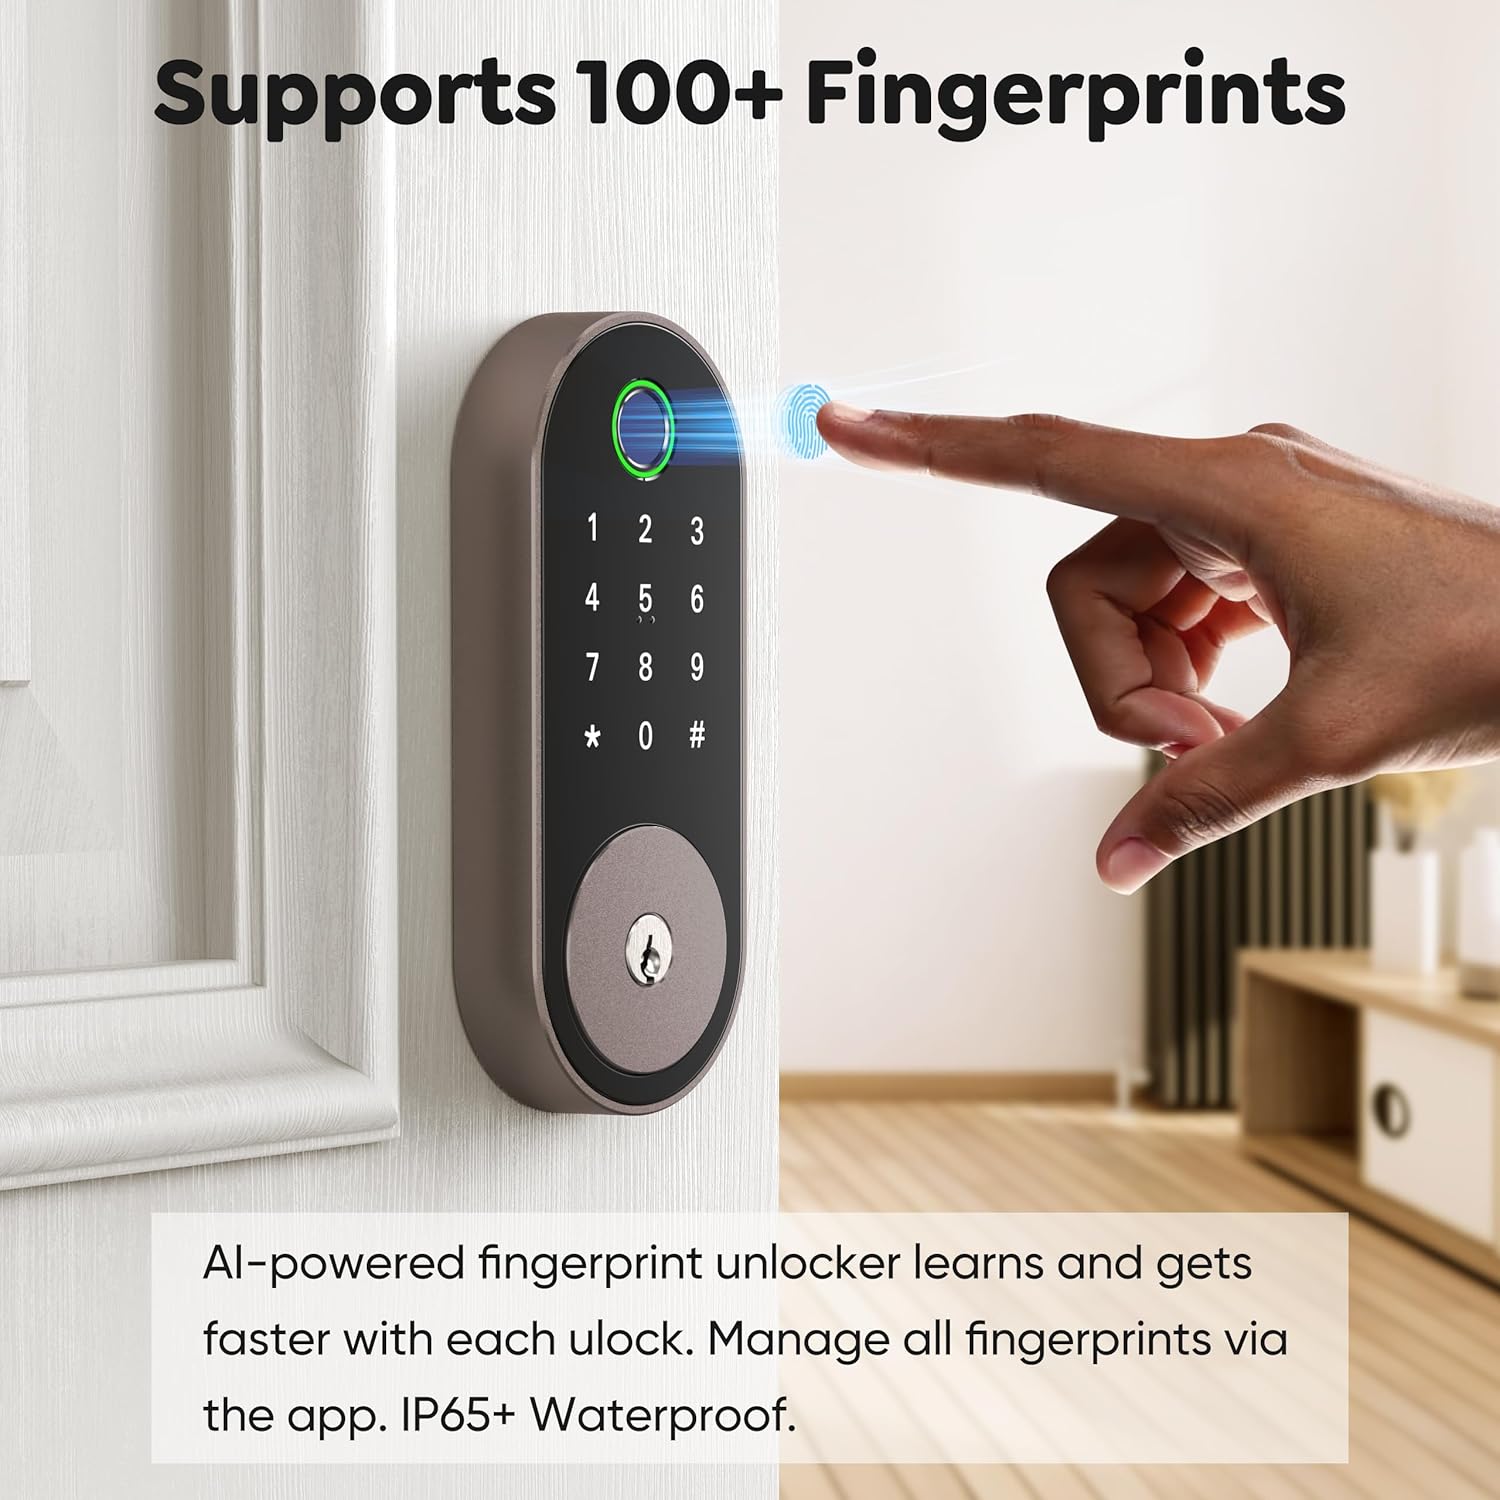
Image: All included components for the Sifely Smart Deadbolt.
3. Specifikationer
| Feature | Detalje |
|---|---|
| Mærke | Sifely |
| Modelnummer | Sifely Model O Deadbolt |
| Låsetype | Biometrisk, kombinationslås, sikkerhedslås, tastatur |
| Materiale | Aluminium, zink |
| Varedimensioner (L x B x H) | 6.3 x 2.6 x 1.9 tommer |
| Varens vægt | 2 pund |
| Særlige funktioner | Anti-Peeping Password, Back-Lit Keypad, Auto-Lock, Fingerprint, Fob Unlock, One-Touch Lock, Passcode Unlock, Touchscreen, Weather Resistant |
| Controller type | App Control, Keypad, Fingerprint, Code / Passcode, Remote Access, Automatic Locking, Voice Control (Alexa / Google) |
| Forbindelsesprotokol | Bluetooth, Wi-Fi (with optional Gateway) |
| Dørtykkelseskompatibilitet | 1 3/8" ~ 2 3/16" (35mm - 55mm) |
| Borehulsdiameter | 2 1/8" (54 mm) |
| Bore Hole Backset | 2 3/8" eller 2 3/4" (60 mm eller 70 mm) |
4. Opsætning og installation
The Sifely Smart Deadbolt is designed for easy DIY installation. A Phillips head screwdriver and 4 AA batteries are required. It is recommended to install the lock with the door open or ajar. Do not close the door until batteries are inserted and the lock is fully tested.

Image: Door compatibility specifications for installation.
4.1. Installationsvideoguide
Video: A detailed guide on how to install the Sifely Smart Deadbolt. This video covers all steps from preparing the door to final calibration.
4.2. Trin-for-trin installation
- Installer deadbolten:
- Hold the deadbolt in front of the door hole to check if the T-shaped hole is centered. If not, adjust the bolt by rotating it to the end.
- Ensure the 'UP' arrow on the deadbolt is facing upwards.
- Install the deadbolt into the door hole and secure it using the screws from the 'STEP 1' screw package.
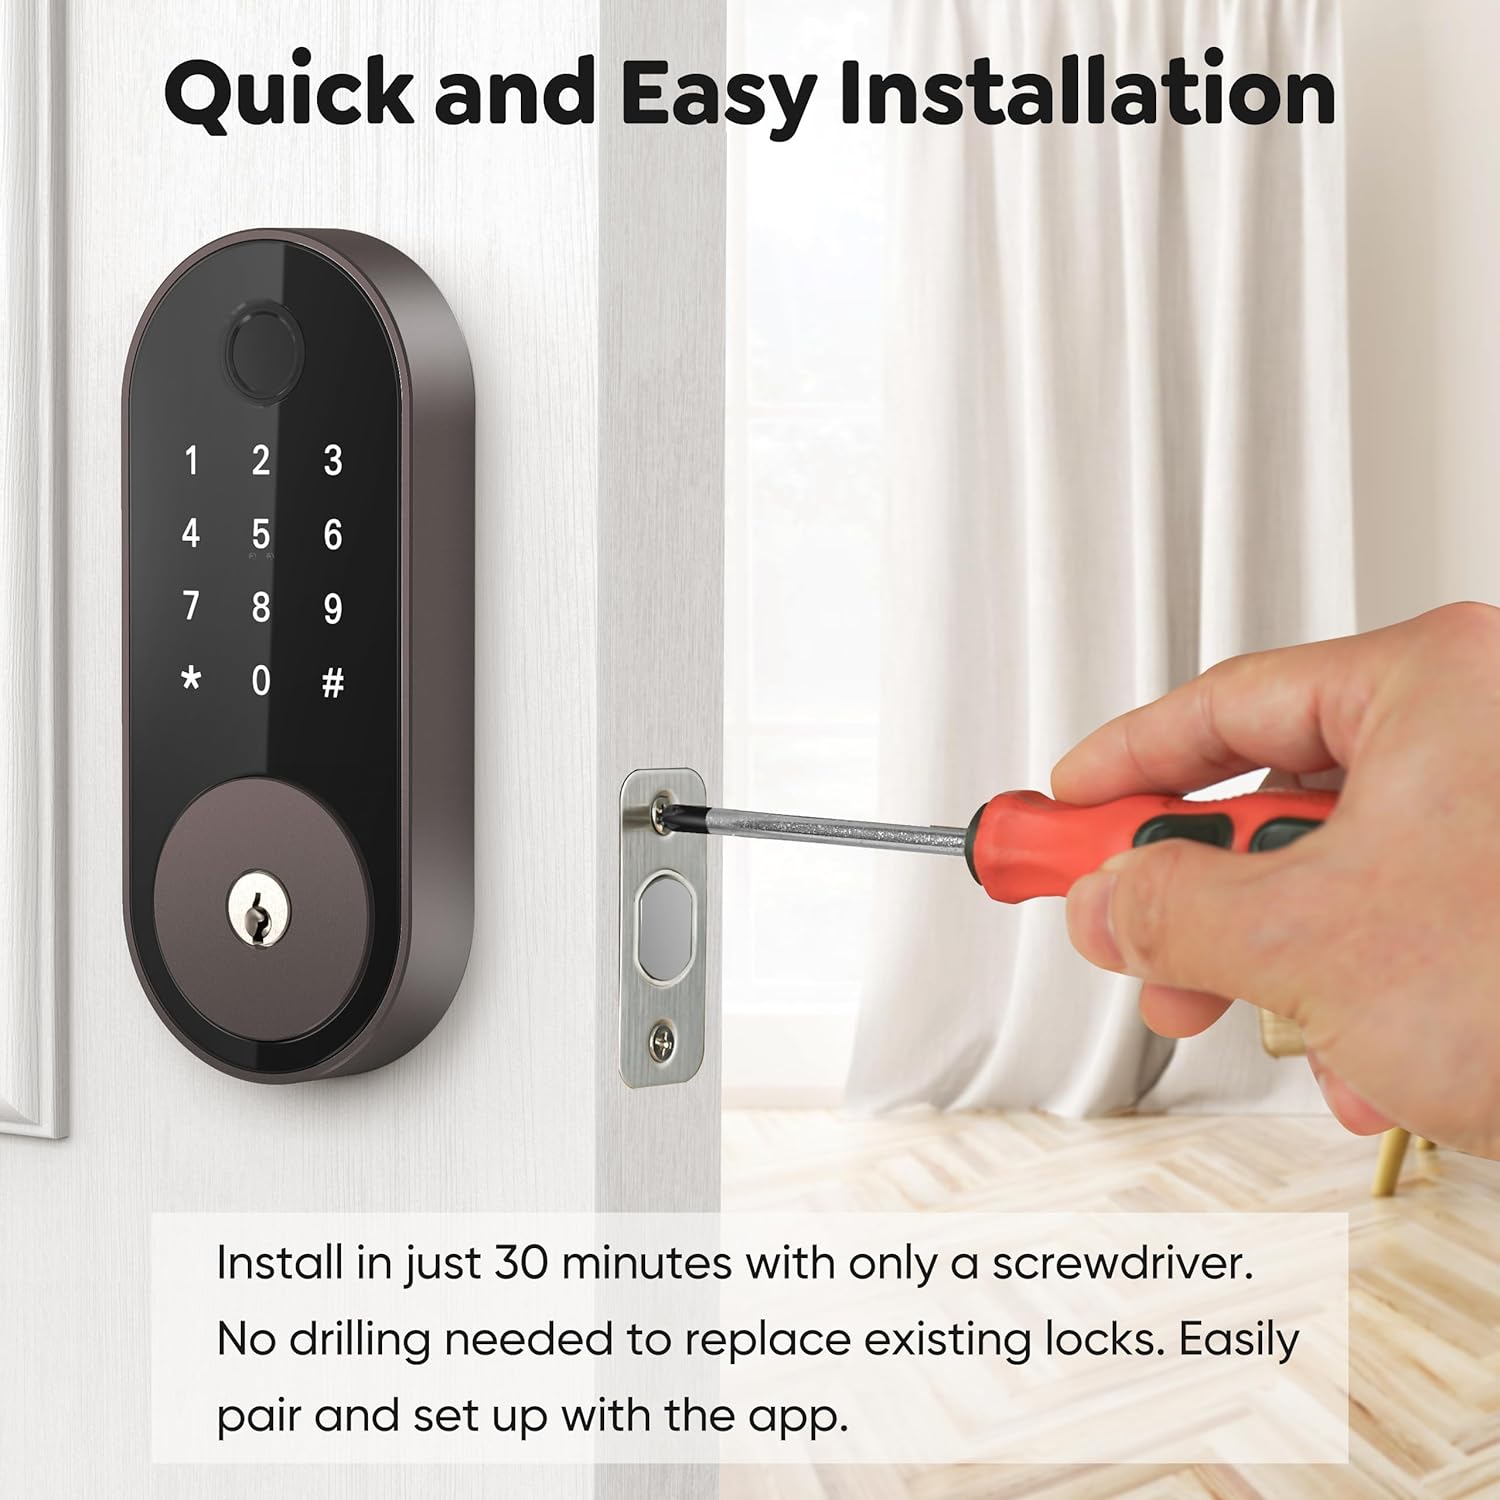
Image: Installing the deadbolt into the door frame.
- Installer udvendigt tastatur:
- Ensure the bump on the tailpiece of the exterior keypad is facing upwards.
- Slide the tailpiece into the T-shaped hole on the deadbolt.
- Route the cable under the deadbolt, ensuring the exterior keypad is facing outside.
- Installer monteringsplade:
- Thread the cable through the hole at the bottom of the mounting plate.
- Slide the tailpiece from the exterior keypad into the corresponding hole on the mounting plate.
- Align the guide posts of the mounting plate with the holes on the exterior keypad.
- Measure your door thickness using the provided scale card to select the correct screws from the 'STEP 3' screw package.
- Secure the mounting plate using the selected screws.
- Attach Wire Cable to Interior Lock:
- Remove the battery cover by pulling it upwards off the interior lock body.
- Connect the cable from the exterior keypad to the designated port on the interior lock.
- Insert any excess cable into the door hole to prevent pinching.
- Installer indvendig lås:
- Insert the tailpiece on the exterior keypad into the T-shaped slot at the back of the interior lock.
- Secure the interior lock using the screws from the 'STEP 5' screw package.
- Perform Calibration for your door:
- Insert 4 AA batteries into the interior lock.
- On the exterior keypad, enter "123456#" to initiate the door handing process.
- When the bolts stop moving, the calibration is complete.
5. Betjeningsvejledning
5.1. Oplåsningsmetoder
- Fingeraftryk: Place your registered fingerprint on the sensor. The lock supports over 100 fingerprints.
- Tastaturkode: Enter your programmed 4-6 digit code on the keypad. The lock supports over 100 codes, including custom, timed, one-time, and recurring codes.
- Mobil app: Use the Sifely app to unlock the door remotely (with optional Gateway) or via Bluetooth when nearby.
- Fob: Tap a registered key fob against the keypad to unlock.
- Fysisk nøgle: Use the provided physical keys as a backup.

Image: Unlocking the deadbolt using the fingerprint sensor.

Image: Managing passcodes via the Sifely app.

Image: Remote control and monitoring via the Sifely app.

Image: Various fob options for unlocking the deadbolt.
5.2. Låsemetoder
- Autolås: The lock can be configured to automatically lock after a set period following each entry.
- Lås med et enkelt tryk: Press and hold the '#' button on the keypad to lock the door from the outside.
- Indvendig knap: Turn the interior knob to manually lock or unlock the door from the inside.

Image: Auto-lock and manual locking features.
5.3. Sikkerhedstilstande
- Privatlivstilstand: Engages a full lock from the inside, preventing external access even with valid credentials.
- Passagetilstand: Keeps the door unlocked for continuous access during specific times or events.
- Anti-Peep Code: Indtast tilfældige cifre før eller efter din faktiske adgangskode for at forhindre andre i at gætte din kode.
5.4. Smart Speaker Integration
The Sifely Smart Deadbolt is compatible with Amazon Alexa and Google Assistant for voice control. A Sifely Gateway (sold separately) is required for this functionality.

Image: Voice control integration with smart speakers.
Video: En kort gennemgangview of the Sifely Smart Lock Model O, demonstrating its features and ease of use.
6. Vedligeholdelse
6.1. Udskiftning af batteri
The Sifely Smart Deadbolt operates on 4 AA batteries and offers up to one year of battery life. The lock will provide low battery alerts when replacement is needed. To replace batteries:
- Remove the battery cover from the interior lock body.
- Fjern de gamle batterier.
- Indsæt 4 nye AA-batterier, og sørg for korrekt polaritet.
- Sæt batteridækslet på igen.
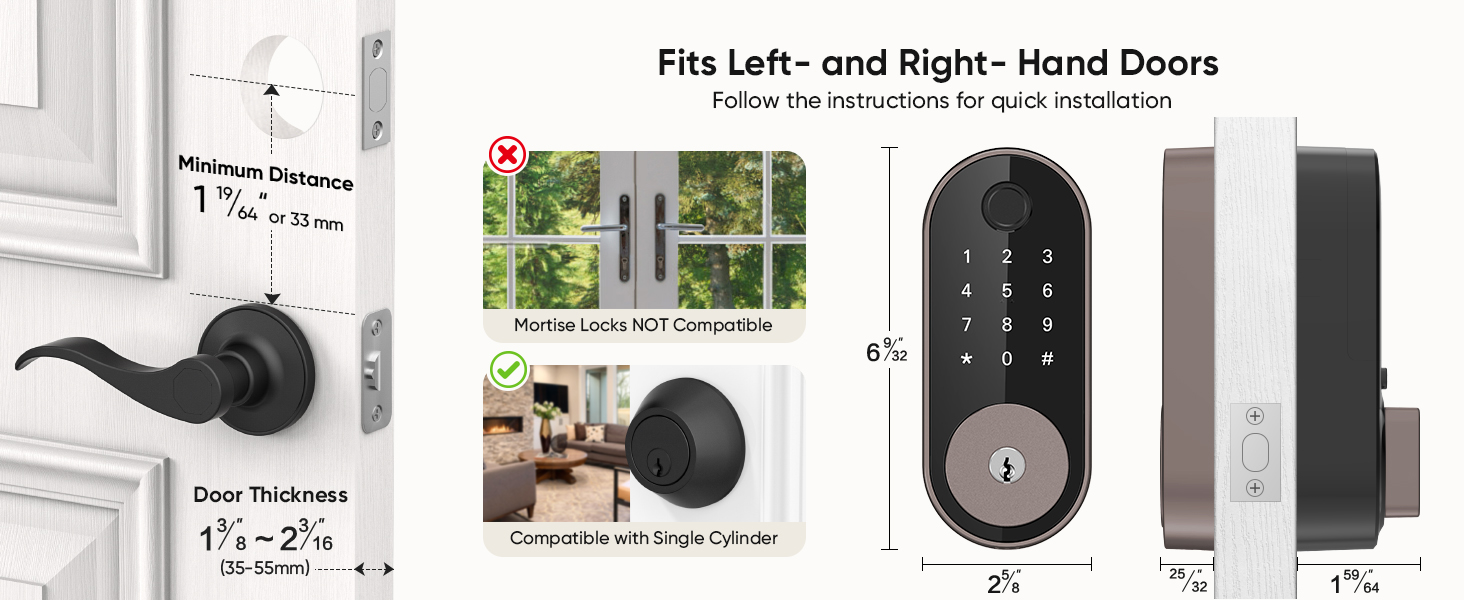
Image: Battery life and low battery alerts.
6.2. Almen pleje
To ensure optimal performance and longevity of your smart deadbolt:
- Undgå at bruge slibende rengøringsmidler eller opløsningsmidler på låsens overflade.
- Wipe the keypad and fingerprint sensor with a soft, dry cloth.
- Ensure the door frame and strike plate are free of obstructions.
7. Fejlfinding
| Problem | Mulig løsning |
|---|---|
| Lås reagerer ikke. | Check battery levels and replace if necessary. Ensure the cable connection between the exterior and interior units is secure. |
| Fingeraftryk ikke genkendt. | Ensure your finger is clean and dry. Try re-registering your fingerprint. Ensure proper placement on the sensor. |
| Tastaturkoden virker ikke. | Verify the code is correct. Ensure the keypad is active (tap to light up). Try re-entering the code. |
| Automatisk låsning aktiveres ikke. | Check the auto-lock settings in the Sifely app. Ensure the door is fully closed. |
| Fjernadgang virker ikke. | Ensure the Sifely Gateway is properly installed and connected to Wi-Fi. Check the app's connection status. |
8. Garantioplysninger
Sifely products typically come with a limited manufacturer's warranty covering defects in materials and workmanship. For specific warranty terms and conditions, please refer to the warranty card included with your product or visit the official Sifely webwebsted. Gem din købsbevis til garantikrav.
9. Support
For technical assistance, product inquiries, or customer support, please contact Sifely customer service through the following channels:
- E-mail: Refer to your Quick Start Manual for the support email address (e.g., cs@sifely.com).
- Online ressourcer: Visit the official Sifely website for FAQs, video tutorials, and additional support documentation.
- Sifely App: The mobile app often includes a support section or direct contact options.
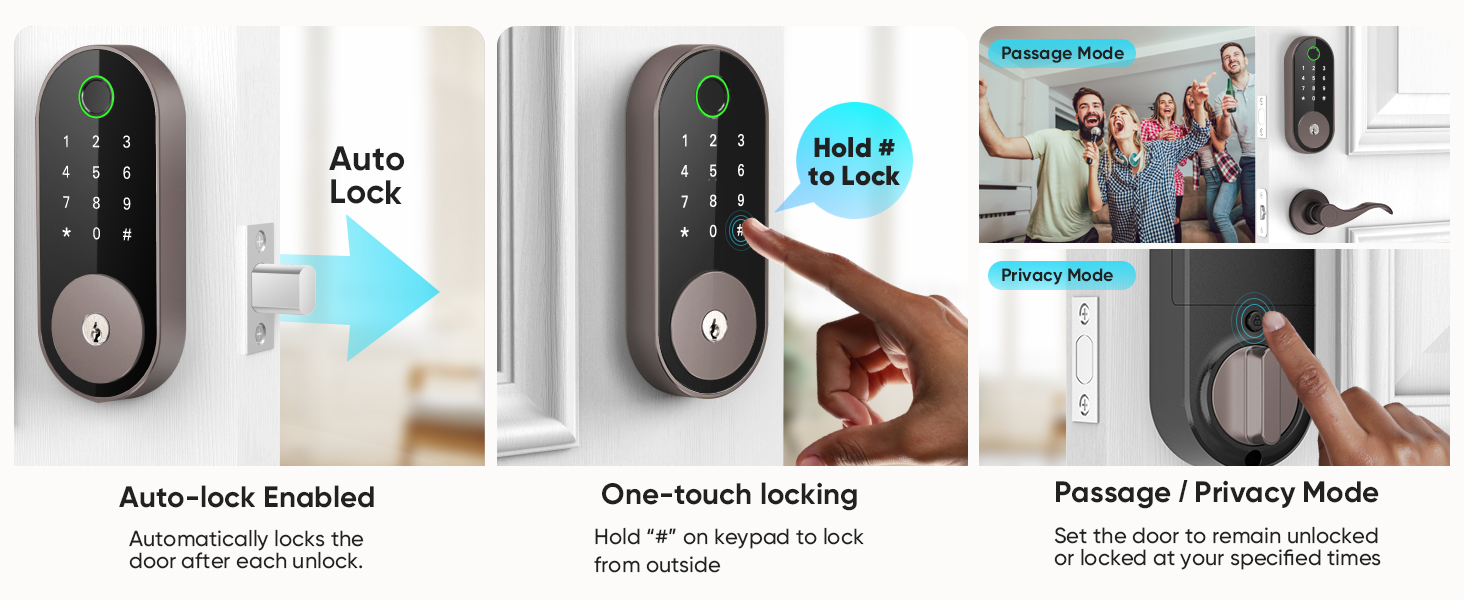
Image: Sifely web portal for managing locks and accessing information.
Ask a question about this manual
Ask about setup, troubleshooting, compatibility, parts, safety, or missing instructions. Manuals+ will review the question and use this page’s manual context to help answer it.