
1. Produktet er slutview
The ANYSECU TYT MD-UV390 Plus is an upgraded version of the TYT MD-390, offering dual-band VHF/UHF operation with digital (DMR) and analog modes. It features a robust IP67 waterproof and dustproof rating, 5W/1W output power, and supports 1000 channels. This radio is equipped with AES256 encryption for secure communications.
Nøglefunktioner:
- FCC ID: POD-MDUV390
- Dual Band VHF/UHF Operation
- IP67 Waterproof and Dustproof Rating
- Digital/Analog Dual Mode
- 5W/1W Output Power
- 1000 kanaler
- AES256 kryptering
- Afbrydelse af transmission
- Group Call Match (Promiscuous)
- Private Call Match (Promiscuous)
- Dual Band, Dual Wait, Dual Standby

Image: TYT MD-UV390 Plus radio highlighting its AES256 encryption capabilities.

Image: TYT MD-UV390 Plus radio partially submerged in water, demonstrating its IP67 waterproof rating.
2. Pakkens indhold
Bekræft, at alle nedenstående varer er inkluderet i din pakke. Hvis der mangler eller er beskadigede varer, bedes du kontakte din forhandler.
- TYT MD-UV390 Plus Radio Body
- 7.4 V 2000mAh Li-ion Battery Pack
- Antenne
- Desktop Oplader
- Adapter
- Oplader kabel
- Bælteclips
- Brugermanual

Image: All included accessories for the TYT MD-UV390 Plus radio.
3. Opsætning
3.1 Komponentidentifikation
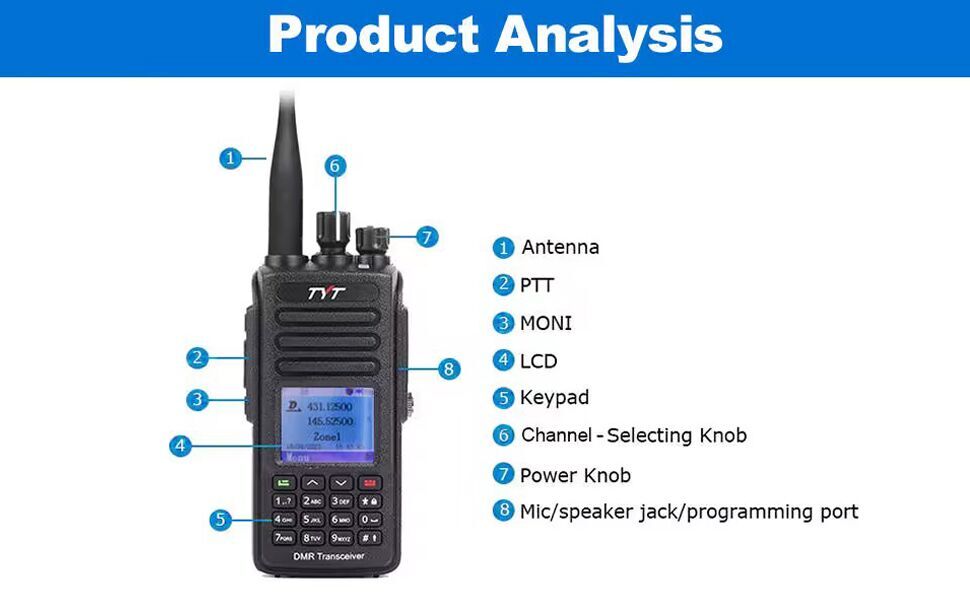
Image: Diagram showing the main components of the TYT MD-UV390 Plus radio.
- Antenne
- PTT (Push-to-Talk) knap
- MONI (Monitor) Button
- LCD Display
- Tastatur
- Channel-Selecting Knob
- Strøm-/lydstyrkeknap
- Mic/Speaker Jack / Programming Port
3.2 Batteriinstallation
To install the battery, align the battery pack with the grooves on the back of the radio and slide it upwards until it clicks into place. Ensure the battery release latch is securely engaged. To remove, press the battery release latch and slide the battery downwards.
3.3 Antennetilslutning
Skru antennen med uret ind i stikket øverst på radioen, indtil den er fingerstram. Spænd den ikke for hårdt.
3.4 Opladning af batteriet
Place the radio with the battery installed into the desktop charger. Connect the adapter to the desktop charger and plug it into a power outlet. The charging indicator light on the charger will show the charging status. A full charge typically takes several hours.
4. Betjeningsvejledning
4.1 Tænd/sluk og lydstyrkejustering
Rotate the Power/Volume knob (7) clockwise to power on the radio. Continue rotating clockwise to increase the volume. Rotate counter-clockwise to decrease the volume and power off the radio.
4.2 Kanalvalg
Use the Channel-Selecting knob (6) to cycle through programmed channels. Alternatively, use the keypad (5) to directly input a channel number or navigate through the menu to select a channel.
4.3 Making a Call (PTT)
To transmit, press and hold the PTT (Push-to-Talk) button (2) on the side of the radio. Speak clearly into the microphone. Release the PTT button to receive.
4.4 Menunavigation
Use the navigation buttons on the keypad to access and scroll through the radio's menu options. The LCD display (4) will show the current menu. Press the 'Confirm' button (usually the green button) to select an option and 'Back' (usually the red button) to return to the previous screen or exit the menu.
4.5 Digitale og analoge tilstande
The MD-UV390 Plus supports both digital (DMR) and analog communication modes. The radio will automatically detect the mode based on the channel settings. Ensure your channels are programmed correctly for the desired mode of operation.
Video: This video demonstrates the unboxing and basic operational features of the TYT MD-UV390 Plus DMR radio, including powering on, navigating menus, and adjusting channels.
5. Vedligeholdelse
5.1 Rengøring
Rengør regelmæssigt radioens yderside med en blød, tør klud.amp cloth. Do not use harsh chemicals or abrasive cleaners. Ensure all ports are dry before use, especially after exposure to water.
5.2 Pleje af batterier
To prolong battery life, avoid overcharging or completely discharging the Li-ion battery. Store the battery in a cool, dry place when not in use. If the radio will not be used for an extended period, remove the battery.
5.3 Vand- og støvbeskyttelse (IP67)
The MD-UV390 Plus is rated IP67, meaning it is protected against dust ingress and can withstand immersion in water up to 1 meter for 30 minutes. Ensure all port covers are securely closed before exposing the radio to water or dusty environments. Do not intentionally submerge the radio beyond its rated limits.
6. Fejlfinding
6.1 Radio Does Not Power On
- Kontroller, om batteriet er korrekt installeret og fuldt opladet.
- Sørg for, at tænd/sluk-/lydstyrkeknappen er drejet med uret forbi 'slukket'-positionen.
- Verify the battery contacts are clean and free of debris.
6.2 Kan ikke sende eller modtage
- Confirm the antenna is securely attached.
- Check if the radio is on the correct channel and frequency.
- Ensure the volume is adjusted to an audible level.
- Verify that the radio is not in a restricted mode or has a low battery.
- For digital mode, ensure correct contact and talk group settings.
6.3 Dårlig lydkvalitet
- Juster lydstyrken.
- Kontrollér for forhindringer omkring mikrofonen og højttaleren.
- Ensure you are within range of the other radio or repeater.
- Verify the antenna connection.
7. Specifikationer
| Modelnummer | MD-UV390-5W |
| FCC ID | POD-MDUV390 |
| Udgangseffekt | 5W / 1W |
| Vandmodstandsniveau | IP67 (Vandtæt) |
| Antal kanaler | 1000 |
| Frekvensområde | UHF VHF Dual band |
| Batteri | 7.4 V 2000mAh Li-ion Battery Pack |
| Varens vægt | 1.57 pund |
| Pakkedimensioner | 9.65 x 6.97 x 4.25 tommer |
| Speciel funktion | Call Alert |
| Kompatible enheder | Other two-way radios using Motorola's digital mobile radio standards, two-way radios operating on UHF/VHF bands. |
8. Garantioplysninger
The ANYSECU TYT MD-UV390 Plus radio body is covered by a 1 års garanti from the date of purchase. This warranty covers manufacturing defects under normal use. Please retain your proof of purchase for warranty claims. The warranty does not cover damage caused by misuse, accidents, unauthorized modifications, or normal wear and tear.
9. Support
For technical assistance, troubleshooting beyond this manual, or warranty inquiries, please contact your authorized ANYSECU dealer or the manufacturer's customer support. Refer to the contact information provided with your purchase documentation or on the official ANYSECU webwebsted.