
1. Introduktion
The Acegeek Gimli Gaming Case (Model AG-GIMLI-BK-3F) is a mid-tower PC chassis designed for gamers and PC enthusiasts. It features a modern, minimalist aesthetic with a tempered glass side panel to showcase internal components. This manual provides essential information for the assembly, operation, and maintenance of your new gaming case.
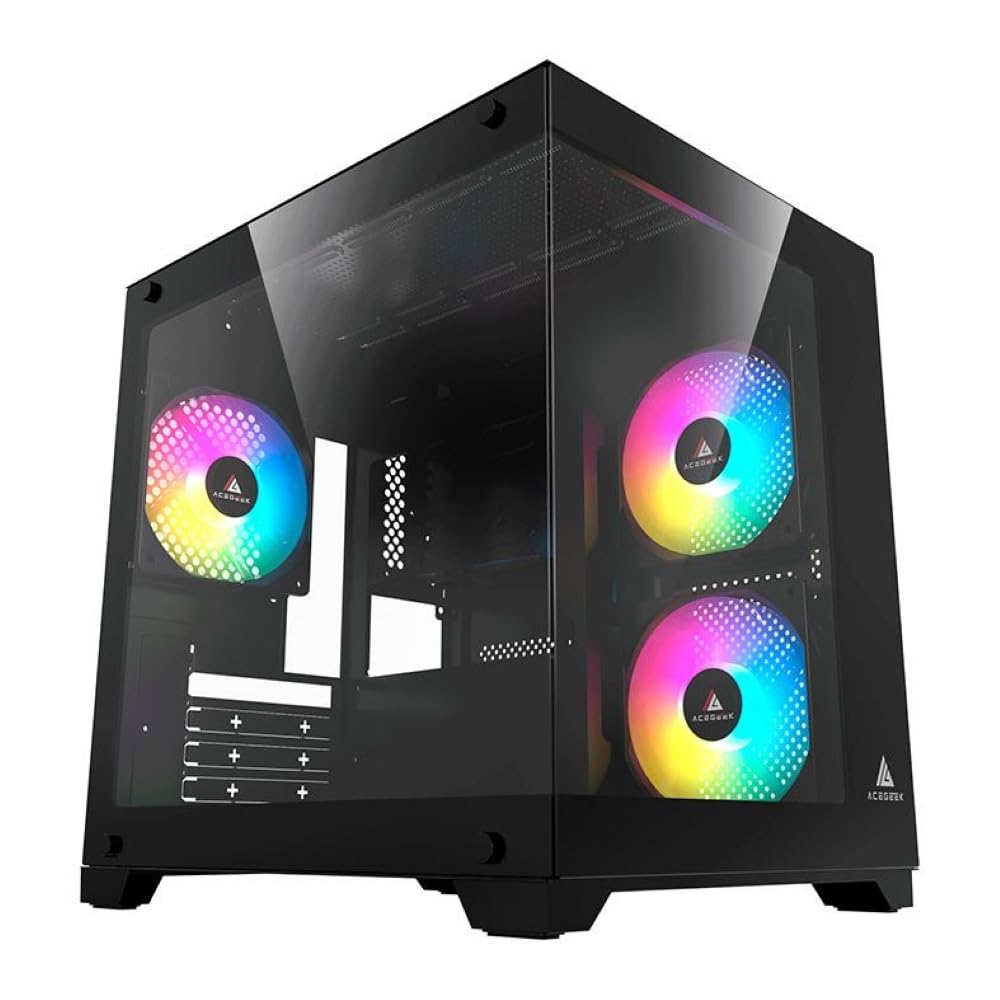
Figur 1: Forside view of the Acegeek Gimli Gaming Case.
2. Nøglefunktioner
- Mid-Tower Form Factor: Compatible with Micro-ATX and ITX motherboards.
- Hærdet glas sidepanel: Giver en klar view af interne komponenter og RGB-belysning.
- Forudinstallerede blæsere: Includes 3 x 120mm fans (2 side, 1 rear) for efficient cooling.
- Storage Bays: Supports 1 x HDD + 1 x SSD or 2 x SSD configurations.
- Udvidelsespladser: Features 4 expansion slots for graphics cards and other add-on cards.
- Kølestøtte:
- Fan Support: Front: 2 x 120mm, Top: 2 x 120mm, Rear: 1 x 120mm, PSU Cover: 2 x 120mm.
- Water Cooler Support: Side: 240mm, Top: 240mm.
- Komponentafstand:
- CPU kølerhøjde: Maximum 155mm.
- VGA Length: Maximum 340mm.
- Kabelstyring: 20mm space for organized cable routing.
- Understøttelse af strømforsyning: Up to 190mm length.

Figure 2: Internal layout showing fan placement and component space.
3. Opsætningsvejledning
3.1 Udpakning
Tag forsigtigt etuiet ud af emballagen. Undersøg for eventuelle skader under transporten. Gem emballagen til fremtidig transport eller garantikrav.
3.2 Afmontering af sidepaneler
The tempered glass side panel is typically secured with thumbscrews at the rear of the case. Unscrew these and carefully slide or lift the panel off. The opposite metal side panel may also be secured with thumbscrews.

Figur 3: Bagside view of the case, showing thumbscrews for side panel removal.
3.3 Installation af bundkort
Install the appropriate standoffs for your Micro-ATX or ITX motherboard. Carefully place the motherboard into the case, aligning it with the standoffs and I/O shield opening. Secure with screws.
3.4 Installation af strømforsyning
Install your power supply unit (PSU) into the designated PSU shroud area, typically at the bottom rear of the case. Secure it with screws from the rear of the case.
3.5 Installation af lagerdrev
Utilize the dedicated bays for 2.5" SSDs and 3.5" HDDs. Refer to the case's internal structure for specific mounting points. The case supports 1 x HDD + 1 x SSD or 2 x SSD.
3.6 Grafikkort og Udvidelseskort
Remove the necessary expansion slot covers at the rear of the case. Insert your graphics card or other expansion cards into the motherboard's PCIe slots and secure them with screws.
3.7 Kabelstyring
Route all power and data cables through the cutouts in the motherboard tray to the rear of the case. Utilize the 20mm cable management space to neatly organize cables, improving airflow and aesthetics.

Figur 4: Intern view highlighting cable routing and component installation areas.
4. Betjening
4.1 Tænd/sluk
Connect the power cable from your PSU to a wall outlet. Press the power button on the front I/O panel to turn on your system. To turn off, use the operating system's shutdown function or press and hold the power button for a few seconds.
4.2 Ventilatorstyring
The pre-installed fans are connected to the motherboard or a fan controller (if included or purchased separately). Fan speed and RGB lighting (if applicable) can typically be controlled via your motherboard's BIOS/UEFI settings or dedicated software provided by your motherboard manufacturer.

Figur 5: Vinklet view showcasing the pre-installed RGB fans.
5. Vedligeholdelse
5.1 Rengøring af støvfiltre
Regularly clean the dust filters (if present) to maintain optimal airflow and cooling performance. Dust filters are typically located at the front, top, and bottom of the case. Remove them and clean with compressed air or water (ensure they are completely dry before reinstallation).
5.2 Cleaning Exterior Surfaces
Wipe down the exterior surfaces, including the tempered glass panel, with a soft, damp cloth. Avoid abrasive cleaners that may scratch the finish or glass.
5.3 Internal Dust Removal
Periodically open the case and use compressed air to remove dust from internal components, especially CPU coolers, GPU heatsinks, and case fans. Ensure the system is powered off and unplugged before performing internal cleaning.
6. Fejlfinding
6.1 Systemet tænder ikke
- Kontroller, om strømkablet er korrekt tilsluttet til både strømforsyningen og stikkontakten.
- Sørg for, at strømforsyningskontakten er i "ON"-positionen.
- Kontroller, at kablet til tænd/sluk-knappen på frontpanelet er korrekt tilsluttet bundkortet.
- Confirm that all internal power connections (24-pin ATX, 8-pin CPU, PCIe for GPU) are securely seated.
6.2 Ventilatorer drejer ikke, eller RGB virker ikke
- Check fan power cables and RGB cables (if applicable) are correctly connected to the motherboard or fan controller.
- Consult your motherboard manual for fan header locations and RGB control software.
- Ensure fan control settings in BIOS/UEFI or software are configured correctly.
6.3 Overophedningsproblemer
- Sørg for, at alle kabinetblæsere drejer og er orienteret korrekt for optimal luftstrøm (indsugning/udsugning).
- Clean any dust filters and internal components as described in the Maintenance section.
- Verify that your CPU cooler and GPU cooling solutions are properly installed and functioning.
7. Specifikationer
| Feature | Detalje |
|---|---|
| Mærke | Acegeek |
| Modelnavn | Gimli |
| Varenummer | AG-GIMLI-BK-3F |
| Sagstype | Mid Tower |
| Bundkort kompatibilitet | Micro ATX, Mini ITX |
| Materiale | Stållegering |
| Farve | Sort |
| Dimensioner (LxBxH) | 35.8 x 27.5 x 36 cm |
| Interne Bugter | 1 x HDD + 1 x SSD or 2 x SSD |
| Udvidelsesslots | 4 |
| Forudinstallerede ventilatorer | Side: 2 x 120mm, Rear: 1 x 120mm |
| Supported Fans (Max) | Front: 2 x 120mm, Top: 2 x 120mm, Rear: 1 x 120mm, PSU Cover: 2 x 120mm |
| Understøttet vandkøler | Side: 240mm, Top: 240mm |
| Max CPU kølerhøjde | 155 mm |
| Maksimal VGA-længde | 340 mm |
| Kabelstyringsplads | 20 mm |
| Supported PSU Length | 190 mm |
| Afkølingsmetode | Luft |
| Anbefalede anvendelser | Spil |

Figure 6: Case dimensions (Length x Width x Height).
8. Garanti og support
The Acegeek Gimli Gaming Case comes with a 12 måneders garanti from the date of purchase. This warranty covers manufacturing defects and malfunctions under normal use. For warranty claims or technical support, please contact Acegeek customer service through their official webwebstedet eller forhandleren, hvor produktet blev købt.
Gem venligst din købsbevis for at validere garantien.