QianBaiwan0920
Wall Mounting EV Charger Lock Box User Manual
Model: QianBaiwan0920
1. Introduktion
This user manual provides comprehensive instructions for the installation, operation, and maintenance of the Wall Mounting EV Charger Lock Box. Please read this manual thoroughly before using the product to ensure proper function and safety.
2. Produktet er slutview
The Wall Mounting EV Charger Lock Box is designed to provide robust protection for your EV charging station. It features a durable construction, secure locking mechanism, and efficient heat dissipation, making it ideal for outdoor use.

Figur 2.1: Forside view of the EV Charger Lock Box.
3. Nøglefunktioner
- Mechanical and Password Lock: Ensures secure storage without reliance on external power. The combination can be reset with a key.
- IP65 Waterproof and Scratch-Proof Plate: Features sandblasting technology and an internal water guide groove to prevent rain and snow intrusion.
- Waterproof and Dustproof Design: IP65 rating provides protection against rain and snow, suitable for outdoor environments. Includes hidden rainwater drainage and tempered glass.
- Double-Sided Ventilation: Vents on both sides and bottom promote air circulation for effective heat dissipation, extending charger lifespan.
- Extended Depth and Durable Construction: Accommodates larger chargers. Made from cold-rolled steel plate for high strength, toughness, and corrosion resistance.

Figure 3.1: Illustration of the mechanical and password lock mechanism.
4. Pakkens indhold
Når du åbner pakken, skal du kontrollere, at alle komponenter er til stede og ubeskadigede.
- EV Charger Lock Box Body
- Installationshardware (skruer, ankre)
- Keys for Lock Mechanism
- Brugervejledning (dette dokument)
5. Opsætning og installation
Follow these steps for proper installation of the EV Charger Lock Box.
5.1. Nødvendigt værktøj
- Bore
- Drill bits appropriate for mounting surface
- Målebånd
- Niveau
- Blyant eller markør
- Skruetrækker
5.2. Installationstrin
- Vælg placering: Select a suitable wall or sturdy surface for mounting. Ensure it is close to your EV charger's power source and allows for easy access.
- Markér borepunkter: Hold the lock box against the desired mounting surface. Use a level to ensure it is straight. Mark the positions for the mounting holes with a pencil.
- Bore huller: Drill pilot holes at the marked points. Use a drill bit appropriate for the wall material and the provided anchors.
- Indsæt ankre: Om nødvendigt, indsæt vægankre i de borede huller.
- Monter kassen: Align the lock box with the drilled holes and secure it to the wall using the provided screws. Ensure it is firmly attached.
- Install EV Charger: Place your EV charger inside the lock box. Utilize the pre-drilled holes for wires and the internal layout for cable management.
- Sikre kabler: Route charging cables through the designated openings. Ensure cables are not pinched or stressed.
- Luk og lås: Close the box door and engage the mechanical/password lock.

Figur 5.1: Eksample of an EV charger installed within the protective box.
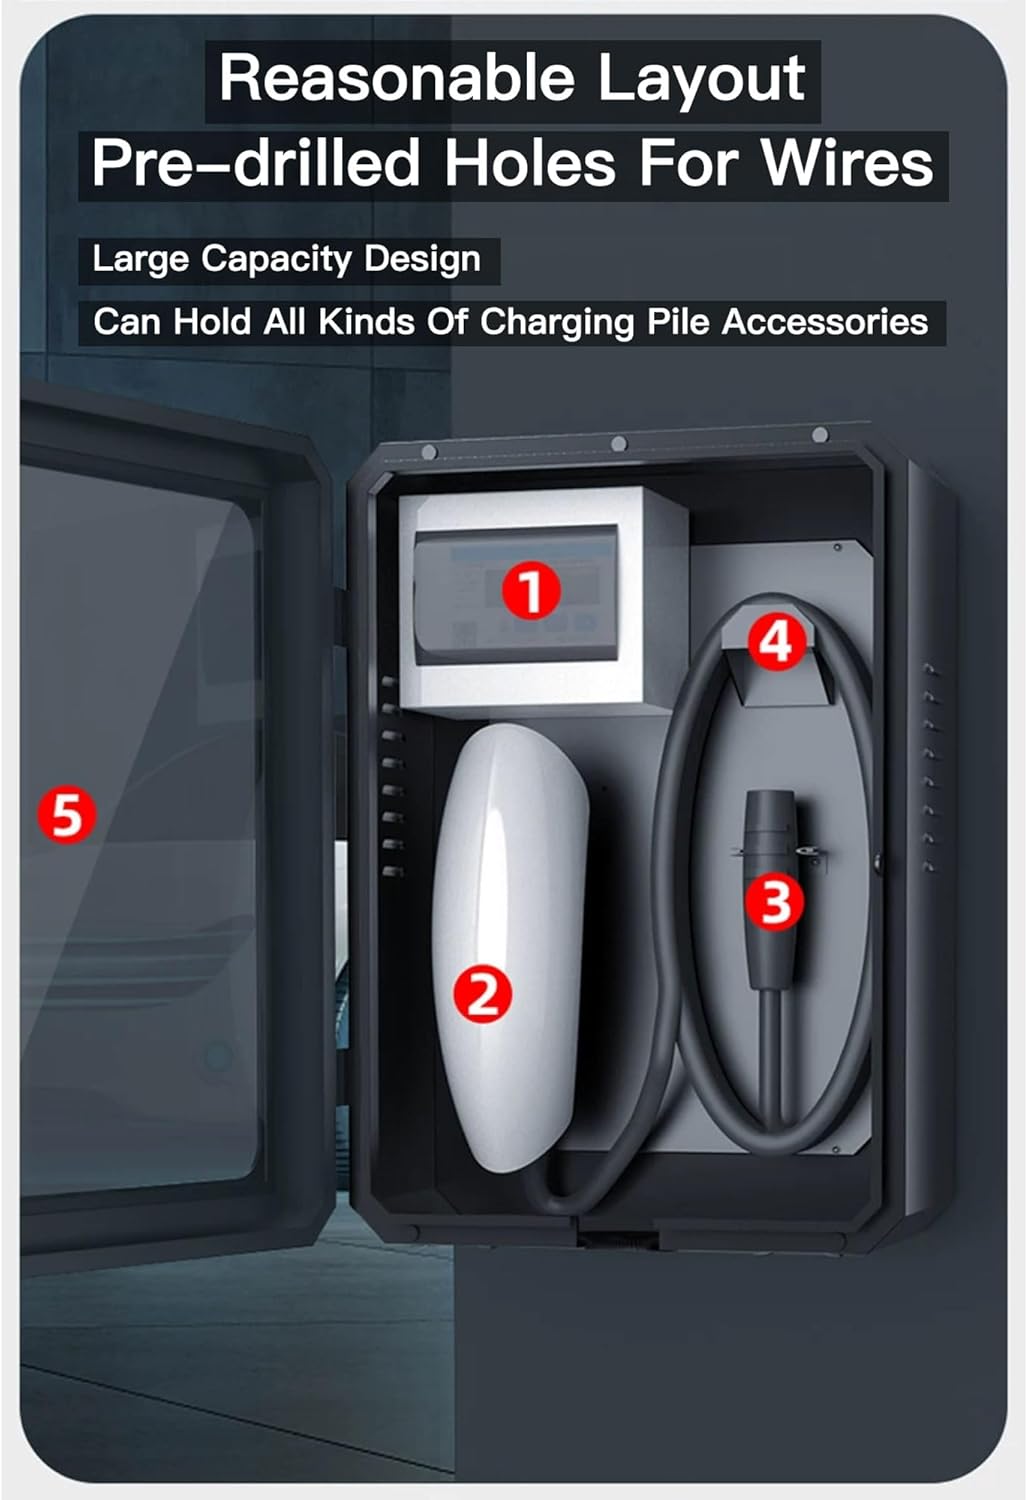
Figure 5.2: Internal layout showing pre-drilled holes for wires and space for accessories. (1) Circuit breaker area, (2) Charger mounting area, (3) Cable storage, (4) Cable routing, (5) Tempered glass door.
6. Betjening
6.1. Using the Mechanical and Password Lock
The lock box is equipped with a mechanical password lock for security. To open the box, enter the correct combination. To lock, ensure the door is fully closed and scramble the combination dials.
Setting/Resetting the Combination: Refer to the specific instructions provided with the lock mechanism. Typically, a key is used to reset the combination. Insert the key, turn it to the reset position, set your new combination, and then return the key to its original position and remove it.
6.2. Varmeafledning
The lock box features double-sided ventilation holes to facilitate air circulation and heat dissipation. Ensure these vents are not obstructed to maintain optimal operating temperature for your EV charger.

Figur 6.1: Side view highlighting the heat dissipation vents.
7. Vedligeholdelse
Regular maintenance will ensure the longevity and optimal performance of your EV Charger Lock Box.
- Rensning: Tør ydersiden af med jævne mellemrum med en blød,amp cloth to remove dust and dirt. Avoid abrasive cleaners that could damage the finish or tempered glass.
- Ventilationskontrol: Ensure that the ventilation holes on the sides and bottom are clear of debris (leaves, dust, insects) to allow for proper airflow and heat dissipation.
- Låsemekanisme: Lubricate the lock mechanism annually with a graphite-based lubricant to ensure smooth operation.
- Strukturel integritet: Periodically inspect the mounting screws and the box structure for any signs of loosening, corrosion, or damage. Tighten screws as needed.
- Vandafledning: Verify that the hidden rainwater drainage channels are not blocked.
8. Fejlfinding
| Problem | Mulig årsag | Løsning |
|---|---|---|
| Box door difficult to open/close | Misalignment; debris in hinges; lock mechanism stiff. | Check alignment; clean hinges; lubricate lock. |
| Condensation inside the box | Blocked ventilation holes; extreme temperature fluctuations. | Clear ventilation holes; ensure proper airflow. |
| Lock combination not working | Incorrect combination entered; lock mechanism jammed. | Ensure correct combination; use key to reset if applicable; lubricate lock. |
| Vandindtrængning | Damaged seals; blocked drainage; improper installation. | Inspect seals for damage; clear drainage channels; re-evaluate installation. |
9. Specifikationer
| Attribut | Detalje |
|---|---|
| Model | QianBaiwan0920 |
| Dimensioner (L x B x H) | 19.6 x 9.8 x 27.5 tommer (500 x 250 x 700 mm) |
| Materiale | Cold-rolled steel plate, Tempered glass |
| Beskyttelsesvurdering | IP65 (vandtæt og støvtæt) |
| Låsetype | Mechanical and Password Lock |
| Ventilation | Double-sided heat dissipation holes |
| Kompatibilitet | Suitable for most EV charger stations (extended depth) |
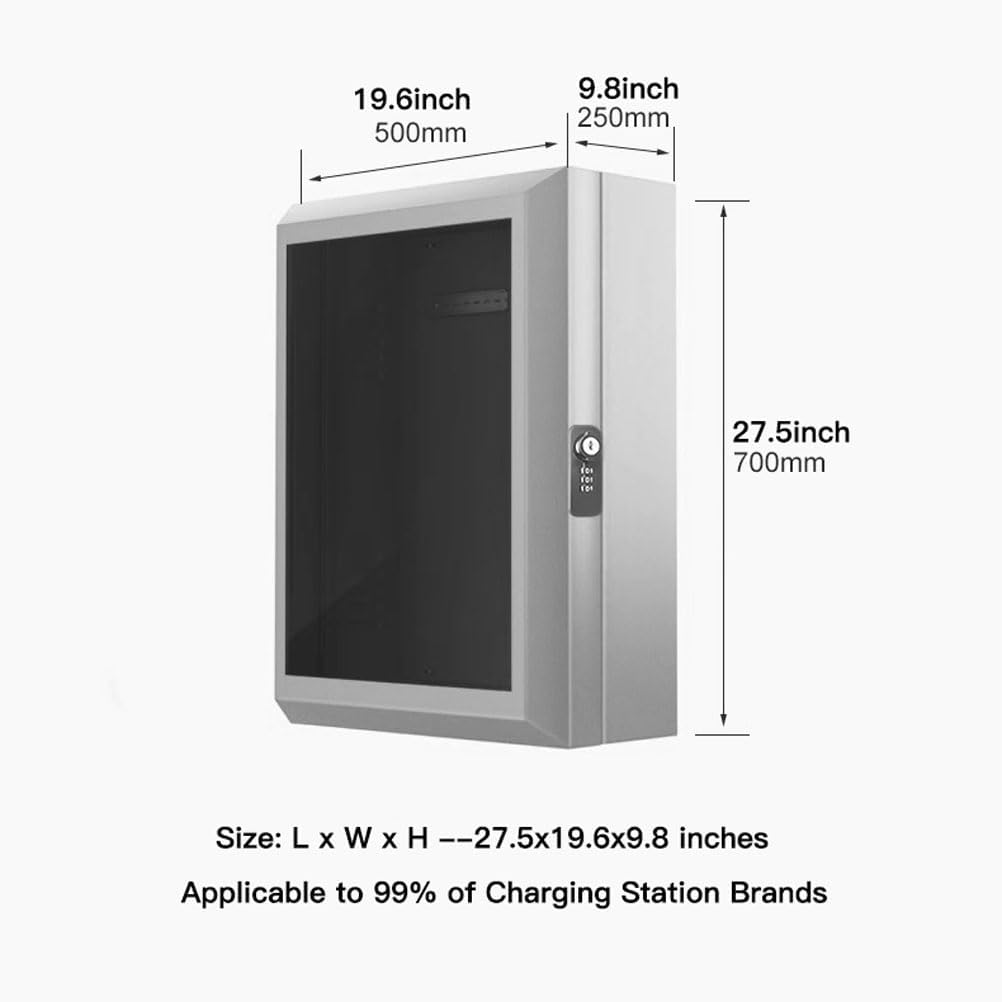
Figur 9.1: Produktmål: 19.6 cm (bredde) x 9.8 cm (dybde) x 27.5 cm (højde).
10. Garanti og support
For warranty information and technical support, please contact the manufacturer or seller directly. Keep your purchase receipt as proof of purchase.
Fabrikant: QianBaiwan
Dato først tilgængelig: 20. september 2024
For further assistance, please refer to the contact information provided at the point of purchase or on the product packaging.