1. Introduktion
This manual provides detailed instructions for the setup, operation, and maintenance of the MakerHawk Vision Master E213 ESP32-S3R8 LoRa Development Board. This board integrates an ESP32-S3R8 microcontroller with a SX1262 LoRa chip and a 2.13-inch E-Ink display, offering versatile wireless connectivity and low-power display capabilities for various IoT and development projects.
2. Produktet er slutview
The Vision Master E213 is a compact and powerful development board designed for applications requiring long-range wireless communication and ultra-low power display. It combines Wi-Fi, Bluetooth, and LoRa connectivity with an energy-efficient E-Ink screen, making it suitable for projects like Meshtastic nodes, environmental monitoring, and other battery-powered IoT devices.

Figure 2.1: Vision Master E213 Development Board with its included accessories, featuring the main board with a 2.13-inch E-Ink display, a LoRa antenna, and pin headers.
3. Nøglefunktioner
- Versatile Wireless Connectivity: Equipped with ESP32-S3R8 MCU, supporting Wi-Fi, Bluetooth, and LoRa (SX1262 chip) for diverse application requirements.
- Long-lasting Display Performance: Features a 2.13-inch E-Ink display with ultra-low power consumption (20uA in deep sleep), capable of retaining display content for up to 180 days after power-off.
- Robust Battery Management: Includes a built-in SH1.25-2 battery interface and an integrated lithium battery management system for safe charging/discharging, overcharge protection, battery level detection, and automatic USB/battery power switching.
- Arduino Compatibility & Sensor Interface: Compatible with Arduino development frameworks and libraries for easy programming. Features two SH2.0-4P sensor interfaces, compatible with QuickLink series sensors.
- Open-source Project Support: Supports popular development frameworks like PlatformIO and MicroPython, and is compatible with open-source projects such as Meshtastic.
4. Pakkens indhold
Bekræft, at alle nedenstående varer er til stede i din pakke:

Figure 4.1: Contents of the Vision Master E213 package, including the main board, LoRa antenna, and battery connector.
- 1x HT-VME213 (Vision Master E213 Development Board)
- 1x LoRa Antenna
- 1x SH1.25x2 Battery Connector Cable
5. Hardwarebeskrivelse
5.1. Komponentlayout
The following diagram illustrates the key components and interfaces on the Vision Master E213 board.

Figure 5.1: Detailed component layout of the Vision Master E213 board, showing the ESP32, LoRa module, E-Ink display, USB Type-C, battery interface, and various antennas.
5.2. Pinout-diagram
Understanding the pinout is crucial for connecting external sensors and peripherals. Refer to the diagram below for GPIO assignments.

Figure 5.2: Comprehensive pinout diagram for the Vision Master E213, indicating power, ground, GPIO, ADC/DAC, and serial communication pins.
5.3. Dimensioner
The physical dimensions of the Vision Master E213 board are provided for integration into custom enclosures or projects.

Figure 5.3: Dimensional drawing of the Vision Master E213 board, showing measurements in millimeters for length, width, and height.
6. Opsætning
Follow these steps to prepare your Vision Master E213 for development:
- Tilslut antenne: Carefully connect the provided LoRa antenna to the U.FL connector on the board. Ensure a secure connection.
- Strømforsyning: Connect the board to a computer using a USB Type-C cable. The board can also be powered via the SH1.25-2 lithium battery interface.
- Driver installation: Depending on your operating system, you may need to install USB-to-serial drivers (e.g., CP210x or CH340) for the ESP32-S3.
- Opsætning af udviklingsmiljø: Install the Arduino IDE, PlatformIO, or MicroPython environment. Add the ESP32 board support package for ESP32-S3.
- Installation af bibliotek: Install necessary libraries for LoRa communication (SX1262) and E-Ink display control. Refer to the official Heltec documentation for specific library recommendations.
7. Betjeningsvejledning
7.1. Programming the Board
Once your development environment is set up, you can upload your code to the Vision Master E213. Select the correct board model (ESP32-S3 Dev Module or similar) and COM port in your IDE. Use the provided examples or develop your own code to utilize the Wi-Fi, Bluetooth, LoRa, and E-Ink display functionalities.
7.2. E-Ink Display Usage
The 2.13-inch E-Ink display is designed for low-power, static information display. Full refreshes can take a few seconds. Avoid frequent full refreshes to prolong the display's lifespan. Partial updates may be supported by specific libraries for faster, localized changes.
7.3. LoRa Communication
The integrated SX1262 LoRa chip supports long-range, low-power communication. Configure LoRa parameters such as frequency (902-928MHz for this model), spreading factor, bandwidth, and coding rate according to your application and regional regulations. The board is compatible with LoRaWAN and Meshtastic protocols.
7.4. Batteristyring
The board's battery management system handles charging and discharging of a connected 3.7V lithium battery. Monitor battery levels through software to optimize power usage and ensure reliable operation in portable applications.
8. Vedligeholdelse
- Rensning: Use a dry, soft cloth to clean the board. Avoid using liquids or solvents.
- Opbevaring: Opbevar printpladen et tørt og antistatisk sted, når den ikke er i brug.
- Håndtering: Handle the board by its edges to avoid touching components, especially the E-Ink display, which can be delicate.
- Firmwareopdateringer: Regularly check for updated firmware or libraries from the manufacturer or community to ensure optimal performance and access to new features.
9. Fejlfinding
- Board ikke fundet: Ensure USB Type-C cable is properly connected. Install necessary USB-to-serial drivers. Try a different USB port or cable.
- Uploadfejl: Verify that the correct board and COM port are selected in your IDE. Ensure no other application is using the serial port. Check for syntax errors in your code.
- E-Ink Display Not Updating: Confirm display libraries are correctly installed and initialized. Check power supply to the display. E-Ink displays have a slower refresh rate; allow sufficient time for updates.
- LoRa-kommunikationsproblemer: Ensure the LoRa antenna is securely connected. Verify LoRa parameters (frequency, spreading factor, etc.) match between devices. Check for interference in the operating frequency band.
- Battery Not Charging/Powering On: Ensure the battery is correctly connected to the SH1.25-2 interface. Check battery voltage. Verify USB power source is sufficient.
10. Tekniske specifikationer
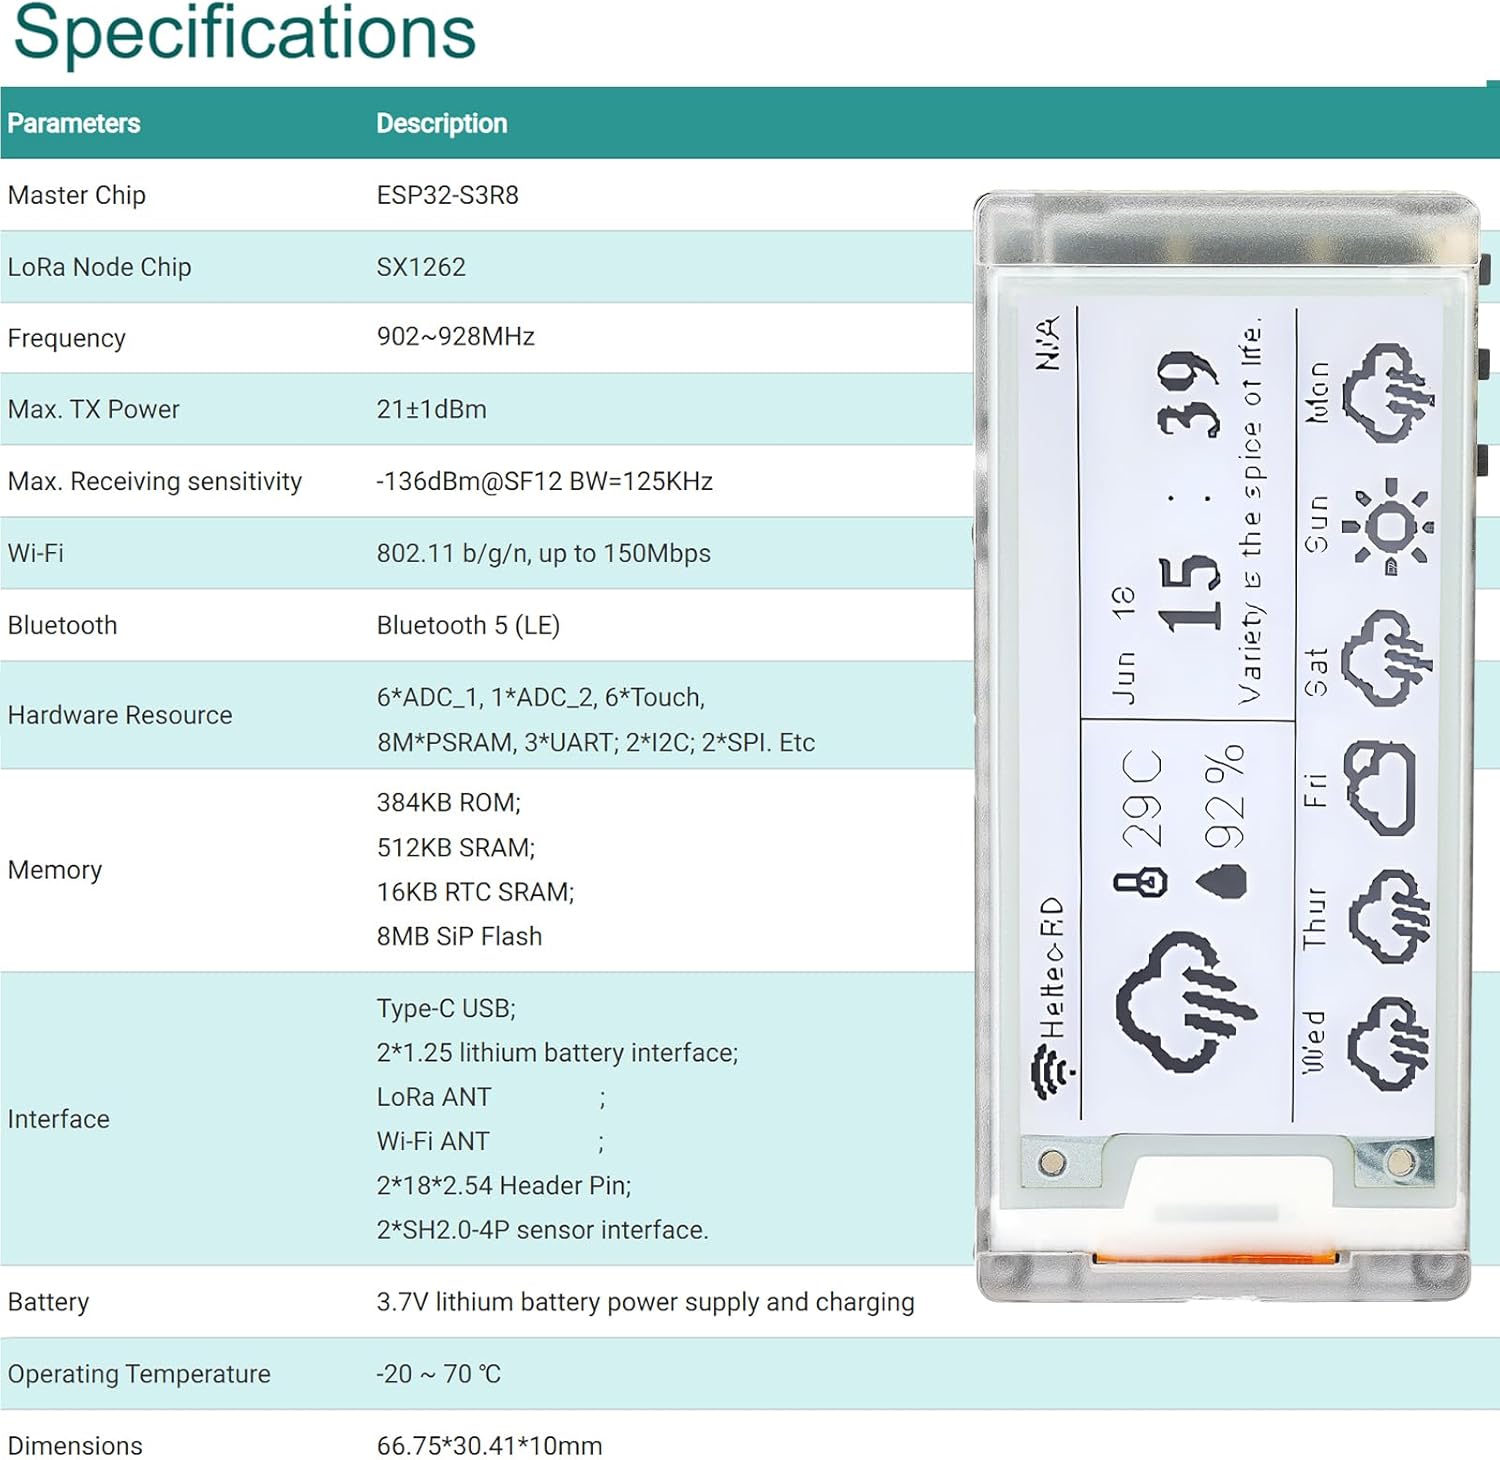
Figur 10.1: Overview of the Vision Master E213 technical specifications.
| Parameter | Beskrivelse |
|---|---|
| Master Chip | ESP32-S3R8 |
| LoRa Node Chip | SX1262 |
| Frekvens | 902-928 MHz |
| Maks. TX -strøm | 21 ± 1dBm |
| Maks. Modtagelse af følsomhed | -136dBm@SF12 BW=125KHz |
| Wi-Fi | 802.11 b/g/n, op til 150 Mbps |
| Bluetooth | Bluetooth 5 (LE) |
| Hardware ressourcer | 6*ADC_1, 1*ADC_2, 6*Touch, 8M*PSRAM, 3*UART, 2*I2C, 2*SPI, etc. |
| Hukommelse | 384KB ROM; 512KB SRAM; 16KB RTC SRAM; 8MB SIP Flash |
| Grænseflader | USB Type-C; 2*1.25 lithium battery interface; LoRa ANT; Wi-Fi ANT; 2*18*2.54 Header Pin; 2*SH2.0-4P sensor interface. |
| Batteri | 3.7V lithium battery power supply and charging |
| Driftstemperatur | -20 ℃ ~ 70 ℃ |
| Dimensioner | 66.75 x 30.41 x 10 mm |
11. Yderligere ressourcer og support
For further technical documentation, examples, and community support, please refer to the official Heltec Automation resources. These resources provide detailed information on ESP32 development, LoRa libraries, and E-Ink display programming.

Figure 11.1: Screenshot of the Heltec Automation documentation and resources page, providing access to frameworks, libraries, schematics, and datasheets.
- Officiel dokumentation: Besøg Heltec Automation Vision Master E213 project page for datasheets, schematics, and development guides.
- Producentsupport: For product-specific inquiries, you can visit the MakerHawk Store on Amazon.