1. Introduktion
This manual provides detailed instructions for the installation, usage, and maintenance of the MECCANIXITY Aluminum Alloy 25T Steering Servo Arm Horn. This component is designed for use with RC cars, boats, and airplanes requiring a 25T spline servo output. Please read this manual thoroughly before installation to ensure proper function and longevity of the product.
2. Produktet er slutview
2.1. Pakkens indhold
- 2 Pcs x 25T Aluminum Servo Horn
- 4 Pcs x Screw
2.2. Funktioner
- Constructed from durable aluminum alloy for enhanced precision and longevity.
- CNC machined for accurate dimensions and fit.
- Includes a bolt to securely fasten the split clamp onto the servo output shaft.
- Designed for 25T spline servo applications.
2.3. Specifikationer
| Specifikation | Værdi |
|---|---|
| Samlet længde | 35 mm (1.4 tomme) |
| Tykkelse | 6 mm (0.24 tomme) |
| Hole Center Distance (Far) | 26 mm (1.02 tomme) |
| Hole Center Distance (Near) | 22 mm (0.87 tomme) |
| Monteringsåbning | 3 mm (0.12 tomme) |
| Servo Output Aperture | 5.5 mm (0.21 tomme) |
| Materiale | Aluminiumslegering |
| Farve | Orange |
| Vægt | Cirka 0.704 ounces (pr. par) |
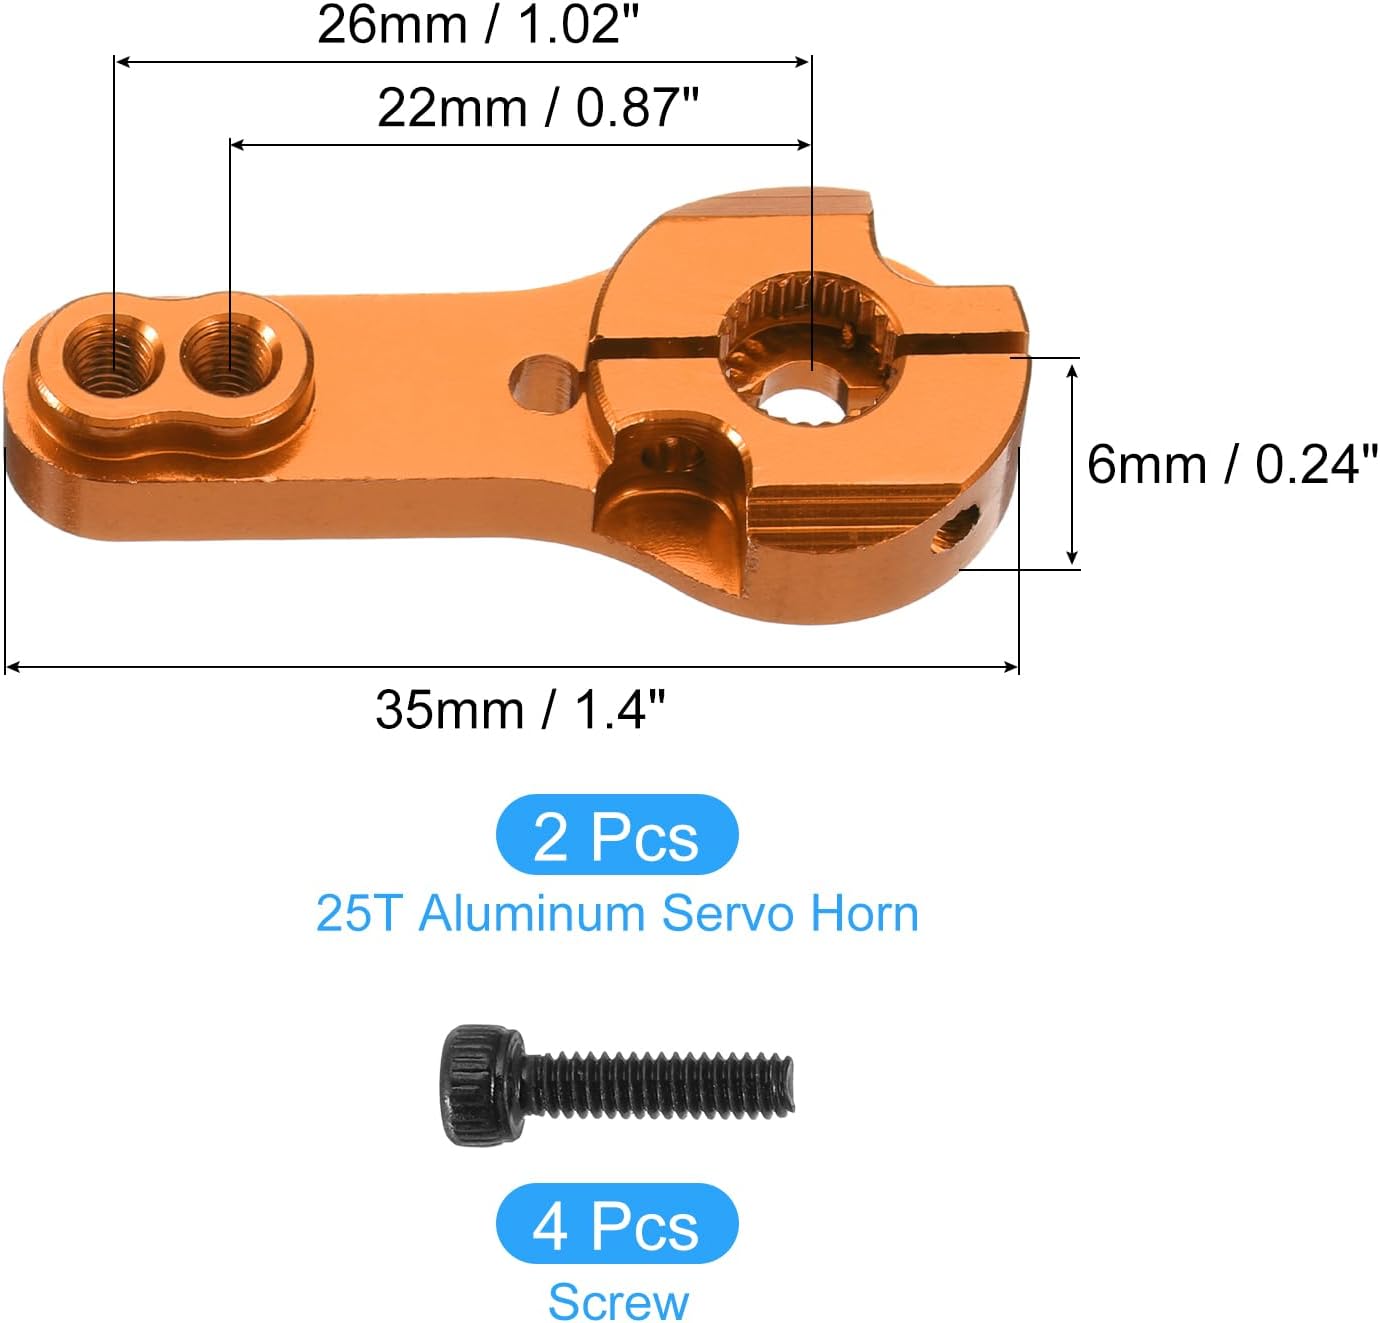
Figure 1: Dimensional diagram of the 25T Aluminum Servo Horn, illustrating key measurements such as 35mm overall length, 6mm thickness, and 26mm/22mm hole center distances.

Figure 2: The 25T Aluminum Servo Horn, showcasing its aluminum alloy construction.
3. Opsætning og installation
The MECCANIXITY 25T Aluminum Servo Arm Horn is designed for straightforward installation. Follow these steps carefully:
- Forberedelse: Ensure your RC vehicle's power is off. If replacing an existing servo horn, carefully remove the old horn from the servo output shaft.
- Attach Steering Link: Connect your steering linkage or control rod to the appropriate hole on the new 25T Aluminum Servo Horn. Ensure the connection is secure but allows for free movement.
- Mount to Servo: Carefully slide the new servo horn onto the 25T spline output shaft of your servo. Ensure it is fully seated and aligned correctly.
- Secure the Horn: Use the provided main center screw to secure the servo horn to the servo output shaft. Tighten gently to prevent stripping the threads, ensuring the horn is firmly attached and does not wobble.
- Endelig kontrol: Once installed, gently move the steering linkage by hand to confirm smooth operation and proper range of motion without binding.
Note: This package includes only the 25T servo arm and screws; the servo unit itself is not included.

Figur 3: Eksample of a servo motor, indicating the component to which the servo horn attaches.

Figure 4: An RC car chassis, demonstrating the typical environment for servo horn installation.
4. Brug og betjening
Once properly installed, the MECCANIXITY 25T Aluminum Servo Arm Horn functions as the mechanical link between your servo motor and the steering or control surface of your RC vehicle. It translates the rotational motion of the servo into linear motion required for steering or other control actions.
- Ensure the servo horn is always securely fastened to the servo shaft to prevent loss of control during operation.
- Regularly check for any signs of wear or damage, especially after impacts or heavy use.
- Confirm that the steering or control surfaces move freely and without obstruction across their full range of motion.
5. Vedligeholdelse
To ensure optimal performance and extend the lifespan of your aluminum servo horn, consider the following maintenance tips:
- Rensning: Periodically clean the servo horn to remove dirt, dust, and debris. A soft brush or compressed air can be used. Avoid harsh chemicals that may damage the aluminum finish.
- Inspektion: Regularly inspect the servo horn for any signs of bending, cracks, or excessive wear, particularly around the mounting holes and the servo spline area.
- Fastgørelseskontrol: Ensure all screws, especially the main center screw securing the horn to the servo, remain tight. Loose fasteners can lead to play in the steering or control system.
- Opbevaring: When not in use, store the servo horn and your RC vehicle in a clean, dry environment away from extreme temperatures.
6. Fejlfinding
If you encounter issues with your MECCANIXITY 25T Aluminum Servo Arm Horn, consider the following:
- Loose Steering/Control:
Mulig årsag: Servo horn not securely fastened to the servo shaft.
Løsning: Re-tighten the main center screw. Ensure the servo horn is fully seated on the servo spline. - Limited Movement or Binding:
Mulig årsag: Steering linkage or control rod is incorrectly attached or obstructed.
Løsning: Check the attachment points of the steering linkage to the servo horn and the control surface. Ensure no other components are interfering with the horn's movement. - Damaged Horn:
Mulig årsag: Stød eller overdreven kraft.
Løsning: If the servo horn is bent, cracked, or stripped, it must be replaced to maintain proper control and prevent further damage to the servo.
7. Garanti og support
For warranty information and customer support regarding your MECCANIXITY Aluminum Alloy 25T Steering Servo Arm Horn, please refer to the purchase documentation or contact the seller directly. MECCANIXITY is committed to providing quality products and support.