1. Introduktion
The VOCOO Wireless Indoor Outdoor Thermometer Hygrometer (Model 5276) provides accurate, real-time monitoring of temperature and humidity both indoors and outdoors. This device features a large LCD display, a wireless remote sensor, and various functions to help you maintain a comfortable and healthy environment. This manual will guide you through the setup, operation, and maintenance of your device to ensure optimal performance.

Image 1.1: Main unit and wireless outdoor sensor.
2. Hvad er der i æsken
- 1 x Indoor Thermometer Unit
- 1 x trådløs udendørssensor
- 4 x AAA-batterier (kan være forudinstalleret eller inkluderet separat)
3. Produktfunktioner
- Trådløs overvågning: Connects to 1 wireless outdoor sensor (IP43 waterproof) with a transmission range of up to 100m/328ft in open areas.
- Stort baggrundsbelyst LCD-display: A 3.7-inch screen (90x87x23 mm) for easy reading of temperature, humidity, and settings, even from a distance or in low light conditions.
- High Precision & Fast Refresh: Updates readings every 10 seconds for current data.
- Bredt måleområde:
- Indoor Temperature: 14°F~140°F (-10℃~60℃)
- Outdoor Temperature: -40°F~158°F (-40℃~70℃)
- Fugtighed: 10% ~ 95% RH
- Nøjagtighed: Temperature ±1℃, Humidity ±3-5%RH.
- Multifunktionelt display: Includes switchable ℃/℉ units, 12/24 hour time and date display, air comfort indicators, temperature and humidity trend arrows, and a low battery icon.
- Min./maks. optegnelser: Displays maximum and minimum temperature/humidity data, which automatically clears after 24 hours.
- Fleksible monteringsmuligheder: The indoor unit has a wall-hanging hole and a retractable stand for tabletop placement. The outdoor sensor includes a hook for easy mounting.

Billede 3.1: Overview af produktets funktioner.
4. Opsætning
4.1 Batteriinstallation
- Indendørs enhed: Åbn batteridækslet på bagsiden af hovedenheden. Isæt 2 AAA-batterier, og sørg for at polerne vender korrekt (+/-). Luk dækslet.
- Udendørs sensor: Åbn batteridækslet på bagsiden af udendørssensoren. Isæt 2 AAA-batterier, og sørg for at polerne vender korrekt (+/-). Luk dækslet.
4.2 Sensorparring
The indoor unit and outdoor sensor should automatically pair once batteries are installed. If the outdoor temperature/humidity is not displayed after a few minutes, follow these steps:
- Sørg for, at begge enheder har nye batterier.
- Place the outdoor sensor close to the indoor unit.
- Press and hold the 'CLEAR' button on the indoor unit for 3 seconds to clear previous data and initiate a new search for the sensor.
- If pairing fails, remove batteries from both units, wait 1 minute, and reinsert them.
4.3 Placering
- Indendørs enhed: Place the indoor unit on a flat surface using its retractable stand, or mount it on a wall using the hanging hole. Ensure it is away from direct sunlight, heat sources, or drafts that could affect readings.
- Udendørs sensor: Mount the outdoor sensor in a shaded, dry location, protected from direct rain and sunlight, to ensure accurate readings. Avoid placing it near metal objects or large electrical appliances that could interfere with the wireless signal. The maximum effective range is 100m/328ft in an open area, but walls and obstacles will reduce this distance.

Image 4.1: Dimensions and mounting options for the main unit and sensor.

Image 4.2: Wireless transmission range and recommended placement for the outdoor sensor.
5. Betjeningsvejledning
5.1 Valg af temperaturenhed (℃/℉)
Press the '℃/℉' button on the back of the indoor unit to switch between Celsius and Fahrenheit temperature displays.
5.2 Min./maks.-optegnelser
The device automatically records the maximum and minimum temperature and humidity values over a 24-hour period. These records are automatically cleared every 24 hours.
- Press the 'MAX/MIN' button once to view de maksimalt registrerede værdier.
- Press the 'MAX/MIN' button again to view de mindste registrerede værdier.
- Press the 'MAX/MIN' button a third time to return to current readings.
- To manually clear the Min/Max records, press and hold the 'MAX/MIN' button for 3 seconds while viewi optegnelserne.

Image 5.1: Display showing Min/Max temperature and humidity records.
5.3 Baggrundsbelysning
The LCD display features a white backlight for improved visibility in dark conditions.
- Touch the light icon area at the bottom of the screen to activate the backlight.
- The backlight will remain on for a few seconds before automatically turning off to conserve battery power.

Image 5.2: Backlit LCD display for clear visibility.
5.4 Indstilling af klokkeslæt og dato
The device displays the current time and date. Refer to the specific instructions on the back of the unit or the included quick start guide for detailed steps on setting the time and date (12/24 hour format).
6. Vis oplysninger
Den store LCD-skærm giver omfattende information med et hurtigt blik:
- UD: Displays outdoor temperature and humidity from the wireless sensor.
- I: Viser indendørs temperatur og luftfugtighed målt af hovedenheden.
- CH1: Indicates the channel for the outdoor sensor (this model supports one sensor).
- Temperature/Humidity Trend Arrows: Arrows indicate whether temperature or humidity is rising, falling, or remaining stable.
- Luftkomfortindikator: A colored bar graph categorizes the current indoor humidity level into DRY (0-30%), COMFORT (31-70%), or WET (71-99%).
- Tid og dato: Current time and date (AM/PM indicator for 12-hour format).
- Ikon for lavt batteri: Appears when batteries in either the main unit or sensor need replacement.
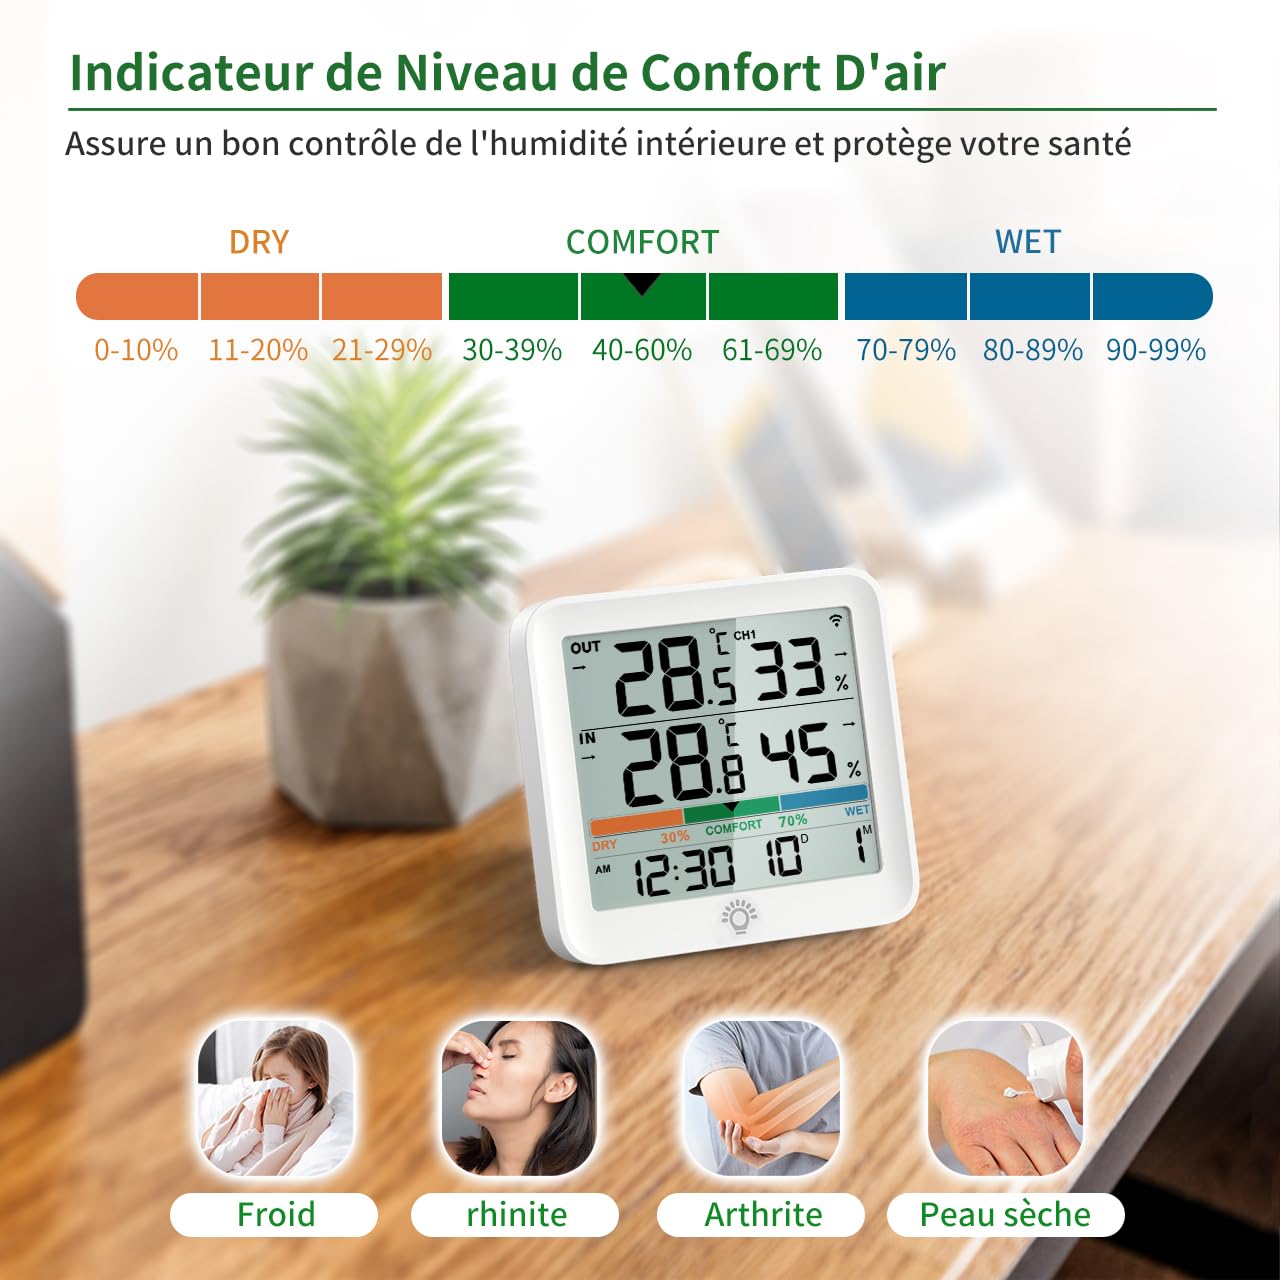
Image 6.1: Air comfort indicator showing DRY, COMFORT, and WET zones.
7. Specifikationer
| Feature | Specifikation |
|---|---|
| Modelnummer | 5276 |
| Indendørs temperaturområde | -10℃ til 60℃ (14°F til 140°F) |
| Udendørs temperaturområde | -40℃ til 70℃ (-40°F til 158°F) |
| Fugtighedsområde | 10% til 95% RH |
| Temperatur nøjagtighed | ±1°C |
| Fugtighedsnøjagtighed | ±3-5% RF |
| Trådløs transmissionsrækkevidde | Op til 100 m / 328 fod (åbent område) |
| Strømkilde | 4 x AAA-batterier (2 til hovedenhed, 2 til sensor) |
| Hovedenhedens dimensioner | 17 x 11 x 4 cm |
| Monteringstype | Wall mount, Tabletop |
| UPC | 677222587383 |

Image 7.1: Detailed temperature and humidity monitoring ranges.
8. Vedligeholdelse
8.1 Udskiftning af batteri
When the low battery icon appears on the display, replace the batteries in the respective unit (main unit or outdoor sensor) with new AAA batteries. Ensure correct polarity.
8.2 Rengøring
Tør enheden og sensoren af med en blød kludamp cloth. Do not use abrasive cleaners or immerse the units in water. Ensure the outdoor sensor's waterproof seal is intact after battery replacement.
9. Fejlfinding
- Ingen aflæsning af udendørs temperatur/fugtighed:
- Check if the outdoor sensor batteries are installed correctly and are not depleted.
- Ensure the outdoor sensor is within the effective transmission range (100m/328ft in open air) and there are no major obstructions or sources of interference between the sensor and the main unit.
- Try re-pairing the sensor by pressing and holding the 'CLEAR' button on the main unit for 3 seconds.
- Upræcise læsninger:
- Ensure both units are placed away from direct sunlight, heat sources, or strong drafts.
- Lad enhederne stabilisere sig i mindst 30 minutter efter den første opsætning eller flytning.
- Compare readings with another known accurate thermometer/hygrometer.
- Skærm virker ikke:
- Check and replace the batteries in the main unit.
- Sørg for, at batterierne er isat med den korrekte polaritet.
10. Garanti og support
This product comes with a standard return policy. For specific warranty details, technical support, or further assistance, please refer to the manufacturer's official website or contact customer service through your point of purchase. Keep your purchase receipt for warranty claims.