1. Introduktion
Thank you for choosing the SIFENE Mini Single Serve Coffee Maker, Model KC211. This manual provides essential information for the safe operation, maintenance, and troubleshooting of your new coffee maker. Please read it thoroughly before first use and retain it for future reference.

Image 1.1: SIFENE Mini Single Serve Coffee Maker in operation, showing coffee pouring into a white mug.
2. Vigtige sikkerhedsinstruktioner
Ved brug af elektriske apparater skal grundlæggende sikkerhedsforanstaltninger altid følges for at reducere risikoen for brand, elektrisk stød og/eller personskade, herunder følgende:
- Læs alle instruktioner.
- Rør ikke ved varme overflader. Brug håndtag eller knopper.
- For at beskytte mod brand, elektrisk stød og personskade må ledning, stik eller kaffemaskine ikke nedsænkes i vand eller anden væske.
- Tæt opsyn er nødvendigt, når et apparat bruges af eller i nærheden af børn.
- Træk stikket ud af stikkontakten, når det ikke er i brug, og før rengøring. Lad det køle af, før du sætter dele på eller af, og før du rengør apparatet.
- Betjen ikke noget apparat med en beskadiget ledning eller stik, eller efter at apparatet ikke fungerer korrekt eller er blevet beskadiget på nogen måde. Returner apparatet til det nærmeste autoriserede serviceværksted for undersøgelse, reparation eller justering.
- Brug af tilbehør, der ikke er anbefalet af apparatets producent, kan resultere i brand, elektrisk stød eller personskade.
- Må ikke bruges udendørs.
- Lad ikke ledningen hænge ud over kanten af bordet eller bordpladen eller røre ved varme overflader.
- Må ikke placeres på eller i nærheden af en varm gas- eller elektrisk brænder eller i en opvarmet ovn.
- Sæt altid stikket i apparatet først, og sæt derefter ledningen i stikkontakten. For at afbryde forbindelsen skal du slukke for en vilkårlig knap og derefter tage stikket ud af stikkontakten.
- Brug ikke apparatet til andet end tilsigtet brug.
- Dette apparat er kun til husholdningsbrug.
3. Produktet er slutview
3.1 Nøglefunktioner
- 2-i-1 brygning: Compatible with K-pods and fresh coffee grounds using the included reusable stainless steel filter.
- Customizable Water Levels: Clear water window with measurements from 6 to 12 oz for precise filling.
- Hurtig brygning: Brews a 12 oz cup in approximately 2 minutes.
- One-Touch Control: Simple operation with a single button.
- Kompakt design: Ideal for small spaces (4.3" D x 7.8" W x 9.4" H).
- Self-Cleaning & Descaling Reminder: Indicator light for descaling and easy cleaning process.
- BPA-fri materialer: Constructed from non-BPA materials for safety.
3.2 Komponenter

Billede 3.1: Overview of the coffee maker with key dimensions and features. The image shows the compact size of the coffee maker (7.8" W x 4.3" D x 9.4" H) next to a water bottle and a coffee mug, highlighting its small footprint and the water window with cup size markings (6, 8, 10, 12 oz).
- Vandreservoir med vandvindue
- Låg
- Bryghoved
- Control Button / Descale Indicator
- Drypbakke
- K-pod Holder (removable)
- Ground Coffee Filter Basket (removable)
4. Opsætning og første brug
4.1 Udpakning
Carefully remove all packaging materials and inspect the coffee maker for any damage. Ensure all components listed in Section 3.2 are present.
4.2 Indledende rengøring
Before first use, clean all removable parts (K-pod holder, ground coffee filter basket, drip tray) with warm, soapy water. Wipe the exterior of the coffee maker with a damp klæde. Nedsænk ikke hovedenheden i vand.
4.3 First Brew Cycle (Cleaning Cycle)
To prime the machine and remove any manufacturing residues:
- Fill the water reservoir with fresh water up to the MAX (12 oz) line.
- Placer et tomt krus på drypbakken.
- Close the lid without any K-pod or ground coffee filter inserted.
- Press the power button once. The white light will illuminate, and the machine will begin a brewing cycle, dispensing hot water into the mug.
- Once the cycle is complete, discard the hot water. Your coffee maker is now ready for use.
5. Betjeningsvejledning
5.1 Brewing with K-pods
- Åbn låget på kaffemaskinen.
- Insert a K-pod into the K-pod holder. Ensure the K-pod is seated correctly.
- Fill the water reservoir with fresh water to your desired level (6-12 oz). Do not exceed the MAX line.
- Placer din kaffekrus på drypbakken.
- Close the lid firmly. Ensure the handle of the holder is placed horizontally for proper closure.
- Press the power button once for hot coffee. The white light will indicate brewing.
- Wait for the brewing cycle to complete. Do not open the lid during brewing.
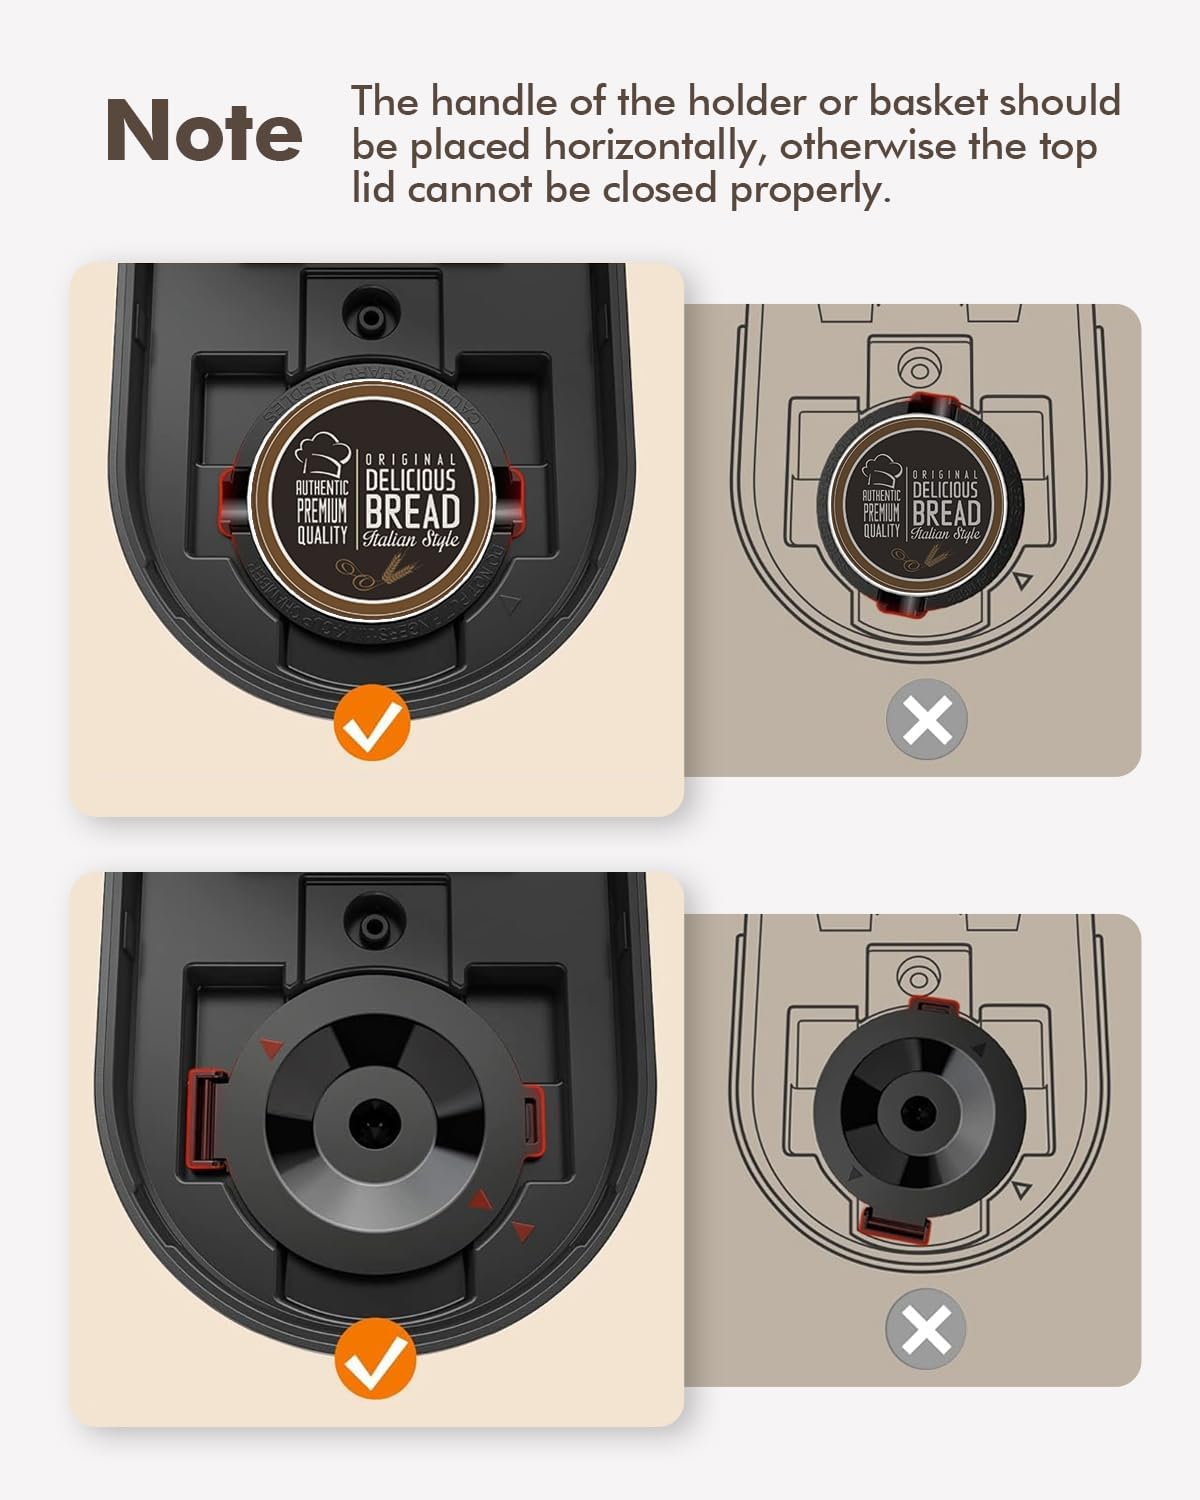
Image 5.1: Correct placement of K-pod and ground coffee filter. The image illustrates the proper horizontal alignment of the holder handle for both K-pods and ground coffee filters to ensure the lid closes securely.
5.2 Brygning med formalet kaffe
- Åbn låget på kaffemaskinen.
- Insert the reusable ground coffee filter basket into the brew head.
- Add your desired amount of ground coffee to the filter basket. Do not overfill.
- Fill the water reservoir with fresh water to your desired level (6-12 oz). Do not exceed the MAX line.
- Placer din kaffekrus på drypbakken.
- Close the lid firmly. Ensure the handle of the filter basket is placed horizontally for proper closure.
- Press the power button once for hot coffee. The white light will indicate brewing.
- Wait for the brewing cycle to complete. Do not open the lid during brewing.
5.3 Iced Coffee Function
The coffee maker features an iced coffee brewing mode. Follow these steps:
- Prepare your K-pod or ground coffee as described above.
- Fill the water reservoir with fresh water to your desired level (6-12 oz).
- Fill your coffee mug with ice and place it on the drip tray.
- Luk låget godt fast.
- Press the power button twice. The blue light will illuminate, indicating iced coffee brewing mode.
- Vent på, at bryggecyklussen er fuldført.

Image 5.2: Control panel with power button and descale reminder. The image shows the power button and the "DESCALE" indicator light, along with simple operating instructions printed on the lid.
6. Vedligeholdelse og rengøring
6.1 Daglig rengøring
- After each use, remove and rinse the K-pod holder or ground coffee filter basket.
- Tøm og skyl drypbakken.
- Tør ydersiden af kaffemaskinen af med adamp klæde.
6.2 Afkalkning
Over time, mineral deposits (scale) can build up in your coffee maker, affecting performance and coffee taste. The "DESCALE" indicator light will illuminate red when descaling is recommended.

Image 6.1: Preparing descaling solution. The image shows a hand pouring descaling powder into a measuring cup filled with water, next to the coffee maker.
Afkalkningsprocedure:
- Forbered en afkalkningsopløsning i henhold til producentens anvisninger (f.eks. en blanding af hvid eddike og vand eller et kommercielt afkalkningsmiddel).
- Pour the descaling solution into the water reservoir up to the MAX (12 oz) line.
- Place a large empty mug or container on the drip tray to collect the solution.
- Close the lid without any K-pod or ground coffee filter inserted.
- Press and hold the power button for 2 seconds to initiate the descaling cycle. The red "DESCALE" light will illuminate.
- The machine will run a descaling cycle, dispensing the solution. This may take longer than a regular brew cycle.
- Once the cycle is complete, discard the used solution.
- Rinse the reservoir thoroughly and run 2-3 cycles with fresh water to flush out any remaining descaling solution.
- The "DESCALE" light should turn off after successful descaling.
7. Fejlfinding
| Problem | Mulig årsag | Løsning |
|---|---|---|
| Coffee not brewing / No water dispensed. |
|
|
| Kaffen smager svagt eller vandig. |
|
|
| "DESCALE" light is on. | Mineralophobning i maskinen. | Udfør afkalkningsproceduren (afsnit 6.2). |
| Maskinen lækker. |
|
|
8. Specifikationer
| Feature | Detalje |
|---|---|
| Mærke | SIFENE |
| Modelnavn | KC211 |
| Produktdimensioner | 7.79" D x 4.33" B x 9.48" H |
| Kaffemaskine type | Drypkaffemaskine, enkeltportion |
| Kaffe input type | Both K-pods and ground coffee |
| Voltage | 120 volt |
| Særlige funktioner | Auto Clean Function, Auto Shut-Off, Permanent Filter, Descaling Reminder |
| Inkluderede komponenter | Single Serve Coffee Maker, 2 Filters (K-pod holder, ground coffee filter) |
| Varens vægt | 2.5 pund |
9. Garanti og support
9.1 Garantioplysninger
Specifikke garantioplysninger findes typisk på produktemballagen eller på producentens officielle webwebsted. Se venligst disse kilder for de mest nøjagtige og opdaterede garantivilkår.
9.2 Kundesupport
For technical assistance, troubleshooting beyond this manual, or warranty claims, please contact SIFENE customer support. Contact information can usually be found on the product packaging, the official SIFENE webhjemmeside eller gennem din forhandler.
Du kan også besøge SIFENE Store on Amazon for yderligere produktinformation og supportressourcer.