1. Produktet er slutview
The OUTDOORMASTER SHARK 3 Electric Air Pump is a high-performance, portable inflation and deflation device designed for various inflatables such as Stand-Up Paddleboards (SUPs), kayaks, air beds, and other high-pressure inflatable items. It features a built-in 74Wh battery, a maximum pressure of 20 PSI, an automatic stop function, and a pressure memory feature for convenient and efficient use.

Image 1.1: The OUTDOORMASTER SHARK 3 Electric Air Pump and its included accessories, including various nozzles for different inflatable valves.
Nøglefunktioner:
- Højhastighedsinflation: Inflates a 300L paddleboard to 15 PSI in approximately 5 minutes.
- Integrated 74Wh Battery: Allows inflation and deflation of up to 3 paddleboards on a single full charge, offering cordless convenience.
- Automatisk stop funktion: Automatically stops when the preset target pressure is reached, preventing over-inflation.
- Pressure Memory: Remembers the last set pressure for quick and easy repeated use across three modes (SUP, KITE, MAT).
- Real-time Pressure Monitoring: A digital LCD display shows current pressure and units (PSI/BAR) for precise control.
- 2-Way Charging: Supports 12V DC car charger input and Type-C input (up to 35W fast charging).
- Alsidige dyser: Includes 7 different nozzles to fit a wide range of inflatable products.
- Deflationsfunktion: Quickly deflates items for compact storage.
2. Sikkerhedsinstruktioner
Læs og forstå alle sikkerhedsinstruktioner, før du bruger enheden. Manglende overholdelse af disse instruktioner kan resultere i elektrisk stød, brand eller alvorlig personskade.
- Pumpen må ikke anvendes i våde omgivelser, og den må ikke nedsænkes i vand.
- Hold pumpen væk fra børn og kæledyr.
- Ensure the correct nozzle is securely attached to prevent air leakage and ensure efficient operation.
- Do not exceed the recommended pressure for your inflatable item. Refer to the inflatable product's manual for proper pressure settings.
- Bloker ikke luftindtaget eller -udløbet under drift.
- Avoid continuous operation for extended periods to prevent overheating. Allow the pump to cool down if it becomes hot.
- Use only the provided charging cables and adapters.
- Opbevar pumpen på et køligt, tørt sted, når den ikke er i brug.
- If the pump shows signs of damage or malfunction, discontinue use immediately and contact customer support.
3. Pakkens indhold
Bekræft at alle varer er til stede i din pakke:
- OUTDOORMASTER SHARK 3 Electric Air Pump
- Højtryksslange
- 7 x Universal Nozzles
- 12V DC bilstrømkabel
- Type-C opladerkabel
- Brugermanual

Image 3.1: All components included with the OUTDOORMASTER SHARK 3 Electric Air Pump.
4. Opsætning og opladning
4.1 Opladning af pumpen
Before first use, fully charge the pump. The pump can be charged using either the 12V DC car power cable or a Type-C charging cable.
- Using 12V DC Car Power Cable: Connect the 12V DC cable to the car's cigarette lighter socket and the other end to the pump's 12V DC input port.
- Using Type-C Charging Cable: Connect the Type-C cable to a compatible USB power adapter (not included) and the pump's Type-C input port. The pump supports fast charging up to 35W.
The digital display will indicate the charging status. A full charge allows for inflating/deflating up to 3 paddleboards.

Image 4.1: The pump supports 12V DC and Type-C charging inputs, and also offers Type-C output.
4.2 Montering af slange og dyse
- Identify the correct nozzle for your inflatable item's valve. The pump comes with 7 universal nozzles.
- Attach the chosen nozzle securely to the high-pressure hose.
- For inflation, connect the hose to the 'INFLATE' port on the pump. For deflation, connect it to the 'DEFLATE' port.
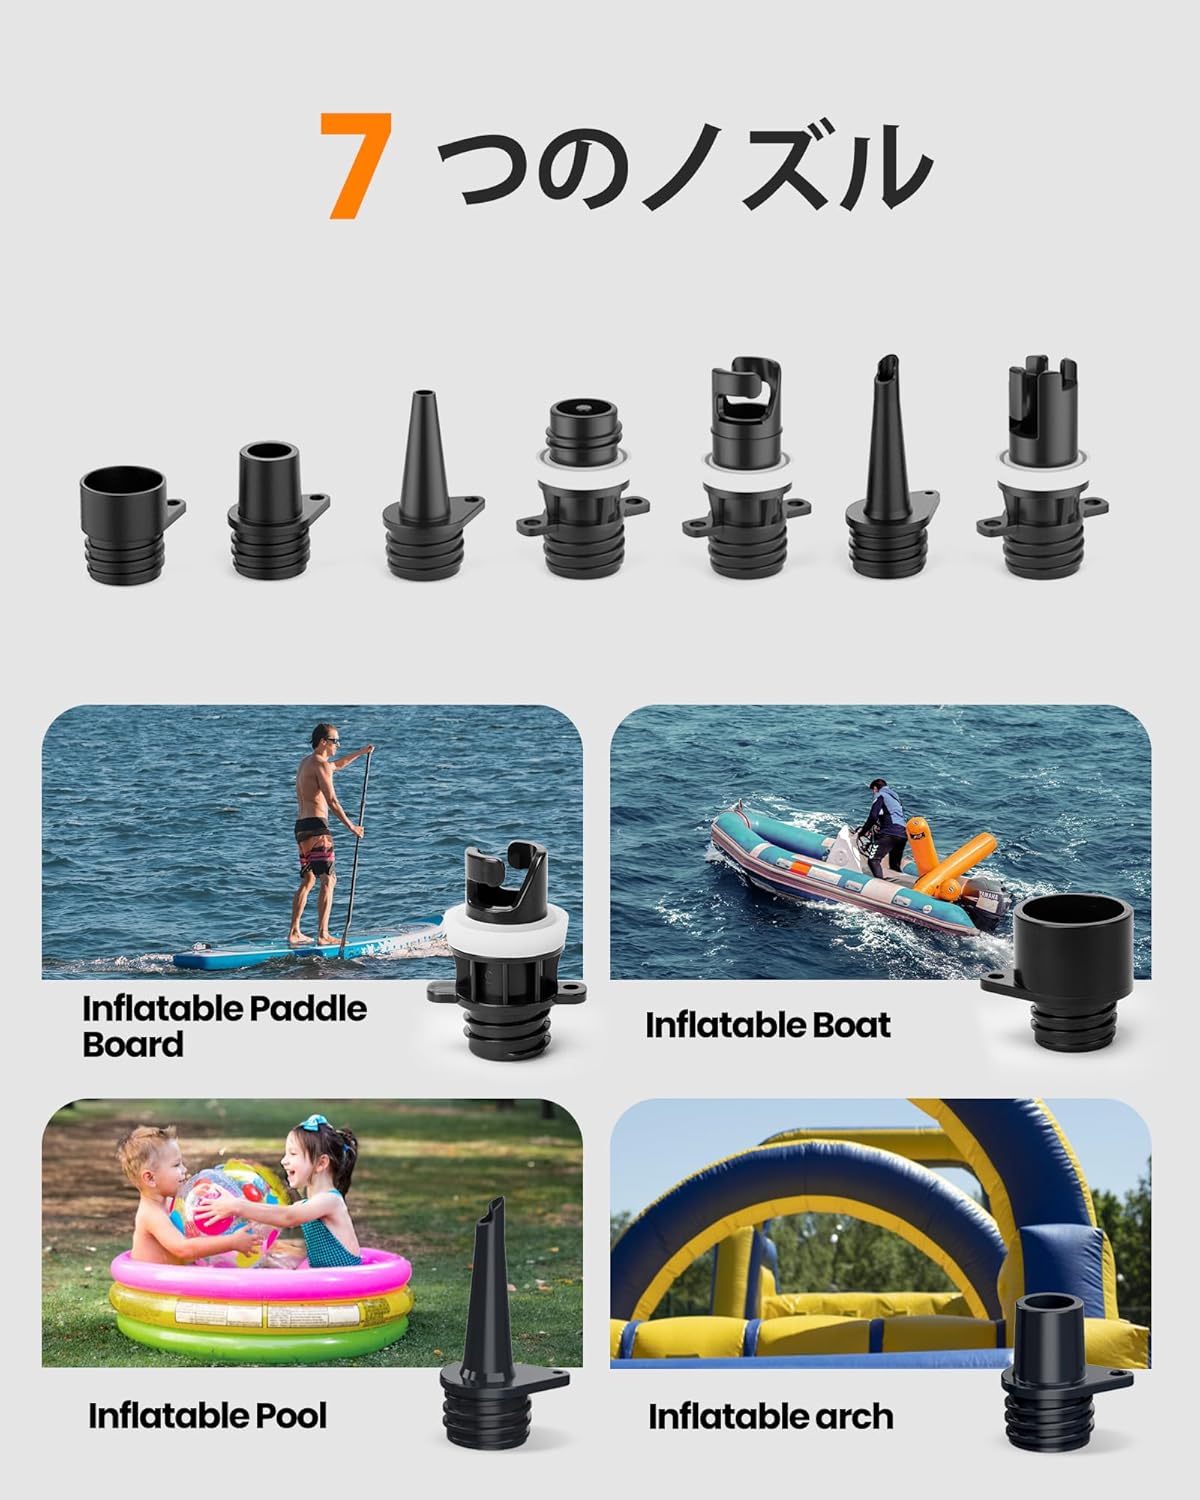
Image 4.2: A selection of the 7 universal nozzles provided for diverse inflatable applications.
5. Betjeningsvejledning
5.1 Oppustningsproces
- Ensure the pump is charged and the hose with the correct nozzle is connected to the 'INFLATE' port.
- Connect the nozzle to your inflatable item's valve.
- Press the power button to turn on the pump. The digital display will light up.
- Use the '+' and '-' buttons to set your desired pressure. The display shows pressure in real-time.
- Press the 'MODE' button to cycle through the three preset modes: SUP (Stand-Up Paddleboard), KITE (Kitesurfing/Inflatables), and MÅTTE (Air Mat/Bed). Each mode remembers its last pressure setting.
- Once the desired pressure is set, press the power button again to start inflation. The pump will automatically stop when the target pressure is reached.
- Disconnect the nozzle from the inflatable and the hose from the pump.

Image 5.1: The digital display provides real-time pressure feedback and indicates when the auto-stop function is active.

Image 5.2: The pump offers three distinct operating modes for different inflatable types.
5.2 Deflation Process
- Connect the hose with the appropriate nozzle to the 'DEFLATE' port on the pump.
- Connect the nozzle to your inflatable item's valve.
- Tryk på tænd/sluk-knappen for at tænde for pumpen.
- Press the power button again to start the deflation process. The pump will extract air from the inflatable.
- Once deflated to your satisfaction, turn off the pump and disconnect the hose and nozzle.

Image 5.3: The pump features dedicated ports for both inflation and deflation.
6. Vedligeholdelse
6.1 Rengøring
- Wipe the exterior of the pump with a soft, dry cloth.
- Brug ikke hårde kemikalier eller slibende rengøringsmidler.
- Ensure the air intake and outlet ports are free from dust and debris.
6.2 Opbevaring
- Store the pump and all accessories in a cool, dry place, away from direct sunlight and extreme temperatures.
- Keep the pump fully charged if storing for extended periods to maintain battery health. Recharge every 3-6 months if not in use.
- Ensure the hose and nozzles are clean and dry before storage.
7. Fejlfinding
| Problem | Mulig årsag | Løsning |
|---|---|---|
| Pumpen tænder ikke. | Batteriet er afladet. | Charge the pump using the 12V DC or Type-C cable. |
| Pump inflates slowly or not at all. | Incorrect nozzle or loose connection. | Ensure the correct nozzle is securely attached to the hose and the inflatable valve. |
| Luftindtag/-udløb blokeret. | Check and clear any obstructions from the air ports. | |
| Pump stops unexpectedly during operation. | Target pressure reached (auto-stop). | This is normal operation. If not, check battery level. |
| Overophedningsbeskyttelse aktiveret. | Allow the pump to cool down for at least 15-20 minutes before resuming use. | |
| Unøjagtig trykaflæsning. | Løs slangetilslutning. | Ensure the hose is tightly connected to both the pump and the inflatable valve. |
8. Specifikationer
| Feature | Detalje |
|---|---|
| Model | SHARK 3 (Product Number: 804720-P-OMJP) |
| Mærke | OUTDOORMASTER |
| Max tryk | 20 PSI |
| Batterikapacitet | 74Wh |
| Input bindtage | 12V DC, Type-C (Max 35W) |
| Dimensioner | 35.1 x 27.2 x 21.9 cm |
| Vægt | 3.88 kg |
| Farve | Black x Orange |
9. Garanti og support
OUTDOORMASTER products are manufactured to high-quality standards. For warranty information, product support, or any inquiries, please refer to the official OUTDOORMASTER webwebstedet eller kontakt deres kundeservice direkte. Gem venligst din købsbevis til garantikrav.