
1. Introduktion
Thank you for choosing the pxton 666S Walkie Talkie. This manual provides essential information for the safe and efficient operation of your two-way radio. Please read this manual thoroughly before use to ensure optimal performance and to prevent damage to the device.

Image 1.1: pxton 666S Walkie Talkies in use, highlighting key features.
2. Produktet er slutview
2.1 Medfølgende komponenter
- pxton 666S Walkie Talkie Unit(s)
- 1500mAh lithium-ion batteri
- Opladningsbase
- Strømadapter
- Bælteclips
- Antenne
- Headphones (earpiece with microphone)
- Brugermanual
2.2 Nøglefunktioner
- VOX (Stemmestyret central): Hands-free communication.
- Støjreduktion: Improves audio clarity in noisy environments.
- TOT (Timeout-timer): Forhindrer utilsigtede lange transmissioner.
- Indbygget lommelygte: Til belysning under forhold med svagt lys.
- Overvågningsfunktion: Allows listening to weak signals.
- Scanningsfunktion: Scans active channels.
- Lang distance: Up to 3 miles in open areas, 1.2 miles in suburban, 0.6 miles in urban.
- 1500mAh Li-ion batteri: Provides extended standby and talk time.
- Vandtæt: Yder beskyttelse mod stænk.
- 16 kanaler: For diverse communication needs.
2.3 Parts of the Walkie Talkie
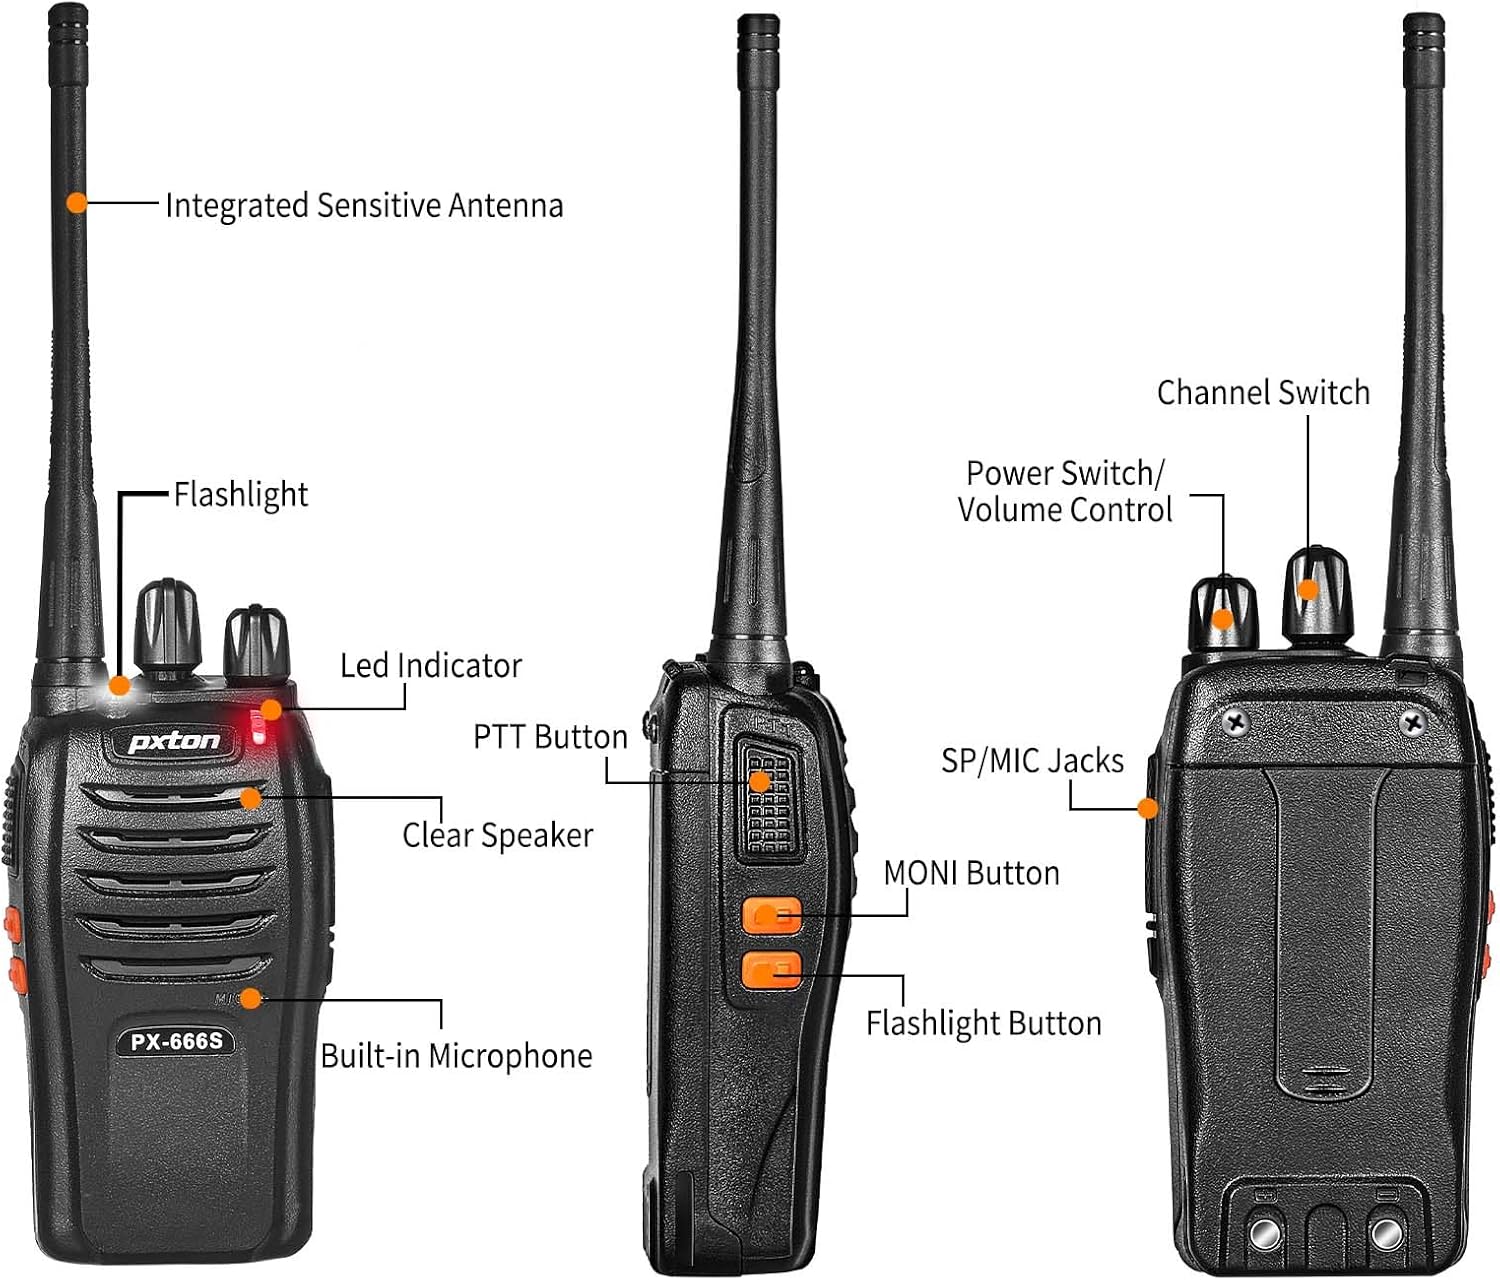
Billede 2.1: Forside og side view of the pxton 666S with labeled components.

Billede 2.2: Vinklet view of the pxton 666S with labeled components.
3. Opsætning
3.1 Batteriinstallation og opladning
- Sørg for, at walkie-talkien er slukket.
- Juster 1500mAh Li-ion-batteriet med batterirummet på bagsiden af radioen.
- Skub forsigtigt batteriet på plads, indtil det klikker sikkert.
- To charge, place the walkie talkie into the charging base. Ensure the charging contacts align.
- Tilslut strømadapteren til opladningsbasen, og sæt den i en stikkontakt.
- The LED indicator on the radio will typically show red during charging and turn green when fully charged.
- Opladningstiden er cirka 3-4 timer for en fuld opladning.

Image 3.1: Battery installation and specifications.

Image 3.2: Walkie talkie in charging base.
3.2 Montering af tilbehør
- Antenne: Screw the antenna clockwise into the connector on top of the radio until it is firm. Do not overtighten.
- Bælteklips: Attach the belt clip to the designated slots on the back of the radio using the provided screws.
- Hovedtelefoner: Insert the headphone jack into the SP/MIC jacks on the side of the radio. Ensure it is fully inserted for proper connection.
4. Betjeningsvejledning
4.1 Tænd/sluk og lydstyrkekontrol
- Tænd: Rotate the Power Switch/Volume Control knob (top left knob) clockwise until you hear a click. The radio will emit a tone, and the LED indicator will flash.
- Sluk: Rotate the Power Switch/Volume Control knob counter-clockwise until you hear a click.
- Lydstyrkejustering: After powering on, continue rotating the Power Switch/Volume Control knob clockwise to increase volume or counter-clockwise to decrease volume.
4.2 Kanalvalg
- Rotate the Channel Switch knob (top right knob) to select your desired channel (1-16).
- Sørg for, at alle radioer i din gruppe er indstillet til den samme kanal til kommunikation.
4.3 Afsendelse og modtagelse
- At sende: Press and hold the PTT (Push-To-Talk) button on the side of the radio. Speak clearly into the microphone (located below the speaker grille). Release the PTT button to stop transmitting.
- At modtage: When the PTT button is not pressed, the radio is in receive mode. You will hear incoming transmissions through the speaker or connected headphones.
4.4 VOX-funktion
The VOX function allows for hands-free operation. When activated, the radio will automatically transmit when it detects your voice, without needing to press the PTT button. Refer to your radio's programming software for VOX activation and sensitivity adjustment (programming cable sold separately).
4.5 Betjening af lommelygte
Press the dedicated Flashlight Button (often located below the PTT button) to turn the built-in LED flashlight on or off.
4.6 Monitoring and Scan Functions
- MONI-knap: Press and hold the MONI (Monitor) button to temporarily disable squelch and listen to all activity on the current channel, including weak signals.
- Scanningsfunktion: The scan function allows the radio to automatically sweep through programmed channels to detect active transmissions. Activation and channel programming for scan typically require programming software.
4.7 Kommunikationsrækkevidde
The actual communication range varies significantly based on terrain and obstructions:
- Open Areas (e.g., flat terrain, mountain peaks): Up to 3 miles.
- Suburban/Countryside: Approximately 1.2 miles.
- City Limits (with buildings and obstructions): Approximately 0.6 miles.

Image 4.1: Communication distance in various environments.
5. Vedligeholdelse
- Rensning: Brug en blød, damp klud til at rengøre radioens yderside. Brug ikke skrappe kemikalier eller opløsningsmidler.
- Batteripleje: Avoid fully discharging the battery frequently. Charge the battery regularly, even if not in use, to maintain its lifespan. Do not expose batteries to extreme temperatures.
- Opbevaring: Opbevar walkie-talkien et køligt og tørt sted, når den ikke er i brug. Fjern batteriet, hvis den opbevares i længere perioder.
- Antenne: Do not bend or modify the antenna, as this can affect performance.
6. Fejlfinding
| Problem | Mulig årsag | Løsning |
|---|---|---|
| Radioen tænder ikke. | Batteriet er lavt eller ikke installeret korrekt. | Charge the battery fully. Reinstall the battery securely. |
| Kan ikke sende eller modtage. | Incorrect channel selected. Out of range. Battery low. | Sørg for, at alle radioer er på samme kanal. Flyt tættere på andre radioer. Oplad batteriet. |
| Dårlig lydkvalitet eller statisk støj. | Svagt signal. Forhindringer. Lydstyrken er for lav/høj. | Move to an open area. Adjust volume. Use MONI button to check for weak signals. |
| Batteriets levetid er kortere end forventet. | Frequent transmissions. Old battery. Extreme temperatures. | Reduce transmission time. Replace old battery. Operate in moderate temperatures. |
7. Specifikationer
| Feature | Detalje |
|---|---|
| Mærke | pxton |
| Modelnummer | 666S |
| Antal kanaler | 16 |
| Frekvensområde | UHF |
| Talerækkevidde (maks.) | 3 Miles (open areas) |
| Batterikapacitet | 1500 mAh Lithium-ion |
| Batteriets gennemsnitlige levetid | Up to 120 hours standby, 12 hours continuous talk |
| Voltage | 3.7 volt (DC) |
| Vandmodstandsniveau | Vandtæt |
| Særlige funktioner | Long Range, Noise Reduction, VOX, Flashlight, Monitoring, Scan |
| Kompatible enheder | PX-888S, PX-777S, PX-888S Pro (with same programming tools/cables) |

Image 7.1: Size comparison of pxton 666S walkie talkie.
8. Garanti og support
pxton offers a 30-day no-questions-asked replacement and refund policy for your peace of mind. Additionally, we provide lifelong after-sales service to ensure your satisfaction.
If you encounter any issues or have questions regarding your pxton 666S walkie talkie, please do not hesitate to reach out to pxton customer support. We are committed to assisting you and resolving any concerns you may have.
For support, please refer to the contact information provided with your purchase or visit the official pxton webwebsted.