Indledning
This manual provides comprehensive instructions for the TeqHome Dash Cam Front and Rear, 720P HD Dual Channel. It covers essential information regarding product features, package contents, setup, installation, operation, maintenance, and troubleshooting. Please read this manual thoroughly before using the device to ensure proper functionality and to maximize your user experience.
Pakkens indhold
Bekræft, at alle nedenstående varer er inkluderet i din pakke:
- 1x Dash Cam
- 1x bagkamera
- 1x cigarettænderkabel
- 1x kabel til bagkamera
- 1x Accessory Bag (includes USB reader, tools, lens cleaning cloth, cable clips)
- 1x Sugekopmontering
- 1x brugermanual

Image: Illustration of all components included in the TeqHome Dash Cam package.
Produkt overview
Familiarize yourself with the main components and functions of your dash cam:

Image: Diagram illustrating the key functions and ports of the TeqHome Dash Cam.
- Krog til fiksering på bagsiden
- USB-datagrænseflade
- Brugerflade til bagkamera
- Tilstandsvalgtast
- Opad valgknap
- OK key/power supply key
- Nedvalgsknap
- Menu-knap
- LCD skærm
- MMC slot (MicroSD card slot)
- RESET knap
- Linse
- Horn

Image: Visual representation of the dash cam's core features including 720P video, loop recording, 2 channels, 140° wide angle, 4" display, motion detection, parking monitor, and super bright light.
Opsætning
1. Indsæt MicroSD-kort
Before first use, insert a Class 10 or higher speed MicroSD card (not included) into the MMC slot of the dash cam. Ensure the card is inserted correctly until it clicks into place.
2. Format MicroSD Card
It is crucial to format the MicroSD card within the dash cam before initial use and periodically thereafter to ensure optimal performance and prevent data corruption.
- Tænd dashcam'et.
- Tryk på Menu button to access the settings.
- Naviger til Format option using the Op/Ned knapper.
- Tryk på OK knappen for at bekræfte og formatere kortet.
Video: A detailed user guide demonstrating the setup and formatting process for a dash cam. This video provides visual steps for preparing the device for use.
Installation
1. Montering af frontkamera
- Clean the windshield thoroughly where the dash cam will be mounted to ensure strong adhesion of the suction cup.
- Fastgør sugekopbeslaget til dashcam'et.
- Press the suction cup firmly against the windshield and lock it into place. Adjust the camera angle as needed.
- Connect the cigarette lighter cable to the dash cam's power port.
- Route the power cable neatly along the windshield edge and dashboard using the provided cable clips and trim tool to conceal it.
- Sæt cigarettænderadapteren i bilens 12V-stikkontakt.

Image: The TeqHome Dash Cam mounted on a car windshield, illustrating its discreet placement and ease of installation without obstructing the driver's view.

Image: A close-up of the dash cam's suction mount, highlighting its 360-degree rotation capability for flexible positioning and optimal video capture.
2. Montering af bakkamera
- Connect the rear camera cable to the dash cam's rear camera interface.
- Route the rear camera cable from the front dash cam to the rear of the vehicle. Carefully tuck the cable along the vehicle's headliner and side panels to keep it hidden and secure.
- Mount the rear camera near the license plate or on the rear windshield using the adhesive pad or screws provided.
- Connect the red wire of the rear camera cable to the live wire of the reversing lamp for parking assistance functionality. (Consult a professional if unsure about wiring).

Image: A diagram illustrating the wiring connections for the rear camera, showing how to connect it to the dash cam and the vehicle's reversing lamp.
Video: This video demonstrates the installation process of a multi-channel dash cam, including routing cables and mounting both front and rear cameras. It also highlights the G-Sensor emergency lock feature.
Operation
1. Automatisk optagelse
The dash cam will automatically power on and begin recording when your vehicle's engine starts. It will save the video and power off when the engine is turned off.
2. Loop-optagelse
When the MicroSD card is full, the dash cam will automatically overwrite the oldest unlocked video files with new recordings. This ensures continuous recording without manual intervention. Emergency locked files er beskyttet mod at blive overskrevet.

Image: An illustration depicting the loop recording function, where the oldest unlocked footage is automatically overwritten when the memory card reaches full capacity.
3. G-sensor (nødlås ved ulykke)
The built-in G-sensor automatically detects sudden collisions or impacts. When triggered, it immediately saves and locks the current footage to an SOS file, preventing it from being overwritten. This feature provides crucial video evidence in case of an accident.
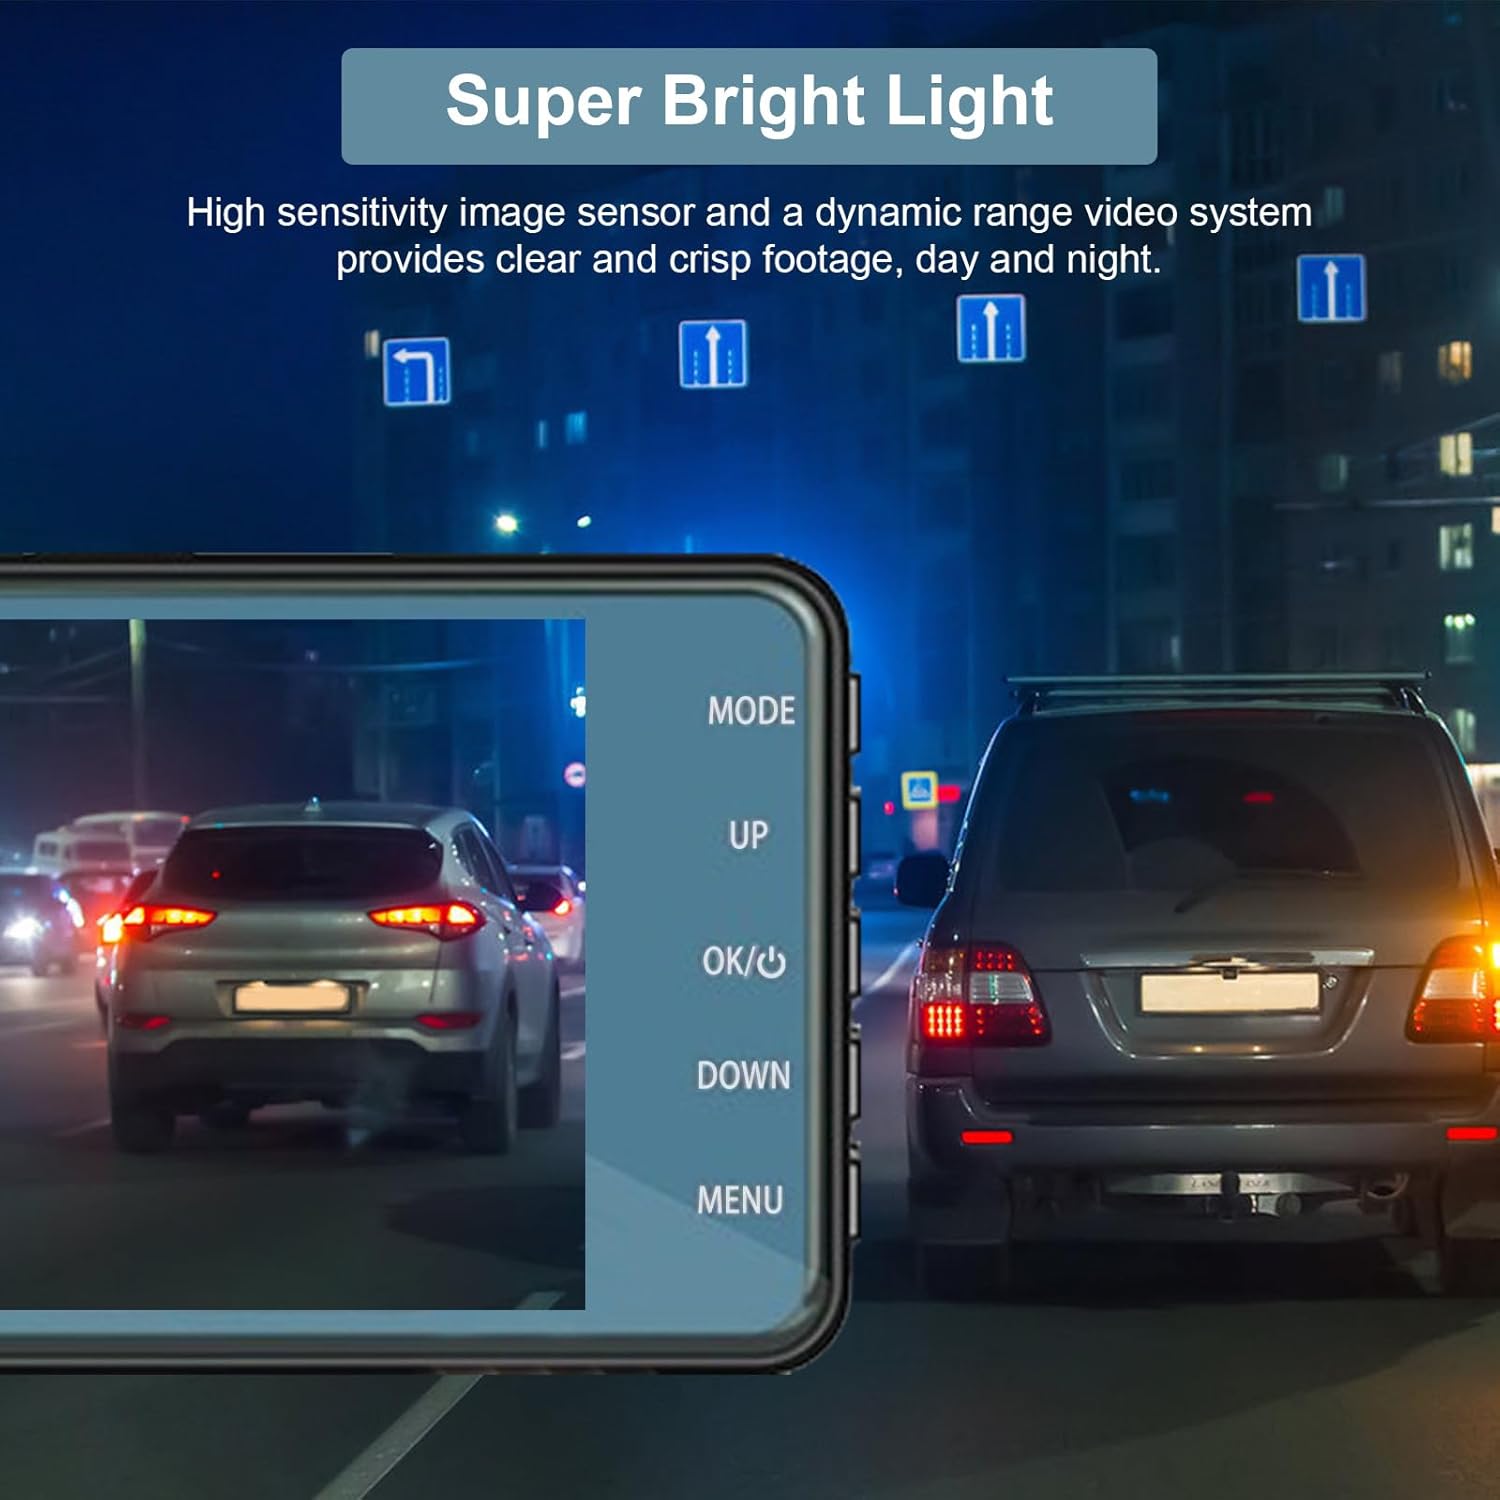
Image: Visuals explaining the G-Sensor's emergency lock function during a collision and the 24-hour parking monitor's automatic recording upon impact.
4. Parkeringsmonitor
With the parking monitor function enabled, the dash cam will automatically sense and record a short video if your car is hit or scratched while parked. This provides surveillance and protection for your vehicle even when you're away.

Billede: Et overheadbillede view of a car in a parking lot, illustrating the 24-hour parking monitoring feature that activates recording when an impact is detected.
5. Night Vision & WDR
The dash cam features Wide Dynamic Range (WDR) technology and IR LED for enhanced night vision. WDR automatically adjusts brightness, weakening strong lights and improving low-light conditions, ensuring clear footagdag og nat.

Image: A night scene from inside a car, demonstrating the dash cam's ability to capture clear footage in low-light conditions thanks to its super bright light feature.
6. 4-tommer berøringsskærm
The 4-inch sensitive touch screen allows for effortless and responsive operation. Navigate menus, adjust settings, and lock current videos with a single finger, enhancing user-friendliness and safety.

Billede: En detaljeret view of the dash cam's 4-inch LED screen and its various key functions, including mode selection, USB interface, and rear camera interface.
Opretholdelse
- Regularly clean the camera lens and screen with a soft, dry cloth to ensure clear image quality.
- Format the MicroSD card every 2-4 weeks to maintain optimal performance and prevent data corruption.
- Undgå at udsætte dashcam'et for ekstreme temperaturer eller direkte sollys i længere perioder.
- Ensure all cables are securely connected and not obstructing the driver's view.
Fejlfinding
- Dash Cam tænder ikke: Sørg for, at strømkablet er korrekt tilsluttet til både dashcam'et og bilens stikkontakt. Kontroller, om bilens 12V-stik fungerer.