1. Introduktion
The TIESFONG A99WB is a sophisticated 3-channel dash camera system designed to provide comprehensive vehicle surveillance. It features high-resolution recording for the front, interior, and rear of your vehicle, along with advanced functionalities such as 24-hour radar parking monitoring, GPS tracking, Wi-Fi connectivity, and enhanced night vision. This manual provides detailed instructions for installation, operation, and maintenance to ensure optimal performance of your dash cam.
2. Hvad er der i æsken
Bekræft, at alle komponenterne nedenfor er inkluderet i din pakke:
- A99WB Dash Camera Unit
- Bagkamera med kabel
- P7 Hardwire Kit
- OBD Connecting Cable
- 128 GB SD-kort
- CPL filter
- Brugermanual
- Elektrostatisk klistermærke (x3)
- Værktøj til biltråd
- Klæbemærkat
- Fuse Connecting Cable
- Sikringsledning (x8)
- Kabelclips (x5)
- Kortlæser
Video: A99WB Unboxing Video. This video demonstrates the unboxing process and shows all included components of the TIESFONG A99WB Dash Cam package.

Billede: Overview of all items included in the TIESFONG A99WB Dash Cam package, including the main unit, cameras, cables, and accessories.
3. Produktet er slutview
The TIESFONG A99WB Dash Cam features a compact design with a 3.16-inch HD screen. It integrates a 4K front camera, a 1080P interior cabin camera, and a 1080P rear camera. Control buttons are located on the side for menu navigation and settings adjustments. The unit also includes a built-in radar sensor for parking monitoring.
Video: A99WB Product Overview. This video provides a detailed look at the physical components and design of the TIESFONG A99WB Dash Cam.

Image: The TIESFONG A99WB Dash Cam main unit, highlighting the front camera, interior camera, and radar sensor.
Billede: Side view of the dash cam, illustrating the accessible control buttons for operation.
4. Opsætning
4.1 Indledende opsætning
- Indsæt det medfølgende 128 GB SD-kort i dashcam'ets SD-kortslot.
- Attach the dash cam to your windshield using the electrostatic sticker and adhesive. Ensure a clear view for all cameras.
- Connect the rear camera to the main unit and route its cable appropriately.
4.2 Strømtilslutning
The A99WB offers multiple power connection options for continuous operation and parking mode functionality:
- OBD Connecting Cable: Plug the OBD cable into your vehicle's OBD port. This provides power and enables parking mode.
- P7 Hardwire Kit / Fuse Connecting Cable: For a more permanent installation, use the P7 Hardwire Kit or Fuse Connecting Cable to connect directly to your vehicle's fuse box. This also supports parking mode and low voltage beskyttelse.
Video: Simple to use. This video demonstrates the installation of the OBD power cable and basic setup of the dash cam.

Image: Illustration of the various power connection methods, including OBD and fuse box wiring, for the TIESFONG A99WB Dash Cam.
5. Betjeningsvejledning
5.1 Grundlæggende betjening
- Tænd/sluk: The dash cam will automatically power on and begin recording when connected to power and the vehicle starts. It will power off when the vehicle is turned off.
- Menu navigation: Use the 'M' button to access the function page. Use the up/down arrow buttons to navigate through options and 'OK' to confirm selections.
- Optagetilstande: The dash cam supports multiple recording modes (1-CH/2-CH/3-CH) which can be selected in the settings.
5.2 Funktioner overview
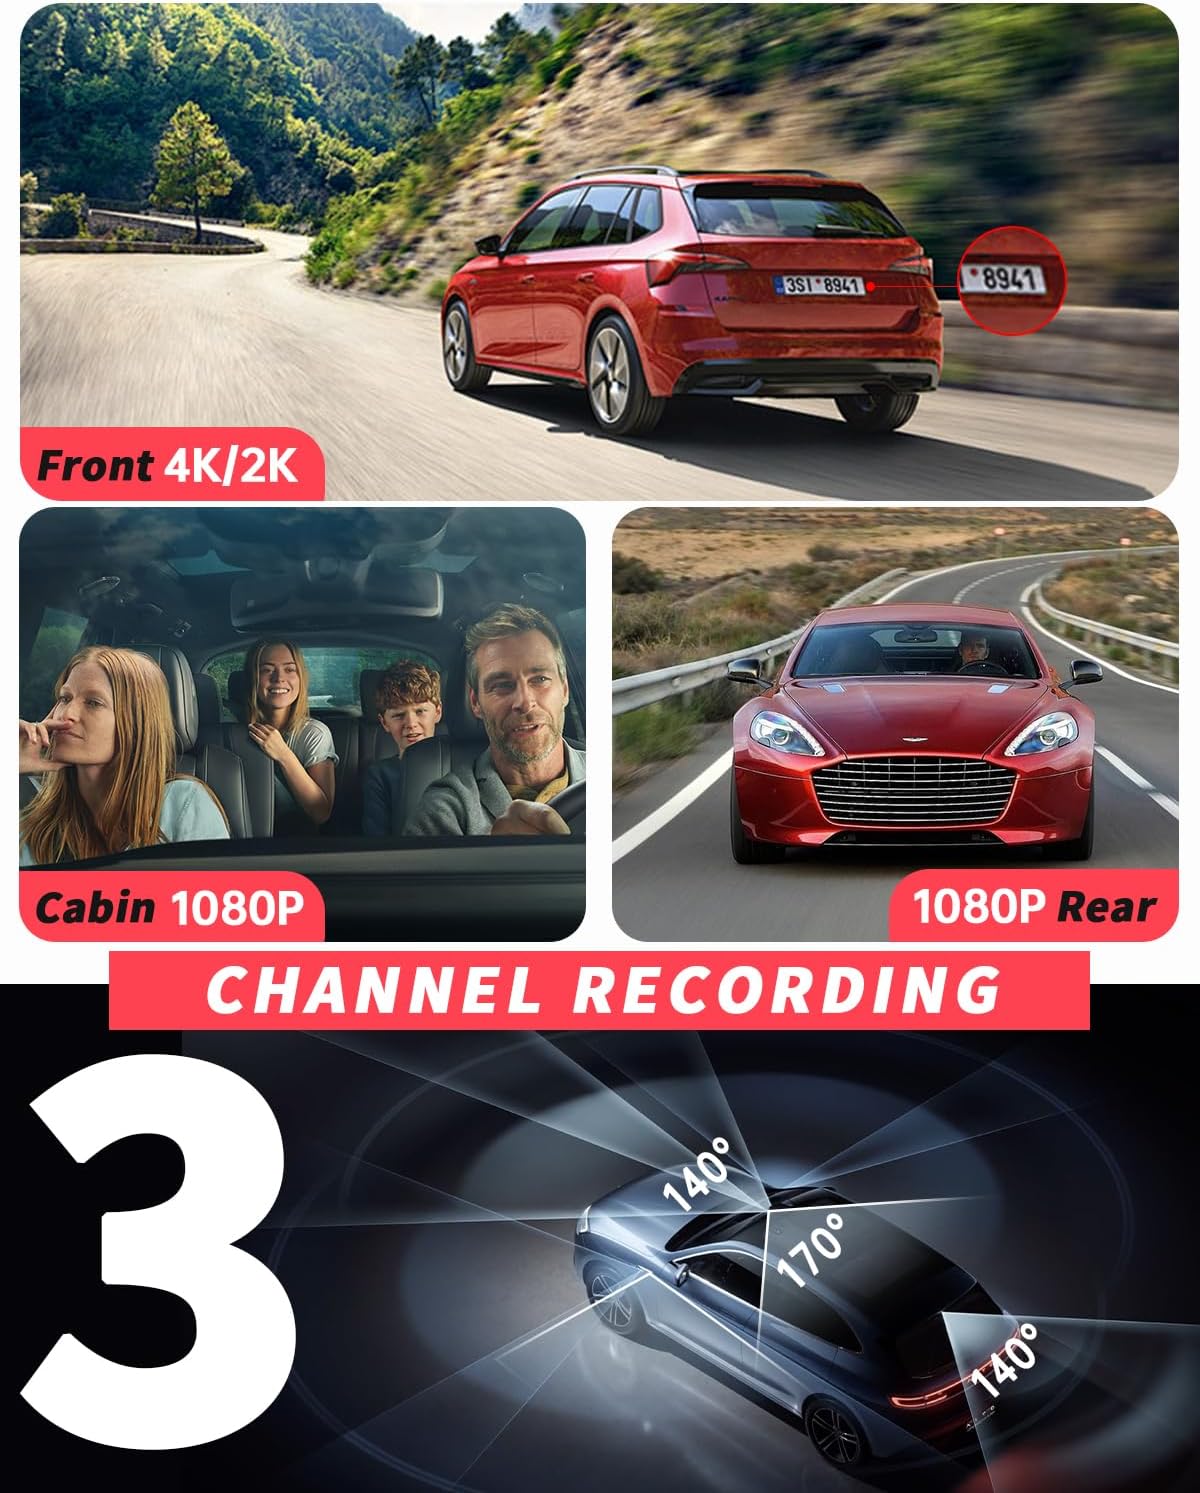
- 3-Channel Wide-Angle Recording: The A99WB provides 140° front, 170° interior, and 140° rear camera views for 360-degree coverage.
- High-Definition Recording: Capture every detail with 1440P + 1080P + 1080P HD video recording in 3-channel mode, or 4K front + 1080P rear/inside in dual-channel mode.
- 24-Hour Radar Parking Monitor & Low Voltage Beskyttelse: Equipped with intelligent radar monitoring, the dash cam starts recording when an object moves within 1-3 meters of the vehicle while parked. It also features adjustable low voltage protection (11.8V/12.0V/12.2V) to prevent car battery drain.
- Nattesyn: The interior camera has 4 infrared LED lights for clear low-light capture. WDR and HDR technology in front and rear cameras balance light for clear footage om natten.
- G-sensor (nødlås): Automatically detects sudden collisions and locks the current 20-second video to prevent overwriting, securing important evidence. Suggested setting is 'low'.
- Loop-optagelse: Continuously records by overwriting the oldest filenår SD-kortet er fuldt, hvilket sikrer uafbrudt optagelse.
- Built-in WiFi & App: Connect to the “TSCAM” app via built-in WiFi for live preview, playback, download, editing, and sharing of videos. Note: WiFi does not support remote connection.
- Built-in GPS Tracking: Records driving track, speed, and provides accurate positioning information. View GPS data via the TsCam app or free GXPlayer on PC (Windows and Mac).
- CPL-filter: The included CPL filter reduces light refraction from the windshield, enhancing contrast and color saturation for clearer recordings.
Video: TIESFONG A99WB 360 Radar Parking Monitor. This video demonstrates the functionality of the radar parking monitor feature.

Image: Visual representation of the 3-channel recording capability, showing simultaneous viewfra front-, kabine- og bagkameraerne.

Image: Diagram illustrating the 360-degree recording coverage provided by the dash cam's multiple lenses.

Image: Visual comparison demonstrating the effectiveness of WDR and HDR technology for clear night vision recordings.

Image: Graphic explaining how the G-Sensor detects impacts and automatically locks video footage som bevis.

Image: Diagram illustrating the 24/7 radar parking mode, showing how it detects movement and initiates recording around a parked vehicle.

Image: Comparison showing power saving and effective recording states of the microwave radar sense parking mode.

Billede: Illustration af bagenden view monitor's functionality in 24/7 parking mode, detecting approaching objects.

Image: Diagram detailing the intelligent monitoring switch for activating and adjusting 24/7 parking mode.

Image: Screenshot of the TSCAM mobile application interface, demonstrating its features for managing dash cam recordings via WiFi.

Image: Diagram explaining the GPS tracking feature and how to use the GXPlayer software for reviewing recorded routes and data.
Image: Close-up of the CPL (Circular Polarizer) filter, which helps reduce glare and reflections from the windshield.
6. Indstillinger
Access the settings menu by pressing the 'M' button. Use the arrow keys to navigate and 'OK' to select. Key settings include:
- Opløsning: Adjust video resolution for front, interior, and rear cameras (e.g., 4K+1080P, 1440P+1080P+1080P).
- Loop -rekord: Set video clip length (1/2/3 minutes).
- G-sensor: Adjust crash sensitivity (Off, Low, Middle, High). Suggested setting is 'low'.
- Sprog: Select from multiple available languages.
- Pauseskærm: Configure screen saver settings for power efficiency.
- Ur: Indstil tiden manuelt.
- Format kort: Format the SD card to ensure proper function.
- Nulstil: Gendan fabriksindstillingerne.
- GPS-status: Display GPS signal status.
- Hastighedsjustering: Fine-tune speed display.
- Hastighedsenhed: Select speed unit (e.g., MPH, KM/H).
- Tidszone: Indstil den korrekte tidszone.
- Sommertid: Enable or disable daylight saving adjustment.
7. Vedligeholdelse
- Regularly format the SD card (at least once a month) to maintain optimal recording performance and prevent data corruption.
- Keep camera lenses clean using a soft, lint-free cloth to ensure clear video quality.
- Ensure all cable connections are secure to prevent power interruptions.
8. Fejlfinding
- Dash Cam tænder ikke: Check all power connections (OBD, fuse box, or cigarette lighter adapter). Ensure the vehicle's ignition is on if not using a hardwire kit for constant power.
- Problemer med optagelse: Format the SD card. Ensure the SD card is not full (loop recording should prevent this, but formatting can resolve other issues). Check resolution settings.
- Parking mode not activating: Ensure the radar switch is toggled to ON (1 or 2) and the dash cam is properly hardwired or connected via OBD for continuous power.
- Problemer med WiFi-forbindelse: Ensure the dash cam's WiFi is enabled in settings. Try restarting both the dash cam and your mobile device.
- GPS sporer ikke: Sørg for, at GPS-modulet er korrekt tilsluttet og har en tydelig view of the sky. Check GPS status in the settings menu.
9. Specifikationer
| Produktdimensioner | 1.96 x 7 x 3.54 tommer |
| Varens vægt | 7.4 ounce |
| Modelnavn | A99WB |
| Farve | Sort |
| Videooptagelsesopløsning | 1440p + 1080p (up to 4K front) |
| Felt Af View | 360 Degrees (140° Front, 170° Interior, 140° Rear) |
| Monteringstype | Forrudemontering |
| Forbindelsesteknologi | P7 Hardwire Kits, OBD Connecting, WiFi |
| Særlige funktioner | 24-Hour Radar Parking Monitor & Low Voltage Protection, 3 Channel Dash Camera, Built-in WIFI & GPS, Easy Installation, IR Night Vision, Built-in G-sensor, Emergency lockout, CPL Filter, 128G SD Card included |
10. Garanti og support
For warranty information, please refer to the specific terms provided with your purchase documentation. For technical support or any questions regarding your TIESFONG A99WB Dash Cam, please contact TIESFONG customer service. Contact details can typically be found in the included User Manual or on the official TIESFONG webwebsted.