1. Introduktion
Thank you for choosing the ROMECH 20W Mini Hot Glue Gun. This manual provides essential information for the safe and effective use of your new tool. Please read it thoroughly before operation and retain it for future reference.
2. Sikkerhedsinstruktioner
WARNING: Hot glue guns operate at high temperatures. Improper use can cause burns or other injuries. Always exercise caution.
- Always wear appropriate safety gear, such as gloves and eye protection, when operating the glue gun.
- Do not touch the hot nozzle or the freshly applied hot glue. The nozzle reaches high temperatures during operation.
- Keep the glue gun away from flammable materials.
- Sørg for, at arbejdsområdet er godt ventileret.
- Do not leave the hot glue gun unattended while it is powered on.
- Opbevares utilgængeligt for børn og kæledyr.
- Do not pull out the glue stick after working; allow it to cool inside the gun. Removing a partially melted glue stick can damage the heating element.
- If the glue gun is not in use, turn off the power switch and unplug it from the electrical outlet.
- The built-in security fuse prevents overheating. If the device stops working, unplug it and allow it to cool before attempting to restart.
3. Produktet er slutview
The ROMECH 20W Mini Hot Glue Gun is designed for precision and ease of use in various crafting and repair tasks. It features a compact design and quick heating capabilities.
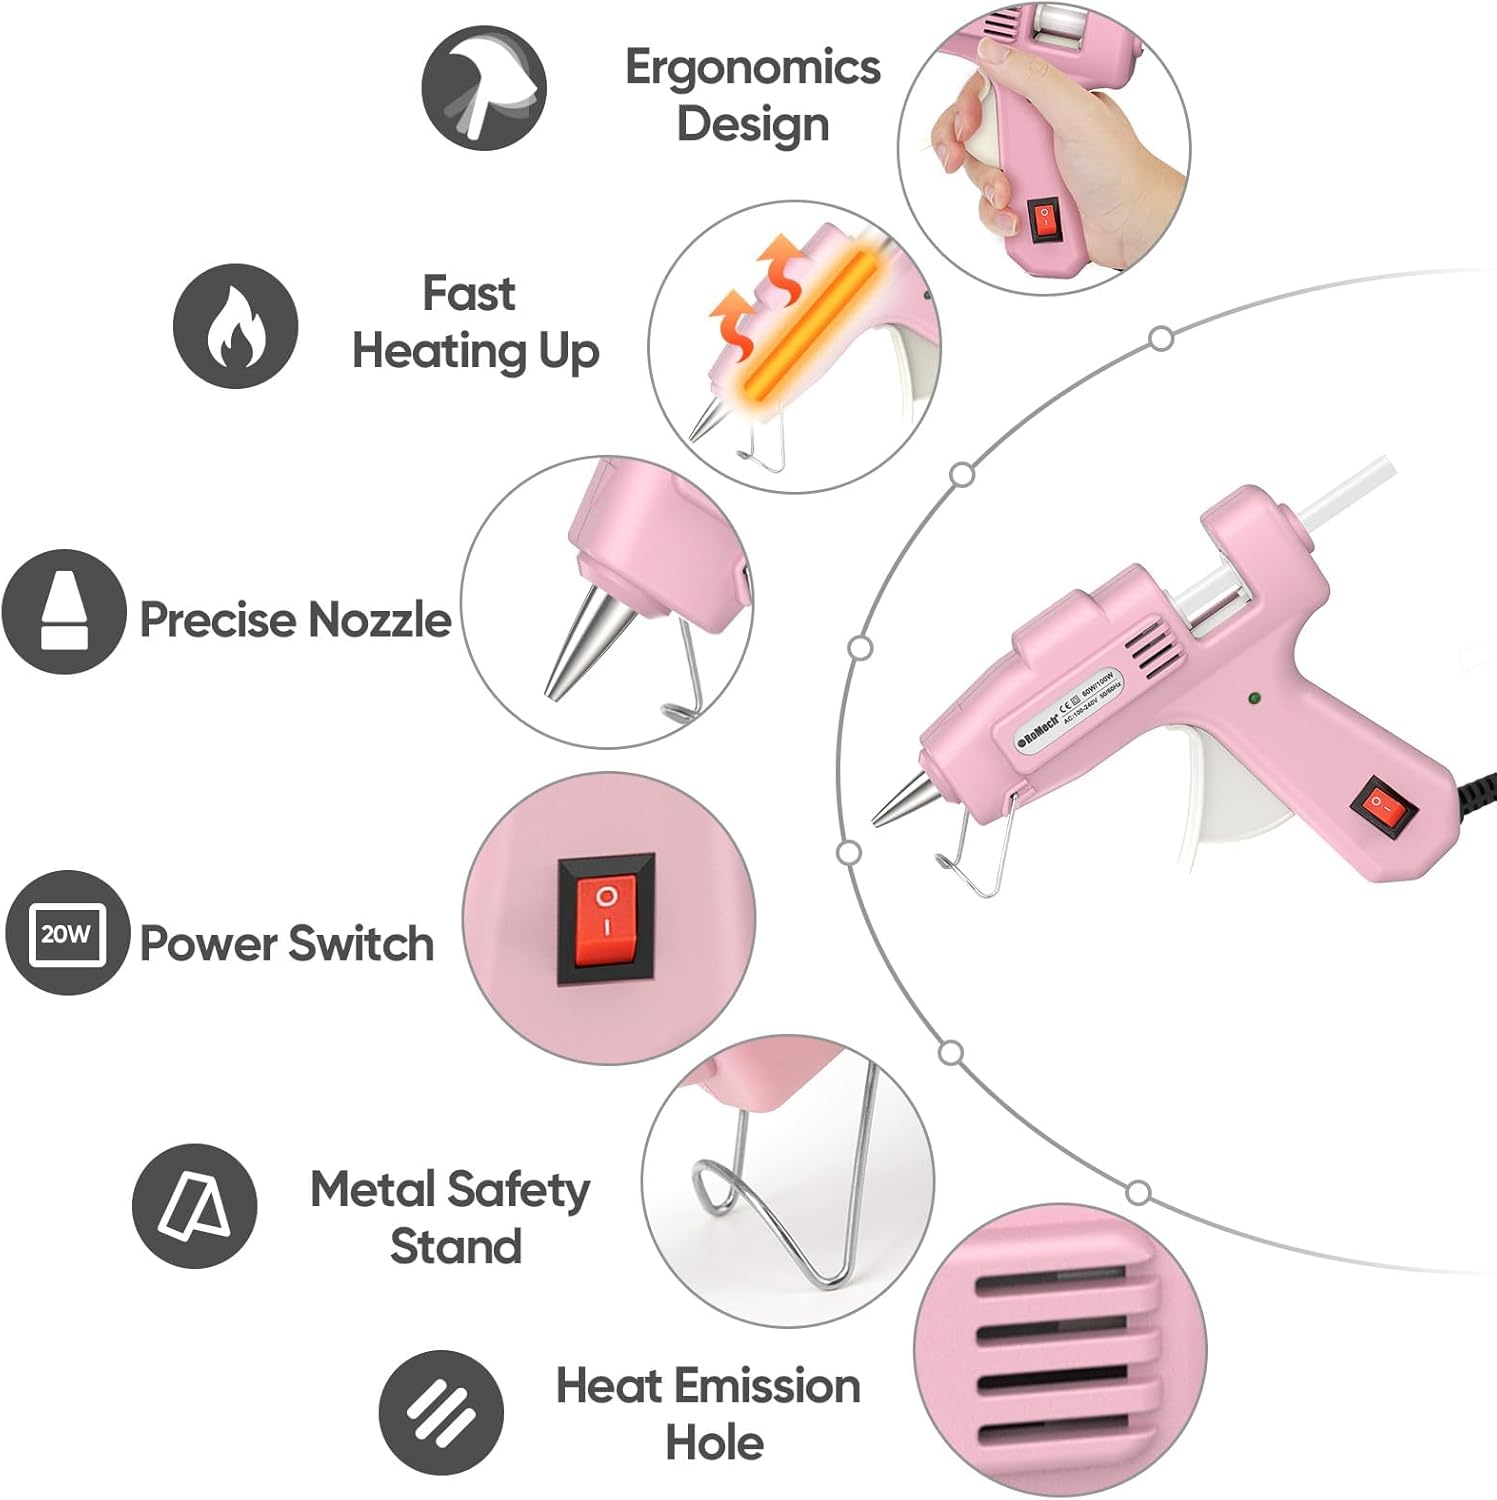
Nøglefunktioner:
- Ergonomisk design: Komfortabelt greb til længerevarende brug.
- Hurtig opvarmning: Reaches operating temperature in 2-3 minutes.
- Præcis dyse: Engineered for accurate glue application and drip prevention.
- Afbryderen: Convenient on/off control.
- Metal Safety Stand: Provides stable support and prevents contact with surfaces when not in hand.
- Heat Emission Holes: Designet til effektiv varmeafledning.
4. Opsætning og første brug
Follow these steps to prepare your ROMECH Mini Hot Glue Gun for operation:
- Indsæt limstift: Insert a 0.28" (7mm) diameter glue stick into the back opening of the glue gun until it is firmly seated.
- Tilslut strøm: Sæt netledningen i en standard 120V stikkontakt.
- Tænd: Flip the red power switch to the 'ON' position. The indicator light will illuminate.
- Forvarmning: Allow the glue gun to pre-heat for 2-3 minutes. The internal heating element will melt the glue stick.
- Prøve: Gently press the trigger to check if the glue is melted and flows smoothly.

5. Betjeningsvejledning
Once the glue gun is pre-heated, you can begin your project:
- Påfør lim: Aim the nozzle at the desired surface and gently press the trigger to dispense melted glue. The precise nozzle allows for controlled application.
- Forbind overflader: Quickly press the surfaces together while the glue is still hot and pliable. Hold them firmly for a few seconds until the glue sets.
- Kompatible materialer: This glue gun is suitable for use with various materials including fabric, glass, paper, and plastic.
- Kontinuerlig brug: As you use the glue gun, the glue stick will shorten. Insert a new glue stick into the back to push the existing one forward.
- Efterbehandling: When finished, release the trigger. Do not pull out any remaining glue stick from the back.

6. Vedligeholdelse og opbevaring
Proper maintenance ensures the longevity and performance of your glue gun:
- Rensning: Ensure the glue gun is unplugged and completely cool before cleaning. Use a dry cloth to wipe down the exterior. Do not use abrasive cleaners or solvents.
- Dysepleje: Do not attempt to clean the nozzle while hot. Any hardened glue around the nozzle can be carefully removed once the gun is cool.
- Opbevaring: Store the glue gun in a dry, cool place, away from direct sunlight and moisture. Ensure it is unplugged and cooled down before storing. Keep any unused glue sticks in their original packaging to protect them from dust.
- Glue Stick Management: It is recommended to leave a partially used glue stick in the gun for storage. This protects the internal mechanism.
7. Fejlfinding
If you encounter issues with your ROMECH Mini Hot Glue Gun, refer to the following common problems and solutions:
| Problem | Mulig årsag | Løsning |
|---|---|---|
| Glue not dispensing | Not pre-heated sufficiently; no glue stick inserted; glue stick jammed. | Allow 2-3 minutes for pre-heating. Insert a new glue stick. If jammed, ensure the glue stick is the correct diameter (0.28"/7mm) and gently push it forward. |
| Glue gun not heating | Ikke tilsluttet; strømafbryder slukket; strøm udtage; internal fuse triggered. | Check power connection and switch. Verify power outlet. If fuse triggered, unplug and allow to cool completely before trying again. |
| Excessive dripping from nozzle | Normal during heating/cooling; incorrect glue stick type. | A small amount of dripping is normal. Ensure you are using standard 0.28" (7mm) hot melt glue sticks. |
| Glue not adhering properly | Surfaces too cold; insufficient glue; incompatible material. | Ensure surfaces are clean and dry. Apply sufficient glue. Some materials may require specific adhesives. |
8. Specifikationer
Detailed technical specifications for the ROMECH 20W Mini Hot Glue Gun:
| Specifikation | Detalje |
|---|---|
| Mærke | ROMECH |
| Modelnummer | ROMECH-178 |
| Wattage | 20W |
| Voltage | 120 volt |
| Strømkilde | Elektrisk med ledning |
| Forvarmningstid | 2-3 minutter |
| Compatible Glue Stick Diameter | 0.28 tommer (7 mm) |
| Kompatible materialer | Fabric, Glass, Paper, Plastic |
| Materiale | Plast |
| Varens vægt | 10.2 ounce |
| Pakkedimensioner | 5.91 x 5.31 x 1.81 tommer |
| Inkluderede komponenter | Hot Glue Gun and 30 Pcs Glue Sticks |

9. Garanti og support
ROMECH is committed to the quality of its products. Your ROMECH 20W Mini Hot Glue Gun comes with a satisfaction guarantee.
- 30-dages pengene-tilbage-garanti: If you are not satisfied with your purchase for any reason, you may contact ROMECH within 30 days for a refund.
- Kundesupport: For any questions, concerns, or assistance with your product, please contact ROMECH customer service. Refer to your purchase documentation or the ROMECH official webwebsted for kontaktoplysninger.


