
Indledning
This manual provides detailed instructions for the installation, operation, and maintenance of your Suuwer S725 Heat Pump Thermostat and its accompanying Wall Plate Cover. The S725 thermostat is designed for heat pump systems, offering programmable control for optimal home comfort and energy efficiency. The included wall plate cover helps to conceal wall imperfections left by previous thermostat installations, ensuring a clean and finished look.
Kompatibilitet og vigtige bemærkninger
Inden installationen, omhyggeligt vedrview the compatibility requirements to ensure proper function and avoid damage to your HVAC system or the thermostat.
- Kompatible systemer: Designed for Heat Pump systems (with auxiliary or emergency heat) and Heat Pump (without auxiliary) systems, supporting up to 2 heat and 1 cool stages.
- Inkompatible systemer:
- Not compatible with 110-240V electric heat systems (e.g., electric baseboard heat, line voltage, convectors, radiant-ceiling heat).
- Does not work with conventional multistage systemer.
- Does not work with mini-split systems.
- Does not work with 12V RV thermostats.
- Kontrol før installation: Verify that your existing thermostat is a heat pump system and that the connection ports on your wall match the S725 base.
- Wall Plate Cover: The included wall plate cover measures 6.3 inches (W) x 5.12 inches (H) x 0.2 inches (D) and is designed to conceal marks or holes left by older thermostats, providing a neat appearance.
Opsætning og installation
Follow these steps for safe and correct installation of your S725 thermostat and cover plate.
1. Sluk
Before beginning any installation, turn off the power to your heating and cooling system at the main circuit breaker or fuse box. This is critical for safety.
2. Fjern den gamle termostat
Carefully remove your old thermostat from the wall. Take a picture of the existing wiring connections for reference. Label each wire with its corresponding terminal letter before disconnecting them.
3. Install Thermostat Base and Wiring
Mount the S725 thermostat base to the wall using the provided screws. Connect the wires from your HVAC system to the corresponding terminals on the S725 base. Refer to the wiring diagram below for typical connections. Ensure all connections are secure.
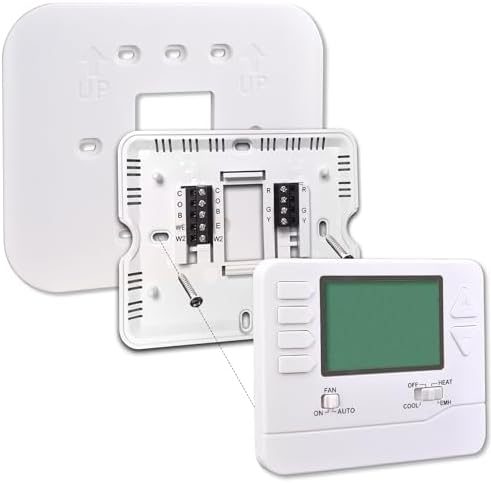
Billede: View of the Suuwer S725 thermostat's back panel and wiring terminals, along with the wall plate. This image illustrates how the thermostat connects to the wall and the cover plate fits behind it.
The S725 thermostat measures approximately 4.72 inches (W) x 3.86 inches (H) x 0.98 inches (D). The cover plate dimensions are 6.3 inches (W) x 5.12 inches (H) x 0.2 inches (D).
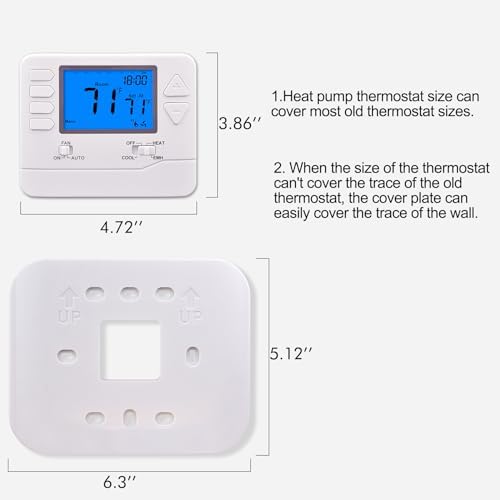
Billede: Diagram showing the dimensions of the Suuwer S725 thermostat and its wall plate cover. This image helps in assessing if the plate will cover existing wall marks.
4. Install Wall Plate Cover (Optional)
If your old thermostat left visible marks or holes on the wall, install the Suuwer Wall Plate Cover before attaching the thermostat. The cover plate is designed to fit behind the thermostat, providing a clean and finished appearance without the need for repainting or additional wall repairs.
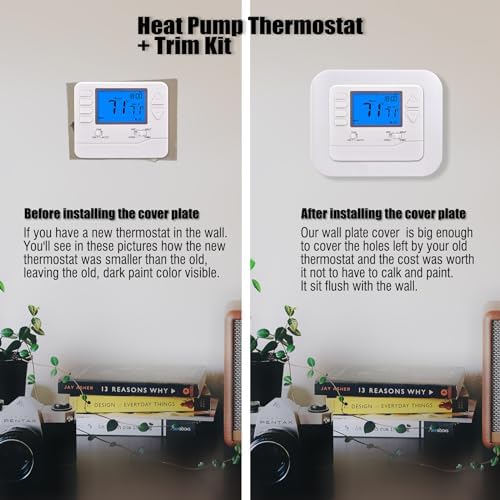
Billede: A side-by-side comparison showing a thermostat installed without the cover plate (left) and with the Suuwer wall plate cover (right). The image demonstrates how the cover plate effectively conceals wall imperfections.
5. Fastgør termostaten til basen
Once the wiring is complete and the cover plate (if used) is in place, carefully align the S725 thermostat unit with its base and snap it into position.
6. Gendan strømmen
Turn the power back on at the circuit breaker. The thermostat display should illuminate.
Betjeningsvejledning
The S725 thermostat features a backlit display and touch controls for easy operation.
Valg af tilstand
Use the mode switch or buttons to select your desired operating mode:
- FEDT NOK: Aktiverer kølesystemet.
- OFF: Slukker for både varme- og kølesystemer.
- VARME: Aktiverer varmesystemet.
- EMH (Emergency Heat): Activates emergency heating, typically used when the primary heat pump system is not functioning.
Ventilatorbetjening
Use the fan switch or buttons to control the fan:
- PÅ: Ventilatoren kører kontinuerligt.
- BIL: Ventilatoren kører kun, når varme- eller kølesystemet er aktivt i drift.
Temperaturjustering
Use the Up and Down arrow buttons to adjust the desired temperature setpoint.
Programming (5-1-1 Day)
The S725 offers 5-1-1 day programmable scheduling, allowing separate programs for weekdays, Saturday, and Sunday. Each day can have up to four program periods:
- Vågne: Your desired temperature for when you wake up.
- Forlade: An energy-saving temperature for when you are away from home.
- Retur: Your desired temperature for when you return home.
- Sove: An energy-saving temperature for overnight.
Refer to the detailed programming instructions in the full product manual (if available) for specific steps on setting schedules. Generally, you will press a "Program" or "Set" button, then use the Up/Down arrows and mode buttons to adjust times and temperatures for each period.
Opretholdelse
The Suuwer S725 thermostat requires minimal maintenance to ensure optimal performance.
- Rensning: Tør forsigtigt termostatens yderside af med en blød kludamp klud. Brug ikke slibende rengøringsmidler eller opløsningsmidler, da disse kan beskadige displayet ellerasing.
- Beliggenhed: Ensure the thermostat is not exposed to direct sunlight, drafts, or heat sources, as these can affect temperature readings.
Fejlfinding
If you encounter issues with your S725 thermostat, consider the following common solutions:
- Intet display/Ingen strøm:
- Kontroller afbryderen til dit HVAC-system for at sikre, at der er strøm på.
- Verify that all wiring connections at the thermostat base are secure.
- Systemet reagerer ikke (opvarmning/køling):
- Ensure the thermostat is set to the correct mode (HEAT, COOL, EMH).
- Check that the temperature setpoint is above the ambient temperature for heating or below for cooling.
- Confirm compatibility (refer to the "Compatibility and Important Notes" section). Incorrect wiring or incompatible systems are common causes.
- Unøjagtig temperaturaflæsning:
- Ensure the thermostat is not located near heat sources (lamps, appliances) or in direct sunlight.
- Check for drafts from windows or doors that might affect the sensor.
If problems persist after attempting these solutions, contact Suuwer customer support for further assistance.
Specifikationer
| Mærke | Suuwer |
| Modelnavn | S725 |
| Produkt stil | S725 Heat Pump Thermostat & Cover Plate Trim Kit |
| Speciel funktion | Programmerbar |
| Temperaturkontrol type | Programmerbar |
| Forbindelsesteknologi | Kablet |
| Strømkilde | Elektrisk med ledning |
| Voltage | 110 volt, 12 volt |
| Display Type | Baggrundsbelyst |
| Kontrolmetode | Røre |
| Monteringstype | Vægmontering |
| Inkluderede komponenter | Wall Plate Cover, Temperature Sensor |
| Thermostat Dimensions (D x W x H) | 0.98 cm x 4.72 cm x 3.86 cm |
| Wall Plate Dimensions (D x W x H) | 0.2 cm x 6.3 cm x 5.12 cm |
Garanti og support
For information regarding product warranty, returns, or technical support, please refer to the official Suuwer webwebstedet eller kontakt deres kundeservice direkte. Behold din købskvittering som købsbevis.
Suuwer Customer Support: Besøg venligst Suuwer Store on Amazon eller deres embedsmand webwebsted for kontaktoplysninger.