
1. Introduktion
This manual provides essential information for the safe and efficient operation of your WLLKIY Hybrid Solar Inverter. This device is a multi-functional inverter/charger that integrates an inverter, solar charger, and battery charger to provide uninterruptible power support in a compact design. Please read this manual thoroughly before installation and use, and retain it for future reference.
2. Sikkerhedsinstruktioner
Overhold følgende sikkerhedsforanstaltninger under installation, drift og vedligeholdelse af inverteren. Manglende overholdelse af disse instruktioner kan resultere i elektrisk stød, brand eller alvorlig personskade.
- Sørg for, at al ledningsføring udføres af kvalificeret personale.
- Do not attempt to disassemble or repair the inverter yourself. Refer to authorized service personnel.
- Kontroller, at input voltage and current ratings match the specifications of your solar panels and battery bank.
- Installer inverteren i et godt ventileret område, væk fra brandfarlige materialer og fugt.
- Frakobl altid alle strømkilder (AC, PV, batteri), før du udfører vedligeholdelse eller ledningsføring.
- Sørg for korrekt jording af inverteren.
3. Produktfunktioner
- Ren sinusbølgeudgang til følsom elektronik.
- Konfigurerbar input voltage-serien til forskellige anvendelser (husholdningsapparater, personlige computere).
- User-configurable battery charging current via LCD settings.
- Configurable AC/Solar charger priority via LCD settings.
- Kompatibilitet med netvolumentage eller generatorstrøm.
- Automatisk genstart ved genoprettelse af klimaanlægget.
- Integrated protection against overload, over-temperature, and short circuits.
- Smart charger design for optimized battery performance.
- Koldstartsfunktion.
- Optional WIFI/GPRS module for remote monitoring.
- Supports connection to lithium batteries.
4. Produktet er slutview
Familiarize yourself with the components and connections of your WLLKIY Hybrid Solar Inverter.

Figur 4.1: Forside view of the WLLKIY Hybrid Solar Inverter, showing the main casing and front display panel.
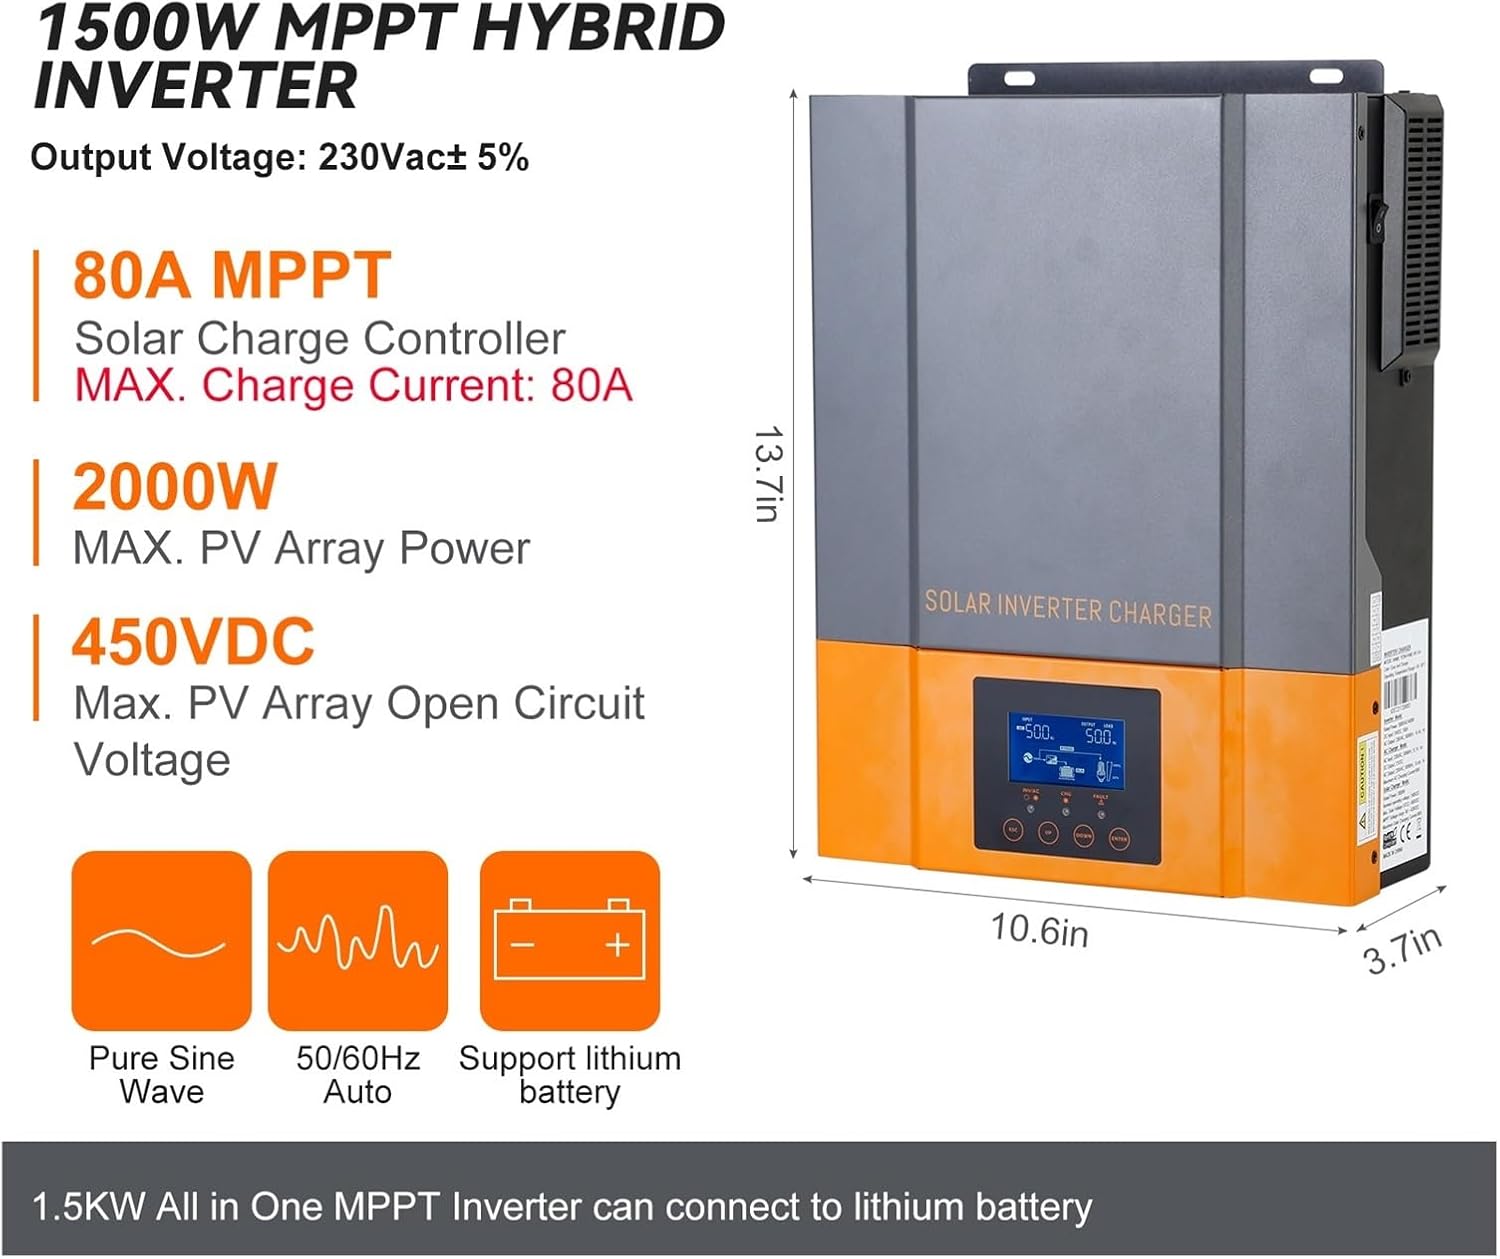
Figure 4.2: Inverter dimensions (13.7in H x 10.6in W x 3.7in D) and key electrical specifications including 230Vac output, 80A MPPT solar charge controller, 2000W max PV array power, and 450VDC max PV open circuit voltage. It supports pure sine wave output, 50/60Hz auto frequency, and lithium batteries.

Figur 4.3: Detaljeret view of the LCD display, LED indicators (AC/INV, CHG, FAULT), and function keys (ESC, UP, DOWN, ENTER) on the front panel. The power ON/OFF switch is located on the side of the unit.
LED-indikatormeddelelser
| LED-indikator | Tilstand | Beskeder |
|---|---|---|
| AC / INV | Solid On (Green) | Udgangen drives af et hjælpeprogram i linjetilstand. |
| Blinker (grøn) | Udgangen drives af batteri eller PV i batteritilstand. | |
| CHG | Solid On (Green) | Batteriet er fuldt opladet. |
| Blinker (grøn) | Batteriet oplades. | |
| FEJL | Solid On (Red) | Der opstår fejl i inverteren. |
| Blinker (rød) | Advarselstilstand forekommer i inverteren. |
Beskrivelser af funktionstaster
| Funktionstast | Beskrivelse |
|---|---|
| ESC | For at afslutte indstillingstilstand |
| UP | For at gå til forrige valg |
| NED | For at gå til næste valg |
| ENTER | For at bekræfte valget i indstillingstilstand eller gå ind i indstillingstilstand |
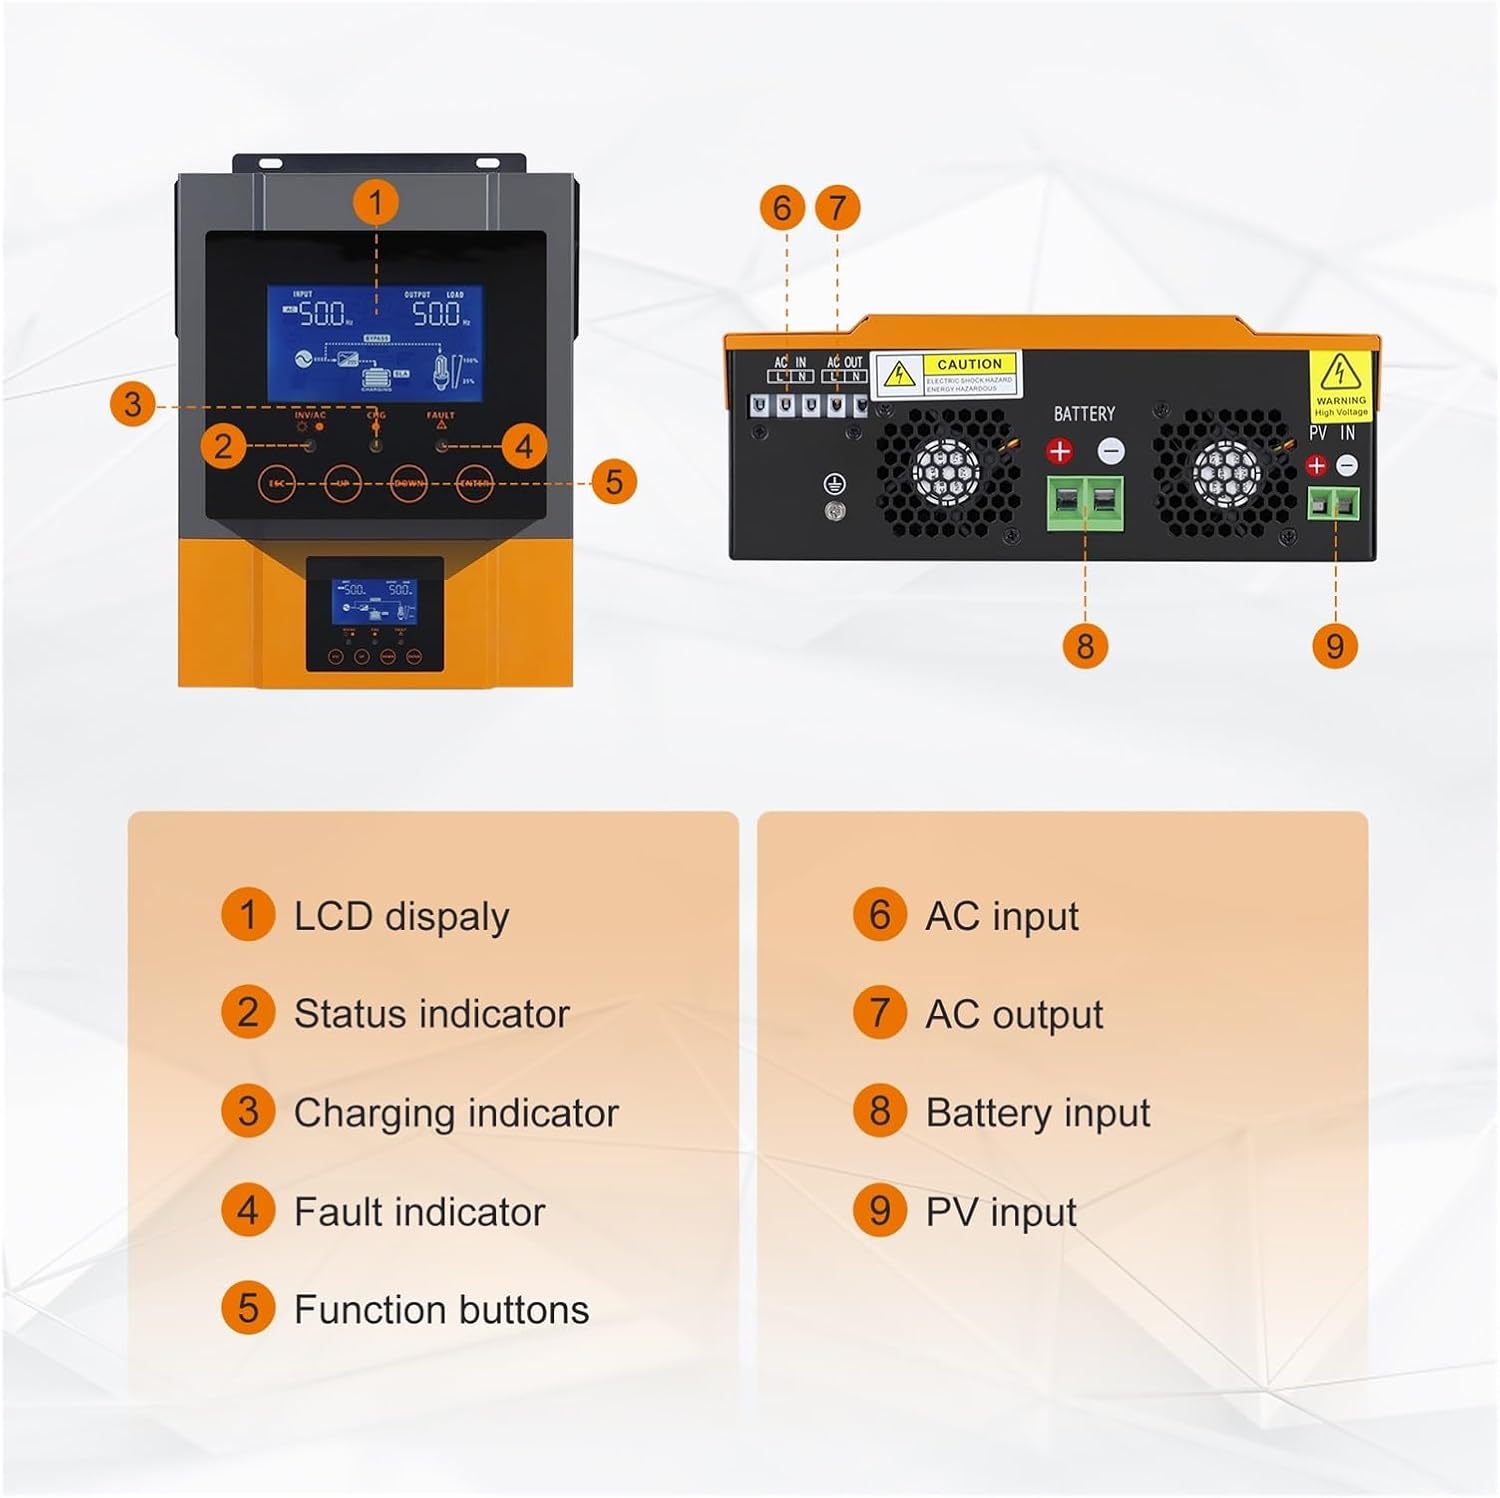
Figure 4.4: Key components and connection points. 1: LCD display, 2: Status indicator, 3: Charging indicator, 4: Fault indicator, 5: Function buttons, 6: AC input, 7: AC output, 8: Battery input, 9: PV input.

Figure 4.5: The inverter supports optional WIFI monitoring, allowing real-time performance viewing and parameter changes via a mobile application. The WIFI module is not included in the standard package.
5. Opsætning og installation
This section outlines the steps for installing your hybrid solar inverter. Ensure all safety instructions are followed.
5.1 Montering af inverteren
- Choose a suitable location: The inverter should be mounted indoors, in a dry, well-ventilated area, protected from direct sunlight, high temperatures, and moisture.
- Ensure adequate clearance: Allow at least 20 cm (8 inches) of clearance around the unit for proper heat dissipation.
- Secure mounting: Use appropriate screws and anchors to securely mount the inverter to a solid wall surface.
5.2 Ledningsforbindelser
Refer to Figure 4.4 for connection port locations. All wiring must comply with local electrical codes.
- Batteriforbindelse: Connect the battery cables to the Battery Input terminals (8). Ensure correct polarity (positive to positive, negative to negative).
- PV-paneltilslutning: Connect the solar panel cables to the PV Input terminals (9). Observe correct polarity and ensure the PV array voltage er inden for inverterens angivne område.
- AC-indgangsforbindelse: Tilslut forsyningsnettets eller generatorens vekselstrøm til vekselstrømsindgangsterminalerne (6).
- AC-udgangstilslutning: Connect your loads to the AC Output terminals (7).
- Jording: Tilslut inverterens jordterminal til en pålidelig jordforbindelse.
5.3 Indledende opstart
- Når alle forbindelser er sikre, skal du tænde for batteriafbryderen.
- Tænd for PV-panelets afbryder.
- Switch on the AC input breaker (if connected).
- Turn on the inverter's power switch (refer to Figure 4.3).
- Observe the LCD display and LED indicators for normal operation.
6. Betjeningsvejledning
Inverteren har et LCD-display og funktionsknapper til overvågning og konfiguration.
6.1 LCD-display og betjening af knapper
The LCD displays real-time system status, including input/output voltage, battery status, and charging information. Use the function keys (ESC, UP, DOWN, ENTER) to navigate through menus and adjust settings as described in Figure 4.3.
6.2 LED-indikatorer
The LED indicators provide a quick visual status of the inverter's operation. Refer to the table in Figure 4.3 for detailed descriptions of each indicator's state and corresponding message.
6.3 Konfiguration af indstillinger
The inverter allows configuration of various parameters to optimize performance for your specific setup. These include:
- Batteriets opladningsstrøm.
- AC/Solar charger priority.
- Input voltage rækkevidde.
- Output frequency (50Hz/60Hz).
To access and modify settings, press the ENTER button to enter the setting mode, use UP/DOWN to navigate, and ENTER to confirm selections. Press ESC to exit.
7. Vedligeholdelse
Regelmæssig vedligeholdelse sikrer din inverters levetid og optimale ydeevne.
- Rensning: Rengør inverterens yderside regelmæssigt med en tør klud. Sørg for, at ventilationsåbningerne er fri for støv og snavs.
- Forbindelser: Kontrollér årligt alle elektriske forbindelser for tæthed og tegn på korrosion.
- Miljø: Sørg for, at installationsmiljøet forbliver inden for de angivne temperatur- og fugtighedsintervaller.
- Batteriets sundhed: Overvåg batteri voltage and performance regularly, especially for lead-acid batteries.
8. Fejlfinding
Dette afsnit indeholder løsninger på almindelige problemer, du kan støde på.
| Problem | Mulig årsag | Løsning |
|---|---|---|
| Inverteren tænder ikke | Ingen batteriforbindelse eller lav batterispændingtage. Power switch off. | Kontroller batteriforbindelser og voltage. Ensure power switch is ON. |
| Ingen AC-udgang | Overload. Short circuit. Inverter fault. | Reduce load. Check for short circuits. Refer to FAULT LED. |
| Batteriet oplades ikke | PV input too low. AC input not present. Charger settings incorrect. | Check PV array and AC input. Verify charger settings on LCD. |
| FAULT LED is solid red | Intern fejl. | Disconnect all power sources, wait 5 minutes, then reconnect. If fault persists, contact support. |
9. Specifikationer
Detailed technical specifications for the WLLKIY Hybrid Solar Inverter models.
| Feature | 1.5 kW 12V Model | 2.4 kW 24V Model | 3.2 KVA / 3 KW 24V Model |
|---|---|---|---|
| Nominel udgangseffekt | 1.5 kW | 2.4 kW | 3200 VA / 3000 W |
| Udgang Voltage Bølgeform | Ren Sine Wave | ||
| Udgang Voltage forordning | 230 Vac ± 5 % | ||
| Opladningsalgoritme | 3-stage | ||
| Max AC ladestrøm | 60 Amp | ||
| Bulk Charging Voltage (oversvømmet batteri) | 14.6 V | 29.2 V | |
| Bulk Charging Voltage (AGM/Gel Battery) | 14.1 V | 28.2 V | |
| Flydende opladning Voltage | 13.5 VDC | 27.0 VDC | |
| Max PV Array Power | 2000 W | 3000 W | |
| Nominel PV Voltage | 240 VDC | ||
| MPPT bindtage Range (PV Array) | 90 ~ 430 VDC | ||
| Max PV Open Circuit Voltage | 450 VDC | ||
| Max Charging Current (AC + Solar) | 80 Amp | ||
| Driftstemperaturområde | -10°C til 50°C | ||
| Opbevaringstemperaturområde | -15°C til 60°C | ||
| Fugtighed | 5 % til 95 % relativ luftfugtighed (ikke-kondenserende) | ||
10. Garanti og support
For garantioplysninger og teknisk support henvises til den dokumentation, der fulgte med dit køb, eller kontakt din forhandler. Behold din købskvittering som købsbevis.