1. Introduktion
Thank you for choosing the Villastar Pool Heat Pump. This manual provides essential information for the safe and efficient operation, installation, and maintenance of your new pool heater. Please read this manual thoroughly before use and retain it for future reference.

Figure 1: Villastar Pool Heat Pump Model YC-005
This image displays the main unit of the Villastar Pool Heat Pump, featuring its compact design, front fan, and digital display. The power cord and water connections are visible on the side.
2. Sikkerhedsoplysninger
Overhold altid følgende sikkerhedsforanstaltninger for at forhindre personskade eller beskadigelse af enheden.
- Ensure the unit is installed by a qualified professional if you are not familiar with plumbing and electrical work.
- Brug ikke enheden, hvis nogen af delene er beskadiget, eller hvis netledningen er flosset.
- Hold børn og kæledyr væk fra enheden under drift.
- Ensure proper ventilation around the unit. Do not block the fan or air vents.
- Afbryd altid strømmen, før du udfører vedligeholdelse eller fejlfinding.
- The unit features automatic leakage protection, low-voltage switch, and high/low temperature protection for enhanced safety.
3. Pakkens indhold
Kontroller, at alle komponenter er til stede og ubeskadigede ved udpakning:
- Villastar Pool Heat Pump Unit (Model YC-005)
- Inlet and Outlet Joints
- Water Pump Unions
- Slange Clamps
- Corrugated Pipes (Hoses)
- Brugermanual
4. Opsætning og installation
The Villastar Pool Heat Pump is designed for easy installation with 1-1/4" water pipe connections. No special plumbing or electrical work is typically needed for standard setups.
4.1 Valg af sted
- Place the unit on a stable, level surface near your pool and existing filtration system.
- Sørg for tilstrækkelig luftcirkulation omkring enheden.
- The unit operates between 23°F to 109.4°F air temperature.
4.2 Tilslutning af enheden
- Prepare Auxiliary Materials: Gather all necessary pipes, joints, and clamps. Ensure you have a filter pump and the swimming pool ready.
- Vedhæft Clamps to Pipes: Skub slangen clamps onto the corrugated pipes.
- Connect Heat Pump Joints: Securely attach the heat pump inlet and outlet joint fittings to the corresponding ports on the heat pump unit.
- Connect Water Pump Union: Connect the water pump union to the pipe leading from your filter pump.
- Connect Pipes to System: Connect the corrugated pipes from the heat pump to your filter pump and then to the pool. Ensure all connections are tight using the hose clamps for at forhindre lækager.
- Remove Air from System: Before powering on, add water to the system to remove any trapped air. This is crucial for proper operation.
Video 1: Villastar Above Ground Pool Heat Pump Easy to Install
This video demonstrates the step-by-step process of connecting the Villastar pool heat pump to an existing pool filtration system, including preparing materials, attaching hoses, and ensuring proper water flow.
Video 2: Villastar Mini Swimming Pool Heat Pump for Above-Ground Pool Overview
Denne video giver et generelt overblikview of the Villastar Mini Swimming Pool Heat Pump, showcasing its features and compact size, and briefly touching upon its installation process.
5. Betjeningsvejledning
The Villastar Pool Heat Pump features an intuitive LED control panel for easy temperature and mode adjustments.
5.1 Kontrolpanel overview

Figure 2: Control Panel for Villastar Pool Heat Pump
This image highlights the digital LED display and control buttons on the unit, including power, mode selection, and temperature adjustment buttons.
- Power knap: Tænder/slukker enheden.
- Pil op/ned: Adjust the desired water temperature.
- Tilstandsknap (M): Switches between heating mode, cooling mode, and automatic mode (heating + cooling).
- The LED screen displays the current pool water temperature.
5.2 Initial Startup and Temperature Setting
- Tænd: Plug in the unit. The display will show "OFF". Press the Power button to start the unit.
- View Temperatur: The set temperature will flash three times, then the actual water temperature will be displayed.
- Skift tilstand: Press the "M" key to cycle through heating mode (sun icon), cooling mode (snowflake icon), and automatic mode (both icons).
- Juster temperatur: Use the Up or Down arrow keys to set your desired water temperature. The unit will automatically work to reach and maintain this temperature.
The unit efficiently warms pools up to 5,000 gallons, maintaining water temperatures between 59°F-104°F for heating and 46°F-82°F for cooling.
Video 3: Villastar Pool Heat Pump Display and Operation
This video demonstrates how to power on the unit, view the current temperature, switch between heating and cooling modes, and adjust the desired temperature using the control panel.
6. Vedligeholdelse
Regular maintenance ensures optimal performance and longevity of your Villastar Pool Heat Pump.
- Clean Fan and Vents: Periodically inspect and clean the fan blades and air intake/exhaust vents to ensure unobstructed airflow.
- Check Water Connections: Regularly inspect all pipe connections for leaks and tighten clamps efter behov.
- Vinterisering: If you live in an area with freezing temperatures, ensure the unit is properly winterized by draining all water from the system to prevent damage.
- Professionel servicering: For complex issues or annual checks, consider professional servicing.
7. Fejlfinding
Her er nogle almindelige problemer og deres potentielle løsninger:
| Problem | Mulig årsag | Løsning |
|---|---|---|
| Enheden tænder ikke | Ingen strøm, udløst afbryder, løs forbindelse. | Check power supply, reset breaker, ensure secure connections. |
| Pool not heating/cooling | Incorrect temperature setting, low water flow, air in system, unit too small for pool size. | Verify settings, check filter pump operation, bleed air from system, allow more time for larger pools. |
| Usædvanlig støj fra enheden | Debris in fan, loose components, internal issue. | Inspect fan for obstructions, check for loose parts. If persistent, contact support. |
| Vandlækage | Loose pipe connections, damaged seals. | Spænd slange clamps, inspect seals for damage. |
For further assistance, please contact Villastar customer support.
8. Specifikationer
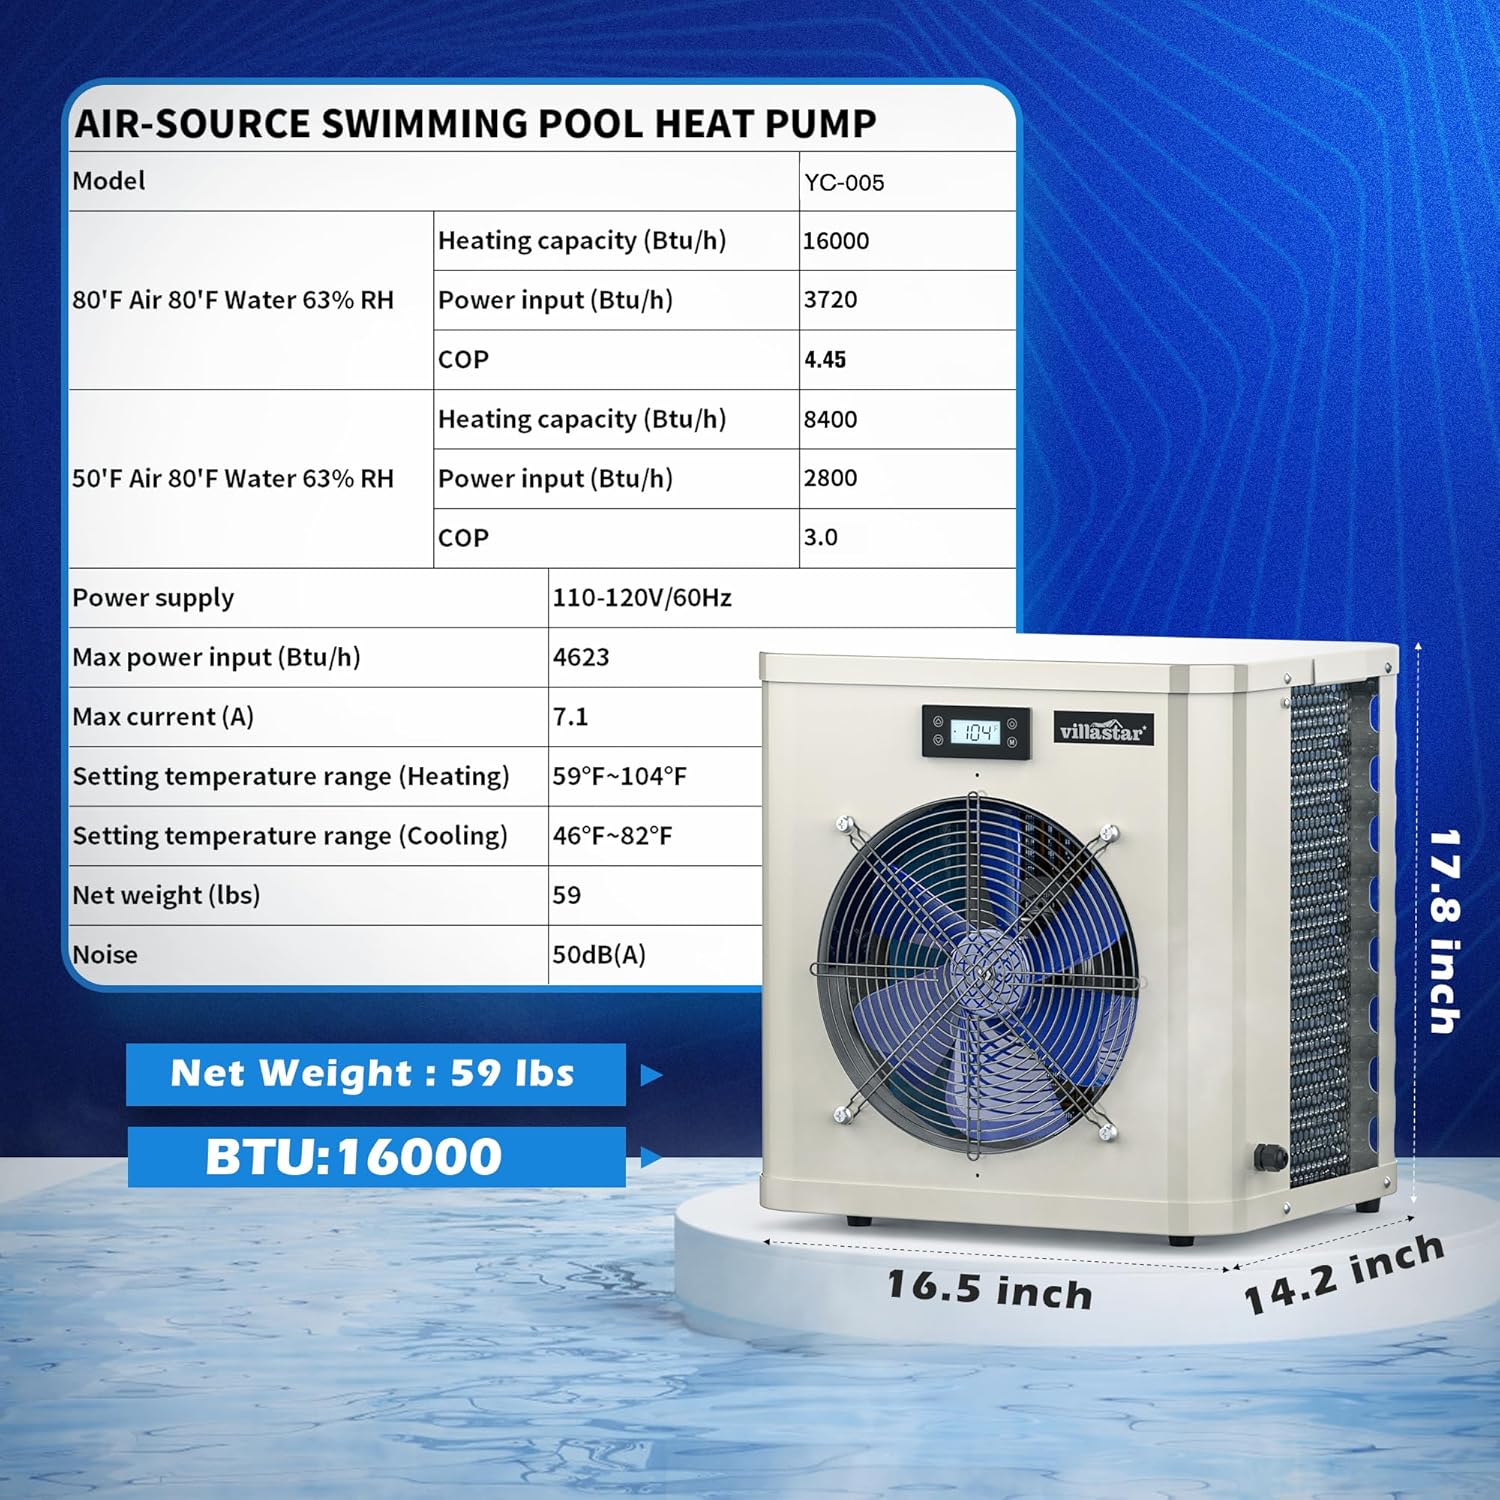
Figure 3: Air-Source Swimming Pool Heat Pump Specifications
This image provides a detailed table of technical specifications for the YC-005 model, including heating capacity, power input, COP, temperature ranges, and dimensions.
| Feature | Detalje |
|---|---|
| Model | YC-005 |
| Varmekapacitet (BTU/time) | 16,036 (at 80°F Air, 80°F Water, 63% RH) |
| Power Input (BTU/hr) | 3,599 (at 80°F Air, 80°F Water, 63% RH) |
| COP | 4.45 (at 80°F Air, 80°F Water, 63% RH) |
| Anbefalet poolstørrelse | Op til 5,000 gallons |
| Opvarmningstemperaturområde | 59°F - 104°F |
| Køletemperaturområde | 46°F - 82°F |
| Driftslufttemperatur | 23°F - 109.4°F |
| Strømforsyning | 110-120V/60Hz |
| Maks. Strøm | 7.1 A |
| Nettovægt | 67.9 pund |
| Produktdimensioner | 15 x 16.5 x 20 tommer |
| Støjniveau | 50 dB(A) |
| Fabrikant | villastjerne |
| Oprindelsesland | Kina |
9. Garanti og support
Villastar is committed to providing exceptional products and customer service.
- Beskyttelsesplaner: Extended protection plans are available for purchase (e.g., 2-Year, 3-Year Protection Plans).
- Returnerer: Produktet er berettiget til 30 dages nem returret.
- Kundesupport: Villastar offers 24-hour online support to assist with any questions or issues you may encounter.
- For specific warranty details or to contact support, please refer to the contact information provided with your purchase or visit the official Villastar store.