HOCO QS2
Hoco QS2 Portable Smart Air Pump & Emergency Start-Up Power Bank User Manual
Model: QS2
1. Introduktion
Thank you for choosing the Hoco QS2 Portable Smart Air Pump & Emergency Start-Up Power Bank. This device is a multi-functional tool designed to provide reliable assistance in various situations, including jump-starting vehicles, inflating tires, and charging electronic devices. Please read this manual thoroughly before use to ensure proper operation and to maximize the lifespan of your device.
2. Sikkerhedsforanstaltninger
Always observe the following safety guidelines to prevent injury or damage to the device and property.
- Do not expose the device to extreme temperatures, direct sunlight, or fire.
- Opbevares utilgængeligt for børn.
- Du må ikke selv adskille, ændre eller forsøge at reparere enheden. Kontakt kvalificeret servicepersonale.
- Ensure proper ventilation during operation, especially when using the air pump or jump start function.
- Undgå at kortslutte udgangsterminalerne.
- Brug ikke jumpstarteren, hvis batteriet er løbet tør.amps eller kabler er beskadigede.
- When jump-starting, ensure the vehicle's ignition is off and all accessories are unplugged.
- Do not over-inflate tires. Always refer to the recommended tire pressure for your vehicle.
- Hvis enheden bliver for varm under brug, skal den straks afbrydes.
3. Pakkens indhold
Markér venligst feltet for følgende elementer:
- 1 x Hoco QS2 8000 mAh Portable Smart Air Pump Emergency Start-Up Power Bank
- 1 x Jump Start Cables (Red and Black Clamps)
- 1 x Air Hose with Valve Connector
- Various Nozzle Adapters (e.g., for bicycles, balls)
- 1 x USB Type-C opladningskabel

Figure 1: Hoco QS2 and its complete set of accessories.
4. Produktkomponenter
Familiarize yourself with the different parts of your Hoco QS2 device.
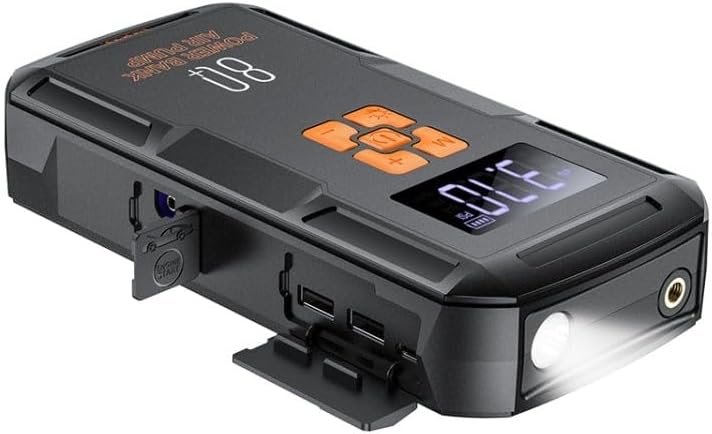
Figur 2: Overview of the Hoco QS2 device.
- Digital skærm: Shows current pressure, battery level, and selected mode.
- Kontrolknapper: Power, Mode selection, Increase/Decrease pressure.
- Luftslangeport: Connects the inflation hose.
- Starthjælpsport: Connects the jump start cables.
- USB Output Ports (2x): For charging external devices (5V/2.4A).
- Type-C Input Port: For charging the Hoco QS2 itself (5V/2.4A).
- LED lommelygte: Giver belysning.
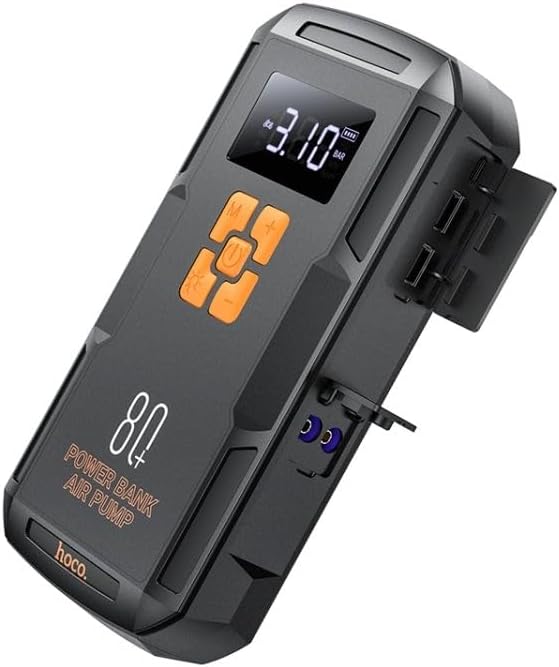
Figur 3: Side view of the Hoco QS2 with ports visible.
5. Opsætning og opladning
5.1 Charging the Hoco QS2
Before first use, fully charge the Hoco QS2. It is recommended to keep the device charged above 50% for optimal performance, especially for jump-starting.
- Connect the provided USB Type-C charging cable to the Type-C input port on the Hoco QS2.
- Connect the other end of the USB cable to a 5V/2.4A USB wall adapter (not included) or a compatible USB port.
- The digital display will indicate the charging status and battery level.
- Opladningstiden kan variere afhængigt af strømkilden.
6. Betjeningsvejledning
6.1 Jump Start Function
The Hoco QS2 can jump-start vehicles with up to 4.0L gasoline or 2.0L diesel engines.
- Ensure the Hoco QS2 is sufficiently charged (at least 75% battery recommended).
- Sluk bilens tænding og alt elektrisk tilbehør.
- Tilslut den røde (+) clamp af startkablet til den positive (+) pol på køretøjets batteri.
- Tilslut den sorte (-) clamp to the negative (-) terminal of the vehicle's battery or a solid, unpainted metal part of the engine block (ground point).
- Insert the blue connector of the jump start cable into the jump start port on the Hoco QS2.
- Once connected, the Hoco QS2 will automatically enter jump start mode.
- Start køretøjets motor. Hvis den ikke starter med det samme, skal du vente 30 sekunder, før du prøver igen. Tørn ikke i mere end 3 sekunder pr. forsøg.
- Once the vehicle starts, immediately disconnect the jump start cable from the Hoco QS2, then remove the black (-) clamp, efterfulgt af den røde (+) kl.amp fra køretøjets batteri.
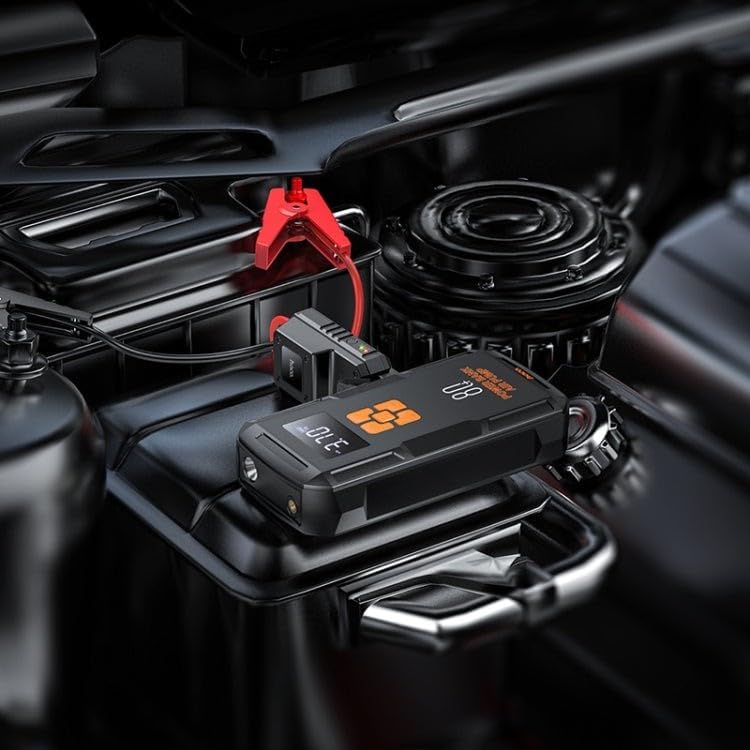
Figure 4: Using the Hoco QS2 for jump-starting a vehicle.
6.2 Tire Inflation Function (Air Pump)
The Hoco QS2 can inflate tires up to 10.3 bar (150 PSI) and features multiple inflation modes.
- Connect the air hose to the air hose port on the Hoco QS2.
- Attach the other end of the air hose to the tire valve. Ensure a secure connection to prevent air leakage. Use appropriate nozzle adapters for other inflatables (e.g., bicycle tires, sports balls).
- Press the Power button to turn on the device. The display will show the current tire pressure.
- Press the 'M' (Mode) button to cycle through the inflation modes: Car, Motorcycle, Bicycle, Basketball. Each mode has a default pressure setting, which can be adjusted.
- Brug knapperne '+' og '-' til at indstille det ønskede måltryk.
- Press the Power button again to start inflation. The pump will automatically stop once the target pressure is reached.
- Disconnect the air hose from the tire valve and the device.

Figure 5: Inflating a car tire with the Hoco QS2.
6.3 Powerbankens funktion
The Hoco QS2 can charge your electronic devices via its dual USB output ports.
- Connect your device's USB charging cable to one of the USB output ports on the Hoco QS2.
- Connect the other end of the cable to your electronic device (e.g., smartphone, tablet).
- The Hoco QS2 will automatically begin charging your device.
- Det digitale display viser powerbankens resterende batteriniveau.
6.4 LED Flashlight Function
The integrated LED flashlight provides illumination for various situations.
- To turn on the flashlight, press and hold the 'Light' button (usually indicated by a light bulb icon).
- Press the 'Light' button again to cycle through different light modes (e.g., steady on, SOS signal, strobe).
- Press and hold the 'Light' button again to turn off the flashlight.
7. Vedligeholdelse og opbevaring
- Rengør enheden med en blød, tør klud. Brug ikke skrappe kemikalier eller slibende rengøringsmidler.
- Store the Hoco QS2 in a cool, dry place, away from direct sunlight and moisture.
- For long-term storage, charge the device every 3-6 months to maintain battery health.
- Ensure all ports are covered when not in use to prevent dust and debris from entering.
8. Fejlfinding
| Problem | Mulig årsag | Løsning |
|---|---|---|
| Enheden tændes ikke. | Lavt batteri. | Oplad enheden helt. |
| Køretøjet starter ikke med startkabler. | Incorrect cable connection; Device battery too low; Vehicle battery severely discharged. | Ensure correct polarity (+ to +, - to -). Charge the Hoco QS2. Allow more time for the vehicle battery to receive a charge, or seek professional assistance if the battery is completely dead. |
| Air pump not inflating or inflating slowly. | Air hose not securely connected; Nozzle adapter not suitable; Device battery low. | Check all connections for leaks. Use the correct adapter. Charge the device. |
| USB-opladning virker ikke. | Device battery low; Cable faulty; Device not compatible. | Charge the Hoco QS2. Try a different USB cable. Ensure your device is compatible with 5V/2.4A charging. |
9. Tekniske specifikationer
| Feature | Specifikation |
|---|---|
| Modelnummer | QS2 |
| Batterikapacitet | 8000 mAh (29.6 Wh) |
| Type-C indgang | 5V / 2.4A |
| USB Output 1/2 | 5V / 2.4A |
| Samlet USB-udgang | 5V / 2.4A |
| Jump Start-output | 12V (for vehicle emergency start) |
| Max lufttryk | 10.3 bar / 150 PSI |
| Dimensioner | Ca.. 12 x 10 x 8 cm |
| Vægt | Ca. 800 gram |
| Driftstemperatur | Se produktemballagen for specifikt sortiment. |
10. Garanti og support
HOCO products are designed and manufactured to the highest quality standards. For warranty information and customer support, please refer to the warranty card included with your purchase or visit the official HOCO webwebsted. Gem din købskvittering som købsbevis i tilfælde af garantikrav.