Carro CFR523N4N-FM
Carro 52-Inch White Flush Mount Ceiling Fan Instruction Manual
Model: CFR523N4N-FM
1. Vigtige sikkerhedsoplysninger
Please read and understand all instructions before beginning installation. Failure to follow these instructions could result in electric shock, fire, or serious personal injury.
- Sørg for, at strømmen er afbrudt ved afbryderen før installation eller vedligeholdelse.
- Al ledningsføring skal være i overensstemmelse med nationale og lokale el-forskrifter.
- Ventilatoren skal monteres på en loftbjælke eller en støttekonstruktion, der kan bære mindst 15.9 kg.
- Brug ikke ventilatoren med beskadigede ledninger, eller hvis ventilatoren er synligt beskadiget.
- Hold hænder, tøj og andre genstande væk fra ventilatorbladene, når ventilatoren er i drift.
- Denne ventilator er kun designet til indendørs brug.
2. Pakkens indhold
Kontroller, at alle komponenter er til stede, før du fortsætter installationen.
- DC Motor Assembly
- 3 ABS klinger
- Fjernbetjening
- Monteringsudstyr (skruer, trådmøtrikker osv.)
- Instruktionsmanual
3. Specifikationer
| Feature | Detalje |
|---|---|
| Mærke | Carro |
| Modelnavn | CFR523N4N-FM |
| Farve | Hvid |
| Elektrisk ventilator design | Loft Fan |
| Strømkilde | DC |
| Produktdimensioner | 10" D x 52" B x 52" H |
| Værelsestype | Soveværelse, Spisestue, Køkken, Stue, Læserum |
| Speciel funktion | Hastighedsjusterbar |
| Støjniveau | 55 decibel (maks.) |
| Wattage | 17 watt |
| Antal blade | 3 |
| Luftmængde kapacitet | 3955 kubikfod i minuttet |
| Voltage | 120 volt |
| Kontrolmetode | Fjern |
| Antal effektniveauer | 10 |
| Indendørs/Udendørs brug | Indendørs |
| Monteringstype | Ceiling Mount (Flush Mount) |
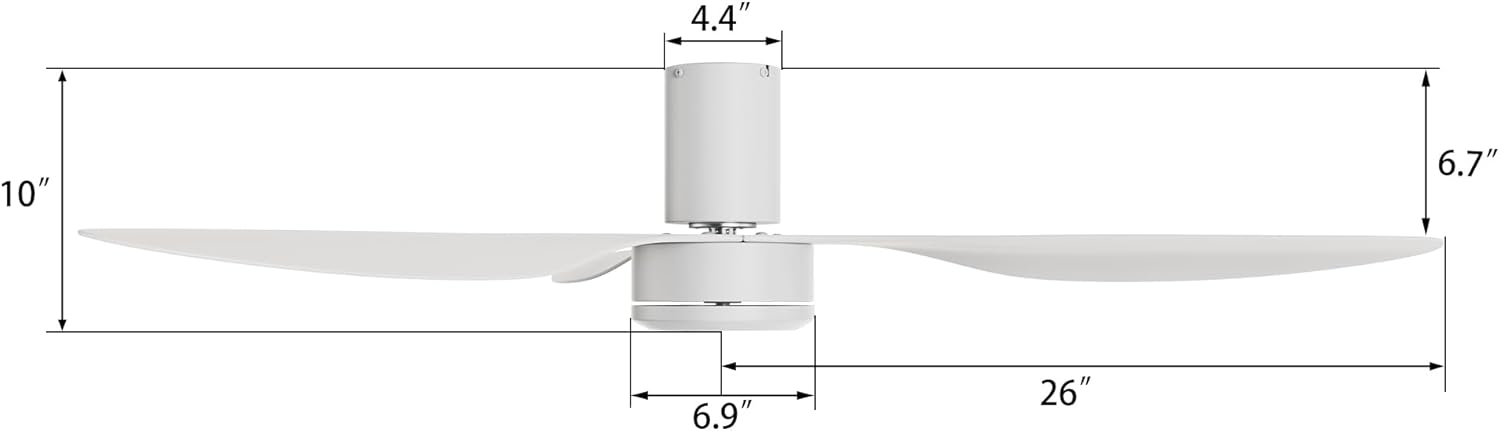
Figure 3.1: Fan Dimensions. Total height is 10 inches, motor housing is 4.4 inches wide, and blades extend 26 inches from the center.
4. Installationsvejledning
4.1 Kontrol før installation
- Ensure the ceiling is flat and capable of supporting the fan's weight. This fan is not adaptable for sloped ceilings.
- Confirm that the electrical box is securely mounted and rated for ceiling fan support.
- Sluk for strømmen ved hovedafbryderen, før du påbegynder noget elektrisk arbejde.
4.2 Ledningsinstruktioner
Connect the fan's wiring to your household electrical system as follows:
- Tilslut Hvid (neutral) wire from the fan to the neutral wire from the ceiling.
- Tilslut Black/Red (Hot/Live) wire from the fan to the hot/live wire from the ceiling.
- Sørg for, at alle forbindelser er sikre med trådmøtrikker.

Figure 4.1: Wiring Diagram and Flush Mount Compatibility. This fan is suitable for flat ceilings and requires connection of neutral and live wires.
4.3 Blade Attachment
Attach the three ABS blades to the motor housing using the provided screws. Ensure they are securely fastened.

Figure 4.2: Fan Blade and Motor Details. Illustrates the robust structure and ABS blade material.
5. Betjeningsvejledning
5.1 Fjernbetjeningsfunktioner
The fan is controlled via the included remote. Familiarize yourself with its buttons:
- TIL/FRA: Tænder eller slukker for blæseren.
- F/R (Forward/Reverse): Changes the direction of blade rotation for summer or winter mode.
- Hastighedsknapper (+/-): Adjusts fan speed across 10 levels.
- Naturlig tilstand: Activates a varying speed setting to simulate natural breezes.

Figure 5.1: 10 Adjustable Fan Speeds. The fan offers a range of speeds from soft to cool wind.

Figure 5.2: Recommended Speed Settings for various activities.
5.2 Reversible DC Motor Function
The fan features a reversible DC motor, allowing for year-round use:
- Sommertilstand (nedtræk): Press the "F/R" button to set blades to rotate counter-clockwise, creating a cooling breeze.
- Vintertilstand (opadgående træk): Press the "F/R" button to set blades to rotate clockwise, circulating warm air trapped near the ceiling.
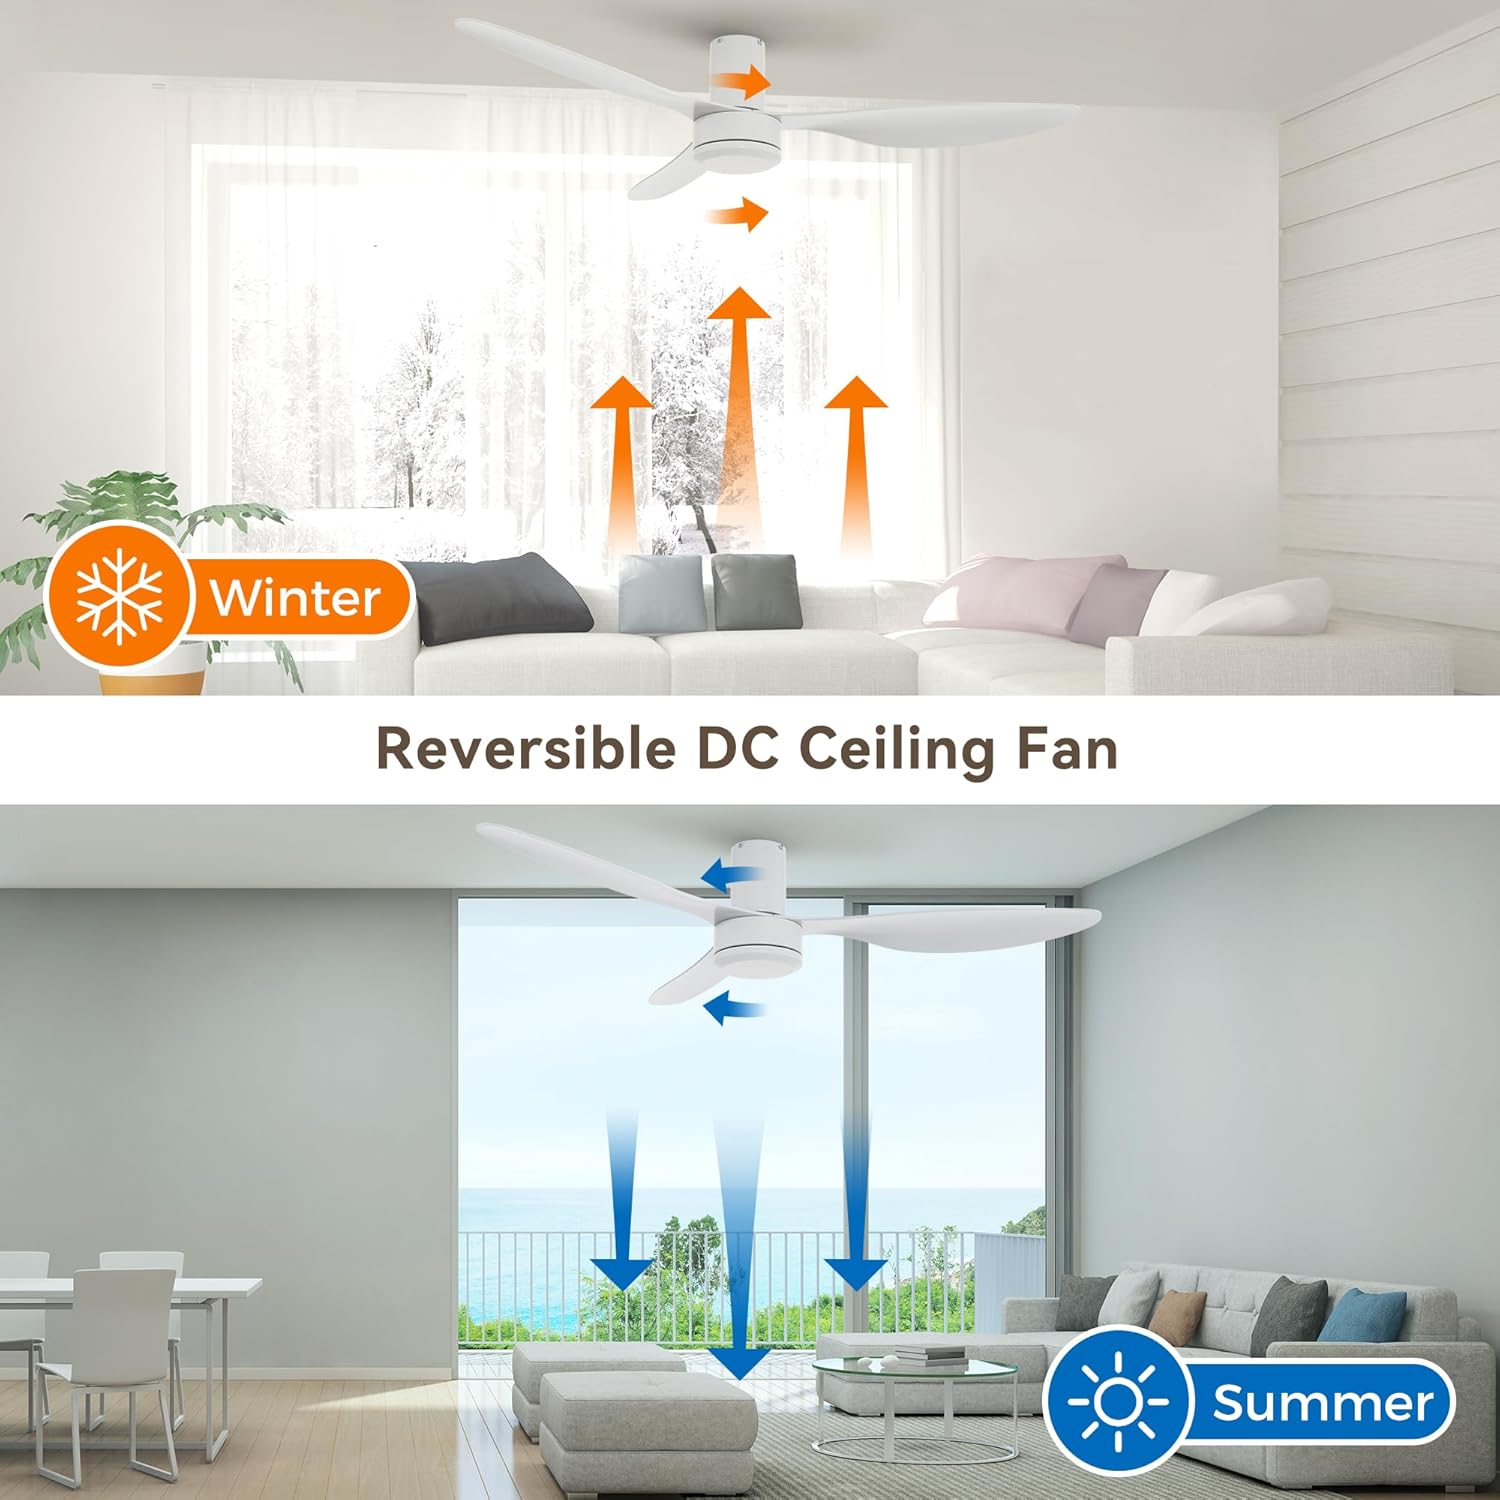
Figure 5.3: Reversible DC Motor Operation for Summer and Winter modes.
6. Vedligeholdelse
Regelmæssig vedligeholdelse sikrer optimal ydeevne og levetid for din loftsventilator.
- Rensning: Tør ventilatorbladene og motorhuset regelmæssigt af med en blød klud.amp klæde. Brug ikke slibende rengøringsmidler eller opløsningsmidler.
- Knivbalance: Hvis ventilatoren vakler, skal du kontrollere, at alle vingeskruer er spændte, og at vingene ikke er bøjede eller beskadigede.
- Motor smøring: DC-motoren er permanent smurt og kræver ikke yderligere smøring.
- Sluk: Always turn off power at the circuit breaker before cleaning or performing any maintenance.
7. Fejlfinding
| Problem | Mulig årsag | Løsning |
|---|---|---|
| Ventilator starter ikke | Ingen strøm til ventilatoren; Løse ledningsforbindelser; Fjernbetjeningens batteri er lavt eller ikke parret. | Kontroller afbryderen; Verificer, at alle ledningsforbindelser er sikre; Udskift fjernbetjeningens batteri, eller reparer fjernbetjeningen. |
| Ventilatoren larmer for meget | Loose screws on blades or mounting bracket; Unbalanced blades. | Tighten all screws; Check blade balance and adjust if necessary. |
| Fjernbetjening virker ikke | Low or dead battery; Remote not paired with fan; Obstruction between remote and receiver. | Replace battery; Follow pairing instructions (if applicable, typically power cycle fan and press remote button); Ensure clear line of sight. |
| Blæseren slingrer | Loose mounting bracket; Unbalanced blades; Blades not securely attached. | Ensure mounting bracket is tight; Use a balancing kit (not included) if needed; Tighten blade screws. |

Figure 7.1: Fan Noise Level Comparison. The Carro fan operates quietly, below 55dB.
8. Garanti og support
8.1 Garantioplysninger
This Carro ceiling fan comes with a 12 måneders garanti fra købsdatoen. Denne garanti dækker fabrikationsfejl og materialefejl ved normal brug.
The warranty does not cover damage caused by improper installation, misuse, accidents, or unauthorized repairs.
8.2 Kundesupport
For any questions, technical assistance, or warranty claims, please contact Carro customer support. When contacting support, please have your order details and model number (CFR523N4N-FM) available.
Alle e-mails vil blive besvaret inden for 24 timer.
For more information, visit the official Carro webwebstedet eller se din købsdokumentation.