BlitzWolf BW-VT2EU
BlitzWolf BW-VT2 Mini Projektor Brugermanual
Your comprehensive guide to setting up, operating, and maintaining your BlitzWolf BW-VT2 Mini Projector.
1. Produktet er slutview
1.1 Pakkens indhold
Kontroller venligst, at alle varer er til stede i din pakke:
- BlitzWolf BW-VT2 Miniprojektor
- Fjernbetjening
- Strømadapter
- HDMI kabel
- Brugervejledning (dette dokument)
1.2 Enhedslayout
Familiarize yourself with the various parts and ports of your projector.
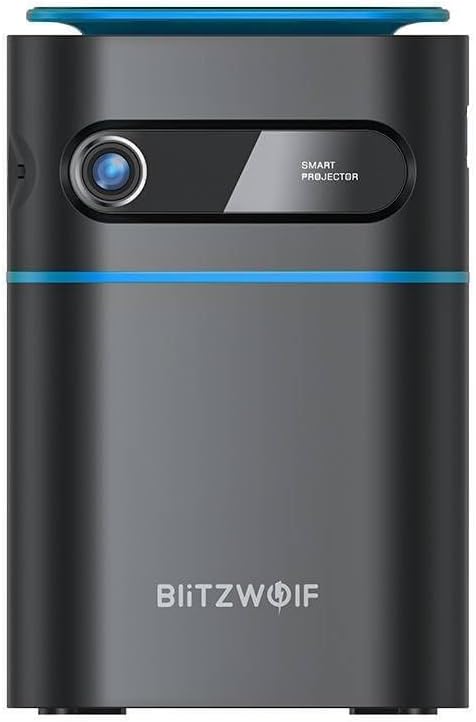
Figur 1.1: Forside View. This image displays the front of the BlitzWolf BW-VT2 Mini Projector, highlighting the projection lens and the 'SMART PROJECTOR' branding.

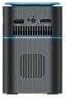
Figure 1.2: Projector with Remote Control. This image shows the BlitzWolf BW-VT2 Mini Projector alongside its dedicated remote control, illustrating the compact size of both devices.
Figur 1.3: Bagside View. The rear of the projector is shown, featuring ventilation grilles and various input/output ports.

Figur 1.4: Side View. This image highlights the side of the projector where additional connectivity options such as USB and HDMI ports are located.

Figur 1.5: Øverst View. The top surface of the projector is visible, featuring the integrated touch control panel for direct interaction.
1.3 Porte og kontroller
- HDMI-port: Connect to laptops, game consoles, Blu-ray players, etc.
- USB-port: Tilslut USB-flashdrev til medieafspilning.
- Lydudgang (3.5 mm) port: Tilslut eksterne højttalere eller hovedtelefoner.
- DC IN-port: Tilslut strømadapteren.
- Power knap: Tænder/slukker projektoren.
- Fokushjul: Justerer billedets klarhed.
- Tryk på Kontrolpanel: Navigate menus and control playback directly on the device.
2. Opsætningsvejledning
2.1 Tænd
- Tilslut strømadapteren til DC IN-porten på projektoren.
- Sæt strømadapteren i en stikkontakt.
- Press and hold the Power Button on the projector or the remote control until the device powers on.
2.2 Indledende placering
For optimalt viewing experience, consider the following:
- Placer projektoren på en stabil, flad overflade.
- Ensure there is adequate ventilation around the projector to prevent overheating.
- Position the projector perpendicular to the projection surface (wall or screen) for a rectangular image.
- Adjust the distance to achieve your desired screen size.
2.3 Fokusjustering
After powering on, adjust the focus to ensure a clear image:
- Drej fokushjulet, der er placeret i nærheden af objektivet, indtil det projicerede billede fremstår skarpt og klart.
2.4 Opsætning af fjernbetjening
Insert batteries into the remote control before first use:
- Åbn dækslet til batterirummet på bagsiden af fjernbetjeningen.
- Isæt to AAA-batterier (medfølger ikke), og sørg for at polariteten (+/-) vender korrekt.
- Luk batterirummets dæksel.
3. Betjeningsvejledning
3.1 Navigation
You can navigate the projector's interface using either the remote control or the touch control panel on top of the device.
- Fjernbetjening: Use the directional buttons (up, down, left, right) to move through menus and the 'OK' button to select.
- Tryk på Kontrolpanel: Swipe and tap on the touch-sensitive surface to navigate.
3.2 Tilslutning af enheder
The BW-VT2 supports various input sources:
- HDMI -indgang: Connect your laptop, game console, or other HDMI-enabled devices using an HDMI cable. Select the HDMI input source from the projector's menu.
- USB-indgang: Insert a USB flash drive into the USB port. The projector's media player will typically detect the drive automatically, allowing you to browse and play supported media files (videoer, fotos, musik).
- Wi-Fi-forbindelse: Navigate to the 'Settings' menu, then 'Network' or 'Wi-Fi'. Select your Wi-Fi network and enter the password to connect the projector to the internet. This enables access to online streaming apps and updates.
3.3 Android OS-funktioner
As an Android-powered projector, the BW-VT2 offers smart functionalities:
- Appadgang: Download and install various streaming apps (e.g., Netflix, YouTube) directly from the pre-installed app store or by sideloading APKs.
- Indstillinger: Customize display settings, audio output, network configurations, and system preferences through the Android settings menu.
- Skærmspejling: Utilize built-in screen mirroring features (e.g., Miracast, AirPlay compatible apps) to project content from your smartphone or tablet wirelessly.
3.4 Lydudgang
The projector has built-in speakers, but you can also connect external audio devices:
- 3.5 mm lydudgang: Connect headphones or external speakers via the 3.5mm audio jack for enhanced sound.
4. Vedligeholdelse
Korrekt vedligeholdelse sikrer projektorens levetid og optimale ydeevne.
4.1 Rengøring af linser
To maintain clear image quality, clean the projector lens regularly:
- Brug en blød, fnugfri klud, der er specielt designet til optiske linser.
- Tør forsigtigt linsen af med cirkulære bevægelser.
- Undgå at bruge slibende rengøringsmidler eller for meget kraft, da dette kan ridse linsen.
4.2 Ventilation
Ensure proper airflow to prevent overheating:
- Do not block the ventilation vents on the projector.
- Brug projektoren i et godt ventileret område.
- Periodically clean dust from the vents using a soft brush or compressed air.
4.3 Opbevaring
When not in use, store your projector properly:
- Store the projector in a cool, dry place, away from direct sunlight and extreme temperatures.
- Use the original packaging or a protective case to prevent dust accumulation and physical damage.
5. Fejlfinding
Se dette afsnit for almindelige problemer og deres løsninger.
| Problem | Mulig årsag | Løsning |
|---|---|---|
| Projektoren tænder ikke. | Ingen strømforbindelse; defekt strømadapter. | Sørg for, at strømadapteren er korrekt tilsluttet til både projektoren og stikkontakten. Prøv en anden stikkontakt. |
| Intet billede projiceret. | Incorrect input source selected; loose HDMI/USB cable. | Verify the correct input source is selected in the menu. Check cable connections. |
| Billedet er sløret. | Focus not adjusted; projector too close/far. | Rotate the focus wheel until the image is clear. Adjust projection distance if necessary. |
| Ingen lyd. | Volume too low; external audio device not connected properly. | Increase volume. Check connections to external speakers/headphones. Ensure audio output is set correctly in settings. |
| Problemer med Wi-Fi-forbindelse. | Forkert adgangskode; routerproblemer; signalforstyrrelser. | Re-enter Wi-Fi password. Restart router. Move projector closer to router. |
| Fjernbetjening virker ikke. | Løse batterier; blokering; fjernbetjening ikke parret. | Replace batteries. Ensure no obstruction between remote and projector. |
6. Tekniske specifikationer
Key specifications of the BlitzWolf BW-VT2 Mini Projector:
| Feature | Specifikation |
|---|---|
| Mærke | BlitzWolf |
| Modelnummer | BW-VT2EU |
| Farve | Sort |
| Forbindelsesteknologi | HDMI, USB, VGA, Wi-Fi |
| Skærmopløsning | 1920 x 1080 (Fuld HD) |
| Display Type | LCD, LED |
| Formfaktor | Transportabel |
| Særlige funktioner | Portable, Android OS, Wi-Fi, HDMI, USB, VGA |
| Kompatible enheder | Laptops, Smartphones, Game Consoles, Blu-ray Players, Media Players, Wi-Fi enabled devices |
| Anbefalede anvendelser | Hjemmebiograf |
7. Garanti og support
7.1 Producentens garanti
The BlitzWolf BW-VT2 Mini Projector comes with a 2 års producentgarantiDenne garanti dækker materiale- og fabrikationsfejl ved normal brug. Gem venligst din købsbevis i tilfælde af garantikrav.
7.2 Kundesupport
If you encounter issues not covered in the troubleshooting section or require further assistance, please contact BlitzWolf customer support. Refer to the product packaging or the official BlitzWolf webhjemmeside for de seneste kontaktoplysninger.