Indledning
The ZEBRONICS Z310 NVMe Micro-ATX Motherboard is designed for modern computing needs, supporting Intel 6th, 7th, 8th, and 9th Generation Processors with an LGA 1151 socket. It features DDR4 memory support up to 2666 MHz, an NVMe M.2 slot, 5.1 channel audio, and various connectivity options including USB 3.0, SATA, RJ45 LAN, and HDMI. This manual provides essential information for the proper installation, operation, and maintenance of your motherboard.
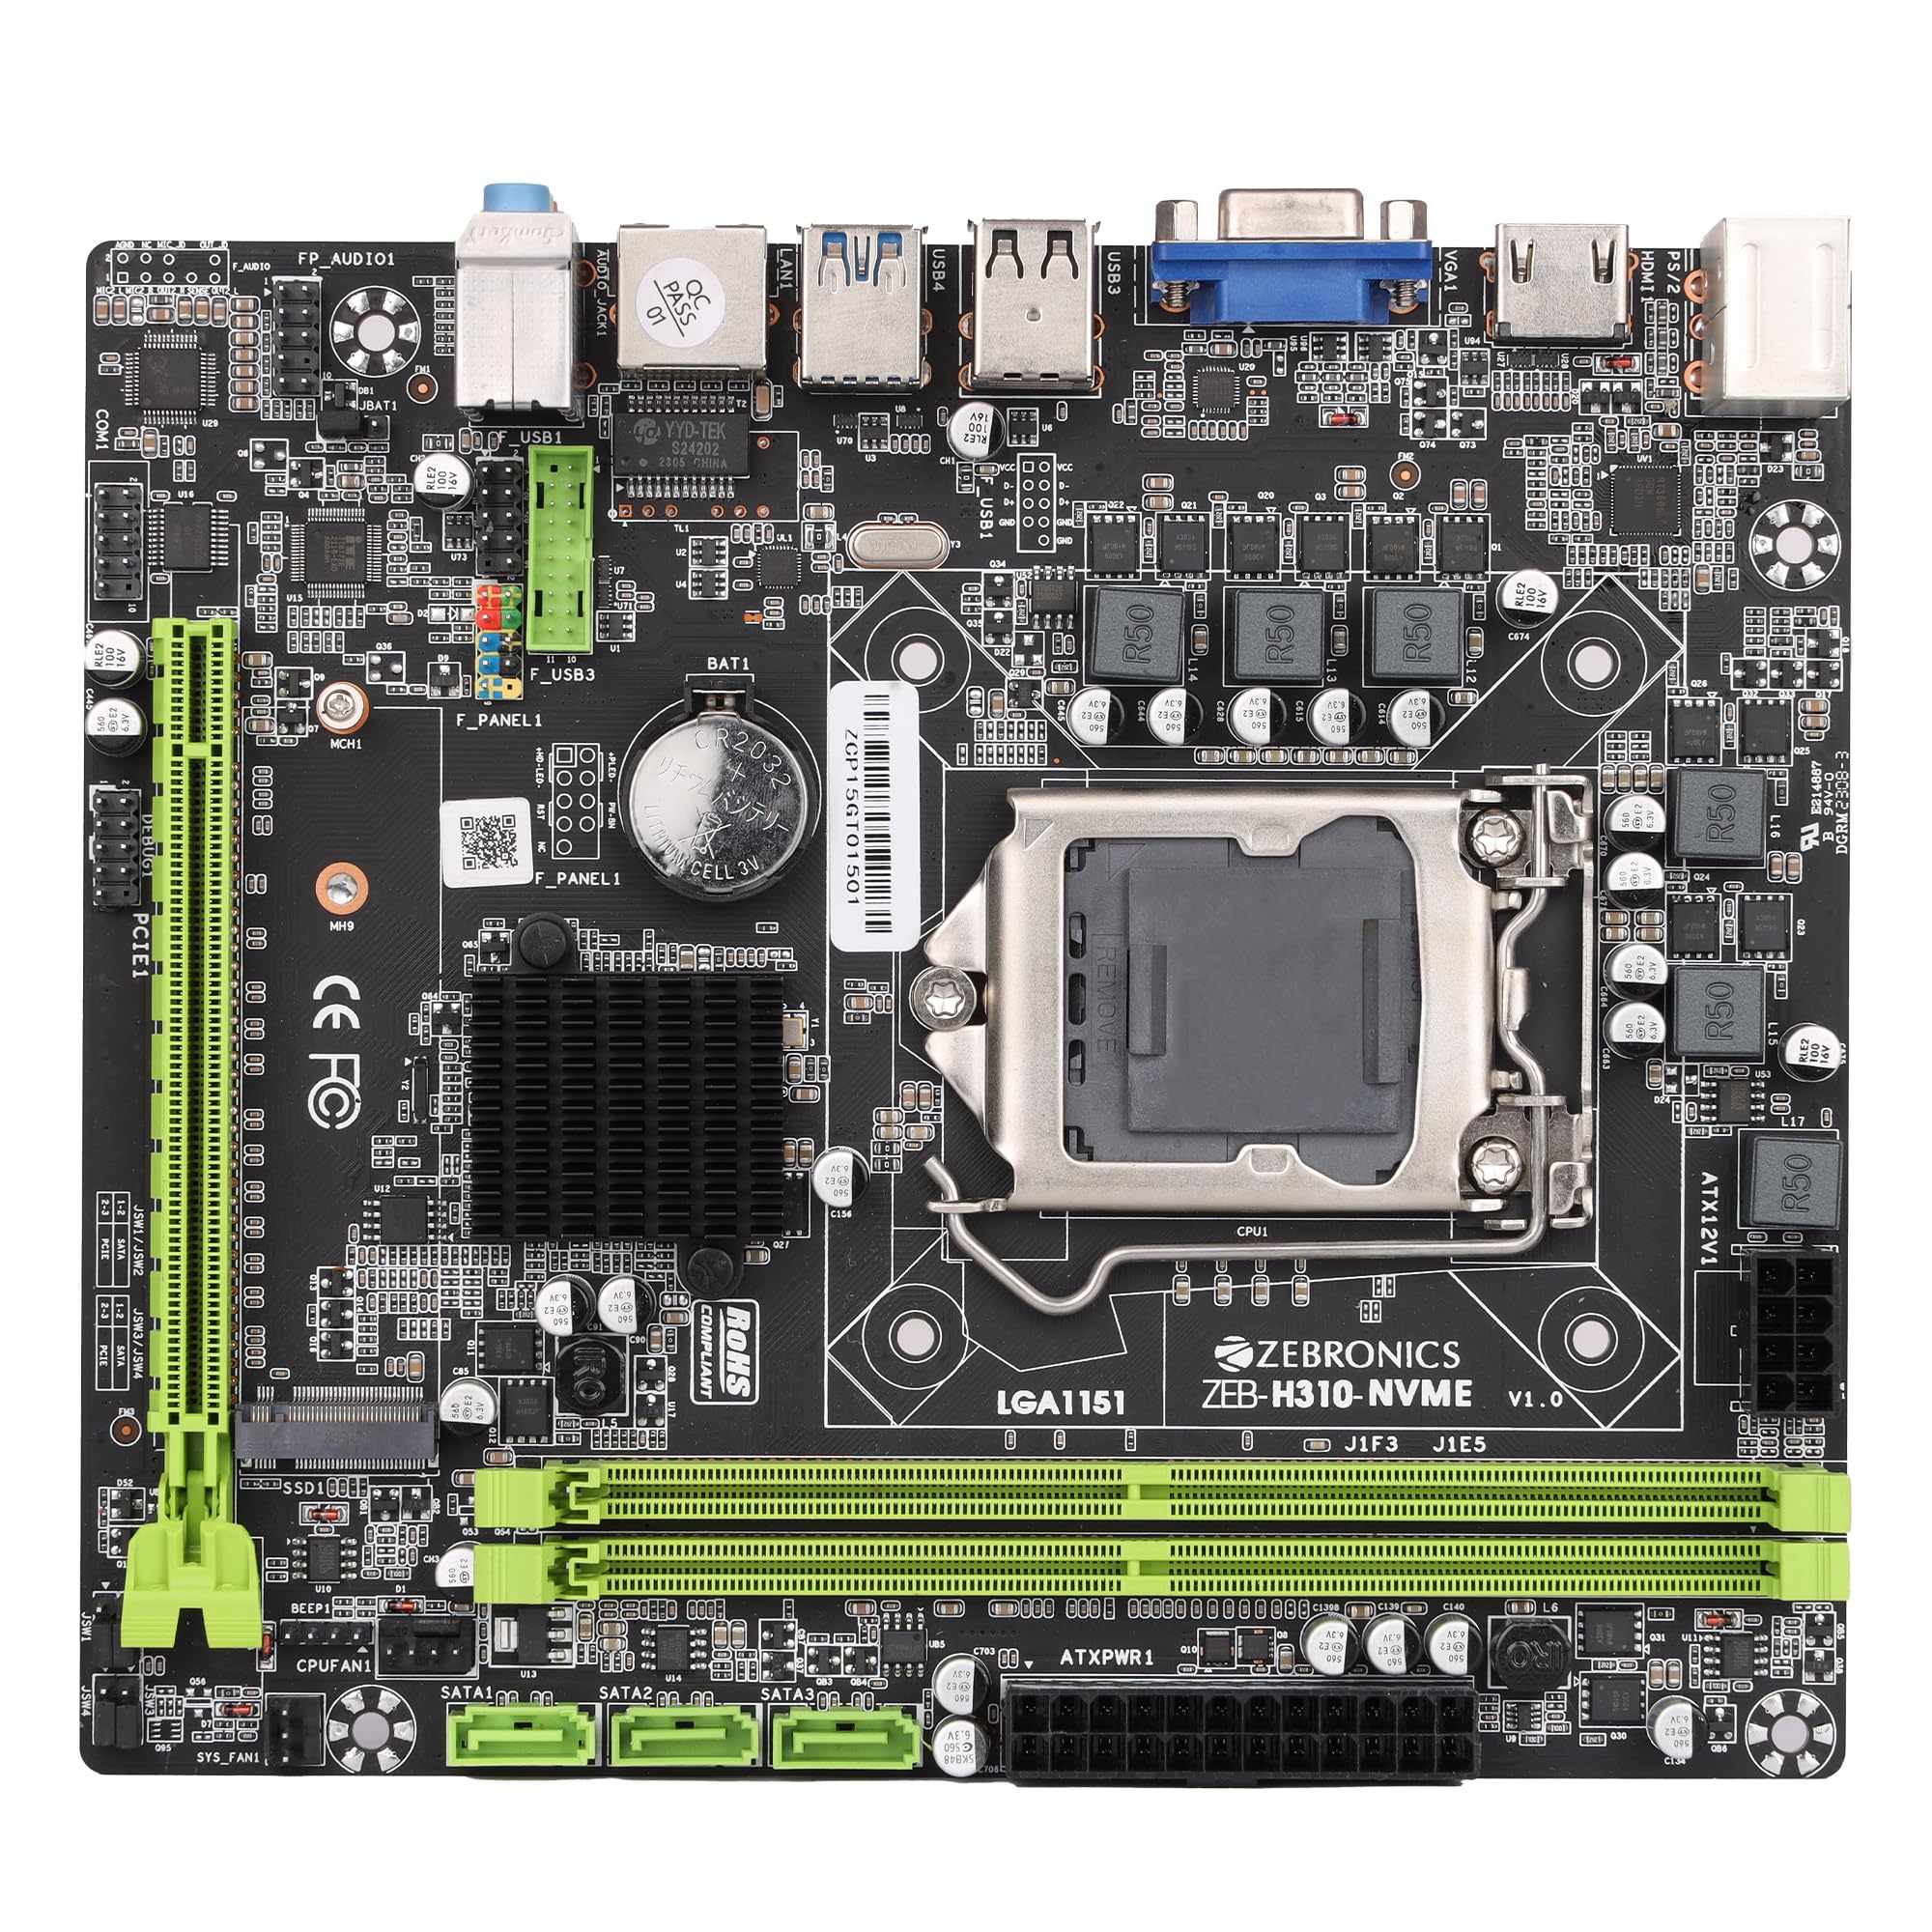
Figure 1: ZEBRONICS Z310 NVMe Micro-ATX Motherboard overview.
Nøglefunktioner
- DDR4-hukommelsesunderstøttelse: Compatible with DDR4 memory modules, supporting speeds from 2133MHz to 2666MHz for optimal system performance.
- LGA 1151-sokkel: Designed to support Intel 6th, 7th, 8th, and 9th Generation Processors, ensuring smooth data transfer and increased processing power.
- 5.1-kanals lyd: Provides a captivating audio experience with crystal-clear sound.
- LAN-forbindelse: Equipped with 10/100/1000 Mbps LAN support for fast and reliable internet connection.
- PCIe 16-slot: Facilitates seamless data transfer for graphics cards and other expansion cards.
- Opbevaringsmuligheder: Includes 3 SATA ports for connecting multiple storage devices (HDDs, SSDs) and a SATA M.2 (NVMe) slot for high-speed M.2 drives.
- USB 3.0-porte: Elevates data transfer speeds for external devices.

Figure 2: Visual representation of key features including DDR4, NVMe M.2, LGA 1151, and PCIe X16 support.
Opsætning og installation
Før installationen påbegyndes, skal du sørge for, at dit system er slukket og taget ud af stikkontakten. Brug en antistatisk håndledsrem for at forhindre skader på komponenterne forårsaget af elektrostatisk udladning (ESD).
1. Installation af CPU'en
- Find LGA 1151 CPU-sokkelen på bundkortet.
- Åbn CPU-sokkelhåndtaget, og løft belastningspladen.
- Juster forsigtigt CPU'en med soklen, og sørg for, at den gyldne trekant på CPU'en matcher trekanten på soklen. Tving ikke CPU'en på plads.
- Sænk lastpladen, og fastgør den med håndtaget.

Figur 3: Top-down view of the motherboard, showing the LGA 1151 CPU socket.
2. Installing RAM (DDR4 Memory)
- Find de to DDR4 DIMM-pladser.
- Åbn klipsene i begge ender af DIMM-stikket.
- Align the RAM module with the slot, ensuring the notch on the RAM module matches the key in the slot.
- Tryk godt ned i begge ender af RAM-modulet, indtil klipsene klikker på plads.
3. Installation af lagerenheder
- SATA-drev: Connect SATA data cables from your storage devices (HDDs/SSDs) to the SATA ports on the motherboard. Connect power cables from your power supply to the drives.
- NVMe M.2 Drive: Locate the M.2 slot. Insert the NVMe M.2 drive at an angle and then gently push it down. Secure it with the provided screw.

Figure 4: Labeled diagram of the motherboard highlighting various ports including SATA and M.2 interface.
4. Tilslutning af strømforsyning
- Tilslut 24-bens ATX-strømstikket fra din strømforsyning til hovedstrømstikket på bundkortet.
- Connect the 8-pin (or 4-pin, depending on your PSU) CPU power connector to the ATX12V socket near the CPU. Ensure all 8 pins are connected if your PSU provides an 8-pin connector for stable operation.
5. Tilslutning af periferiudstyr og frontpanel
- Connect USB devices, keyboard, mouse, and display cables to the rear I/O panel.
- Connect the front panel headers (power button, reset button, HDD LED, power LED, front USB, front audio) to their respective pins on the motherboard. Refer to the motherboard diagram for correct pin alignment.

Figure 5: Rear I/O panel with various ports including PS/2, VGA, USB, LAN, and audio jacks.
Betjeningsvejledning
After completing the hardware installation, you can proceed with the initial boot-up and operating system installation.
- Tilslut din skærm, tastatur og mus.
- Tænd dit system.
- Under opstart skal du trykke på den angivne tast (normalt DEL eller F2) for at åbne BIOS/UEFI-opsætningen.
- Konfigurer opstartsrækkefølgen for at installere dit operativsystem fra et USB-drev eller en optisk disk.
- Gem ændringerne, og afslut BIOS. Systemet genstarter og starter installationsprocessen for operativsystemet.
- Install necessary drivers for the motherboard components (chipset, audio, LAN, etc.) from the provided driver CD or the ZEBRONICS webwebsted.
Opretholdelse
Regelmæssig vedligeholdelse er med til at sikre dit bundkorts levetid og stabile ydeevne.
- Hold det rent: Rengør bundkortet og andre komponenter regelmæssigt med trykluft. Sørg for, at systemet er slukket og frakoblet, før du rengør det.
- Tjek forbindelser: Ensure all power and data cables are securely connected. Loose connections can cause system instability.
- BIOS-opdateringer: Check the official ZEBRONICS website for BIOS/UEFI updates. Update only if necessary and follow the instructions carefully.
- Miljøkontrol: Operate the motherboard in a well-ventilated area to prevent overheating.
Fejlfinding
Hvis du støder på problemer, kan du se følgende almindelige fejlfindingstrin:
- Ingen strøm:
- Ensure the power supply is connected correctly to both the 24-pin ATX and 8-pin (or 4-pin) CPU power connectors. A common issue is not fully connecting the 8-pin CPU power.
- Verify the power button is correctly connected to the front panel header.
- Check if the power supply unit (PSU) is functional.
- Ingen visning:
- Ensure the monitor is connected to the correct video output (motherboard integrated graphics or dedicated graphics card).
- Genindsæt RAM-modulerne. Forkert isat RAM er en almindelig årsag til manglende visning.
- If using a dedicated graphics card, ensure it is properly seated in the PCIe slot and has adequate power.
- Systemustabilitet/nedbrud:
- Kontroller for overophedning. Sørg for, at CPU-køleren er korrekt installeret, og at blæserne drejer.
- Verify RAM compatibility and stability. Test with one RAM stick at a time.
- Sørg for, at alle drivere er opdaterede.
- Lydproblemer:
- Ensure audio cables are connected to the correct jacks on the rear I/O panel or front panel.
- Install or update audio drivers.
- Check audio settings in your operating system.
For further assistance, consult the ZEBRONICS support webwebsted eller kontakt kundeservice.
Specifikationer
| Feature | Detalje |
|---|---|
| Mærke | ZEBRONIK |
| Modelnavn | Z310 NVMe |
| CPU socket | LGA 1151 |
| Kompatible processorer | Intel Core 6th Gen, 7th Gen, 8th Gen, 9th Gen |
| Chipsættype | Intel Z310 |
| RAM-hukommelsesteknologi | DDR4 |
| Hukommelses urhastighed | 2400 MHz (Supports up to 2666 MHz) |
| Hukommelsespladser til rådighed | 2 |
| Drive/Memory Storage Capacity (Max) | 32 GB |
| Total SATA Ports | 3 |
| M.2 Slot | 1 (NVMe support) |
| Grafikkort interface | PCI Express |
| Total PCIe Ports | 1 (PCIe 16x) |
| Samlet USB-porte | 6 (inklusive USB 3.0) |
| USB 2.0 porte | 2 |
| Antal Ethernet-porte | 1 (10/100/1000 Mbps) |
| Total HDMI Port | 1 |
| Type hovedstrømstik | 24-benet |
| Varens vægt | 800 gram |
| Varedimensioner (L x B x H) | 22.1L x 5.5W x 27.5H Centimeter |
Garanti og support
The ZEBRONICS Z310 NVMe Micro-ATX Motherboard comes with a 1-year carry-in service center warranty. For warranty claims or technical support, please contact ZEBRONICS customer service or visit their official webwebsted.
Du kan finde flere oplysninger og supportressourcer på ZEBRONICS Store on Amazon.in.
Produktvideo overståetview
Video: En officiel produktvideoasing the features and overview of the ZEBRONICS Z310 NVMe Micro-ATX Motherboard.


