
1. Introduktion
This manual provides detailed instructions for the safe and effective operation, setup, and maintenance of your Ortur Laser Master 2 S2 LU2-10A Laser Engraver and Cutter, along with the Ortur Laser Rotary Roller. Please read this manual thoroughly before using the device to ensure proper functionality and safety.
2. Sikkerhedsoplysninger
WARNING: This product uses a high-power laser. Improper use can cause serious injury, including eye damage and burns. Always wear appropriate laser safety goggles when operating the device. Never look directly at the laser beam.
Overhold følgende sikkerhedsforanstaltninger:
- Øjenbeskyttelse: Always wear certified laser safety goggles.
- Ventilation: Operate in a well-ventilated area to dissipate fumes and smoke generated during engraving/cutting.
- Brandfare: Hav en brandslukker i nærheden. Lad ikke maskinen være uden opsyn under drift.
- Materiale kompatibilitet: Only engrave or cut materials suitable for laser processing. Avoid reflective, flammable, or PVC materials.
- Børn og kæledyr: Hold børn og kæledyr væk fra operationsområdet.
- Nødstop: Gør dig bekendt med placeringen af nødstopknappen.
The Ortur Laser Master 2 S2 LU2-10A includes the following safety protections:
- Exposure Duration Detection
- Laser Beam Safety Guard
- Strømstyringssystem
- Position Movement Protection
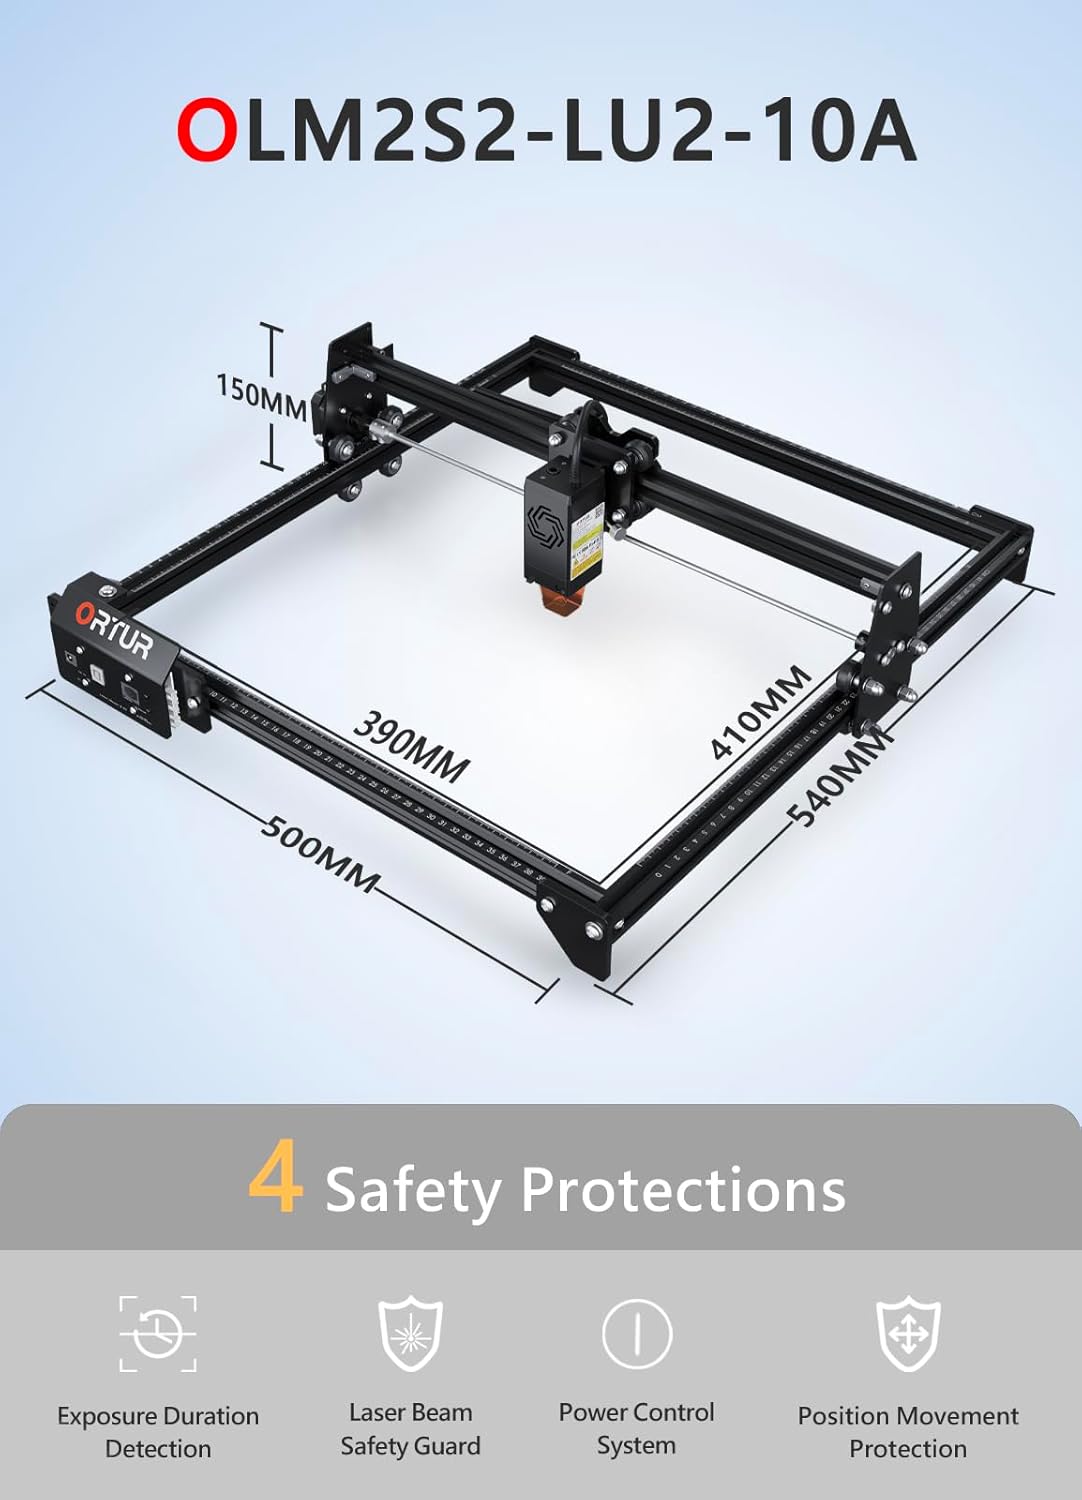
Billede: Overview of the Ortur Laser Master 2 S2 LU2-10A, showing its dimensions and highlighting its four safety protection features: Exposure Duration Detection, Laser Beam Safety Guard, Power Control System, and Position Movement Protection.
3. Pakkens indhold
Upon unpacking, verify that all components are present. The package typically includes:
- Ortur Laser Master 2 S2 Engraver Frame
- LU2-10A Laser Module (10W Output Power)
- Ortur Laser Rotary Roller (YRR2.0)
- Strømadapter og kabler
- USB kabel
- Sikkerhedsbriller
- Monteringsværktøj og skruer
- SampMaterialer til testning
- Brugervejledning (dette dokument)

Image: The complete Ortur Laser Master 2 S2 LU2-10A laser engraver with the 10W laser module, shown alongside the Ortur Laser Rotary Roller and various engraved sampvarerne.
4. Produktet er slutview
4.1 Ortur Laser Master 2 S2 LU2-10A Engraver
The Ortur Laser Master 2 S2 LU2-10A is a high-performance laser engraver and cutter featuring a powerful 10W optical output laser module. It is designed for precision engraving and efficient cutting of various materials.
- Laser modul: LU2-10A, 10W optical power.
- Compressed Spot: 0.05mm x 0.1mm for fine detail.
- Skæreevne: Can cut up to 30mm acrylic and 20mm wood.
- Graveringsområde: 390 mm x 410 mm.
- Air-Assist Interface: Built-in for enhanced cutting performance.
- Struktur: Industrial-grade full metal design for reliability and accuracy.

Image: Close-up of the Ortur LU2-10A laser module, illustrating its higher precision with a smaller compressed spot size (0.05x0.1mm) compared to other modules.

Image: Demonstrates the cutting capability of the Ortur LU2-10A laser module, showing clean cuts through 12mm thick black acrylic and 15mm thick plywood in a single pass.

Billede: Eksploderet view of the Ortur 10W laser module, detailing its internal components including air intake, dual fans, laser diodes, focus gauge, and protective cover.
4.2 Ortur Laser Rotary Roller (YRR2.0)
The Ortur Laser Rotary Roller is an accessory designed for engraving cylindrical or irregularly shaped objects that cannot be processed on a flat bed. It expands the versatility of your laser engraver.
- Fungere: Enables 360° rotating engraving on cylindrical objects.
- Adjustable Diameters: Features 7 adjustable diameter settings, accommodating objects from 8mm to 110mm.
- Kompatibilitet: Suitable for items such as cups, bottles, pipes, and small diameter cylinders.

Image: Close-up of the Ortur Rotary Roller, illustrating its gear mechanism and the 7 adjustable diameter settings for engraving objects of various sizes, from 8mm to 100mm.

Image: The Ortur Rotary Roller in operation, demonstrating 360° rotating engraving on a cylindrical object (a beverage can).

Billede: En collageudstillingasing various items that can be engraved using the rotary roller, including wine glasses, bottles, tumblers, rolling pins, rings, and pens.
5. Opsætning
5.1 Main Unit Assembly
The Ortur Laser Master 2 S2 LU2-10A features a modular design for easy assembly. Typically, assembly can be completed within 10-15 minutes by following the included quick start guide or video instructions.
- Pak alle komponenter ud, og kontroller dem med pakkens indholdsliste.
- Assemble the frame according to the provided diagrams, securing all screws.
- Install the LU2-10A laser module onto the gantry.
- Tilslut alle nødvendige kabler (strøm, USB, motorkabler).
- Sørg for, at maskinen er placeret på en stabil, plan overflade i et godt ventileret område.
5.2 Rotary Roller Connection
To use the Ortur Laser Rotary Roller, connect it to the engraver's dedicated rotary axis port. Specific connection details can be found in the rotary roller's supplementary guide.
- Ensure the main engraver is powered off.
- Connect the rotary roller's motor cable to the designated port on the engraver's control board.
- Place the rotary roller on a stable surface within the engraver's working area.
- Adjust the height of the engraver's gantry or the rotary roller's support to ensure proper focus on the cylindrical object.
6. Betjeningsvejledning
6.1 Softwarekompatibilitet
The Ortur Laser Master 2 S2 LU2-10A is compatible with popular laser engraving software:
- LaserGRBL: Free software, compatible with Windows 7 / 8 / XP / 10 / 11.
- LightBurn: Paid software, compatible with Windows 7 / 8 / XP / 10 / 11 and macOS.
Understøttet file formats include SVG, DXF, JPG, JPEG, PNG, BMP, TIF, CR2, etc.
6.2 Grundlæggende graverings-/skæringsproces
- Designforberedelse: Create or import your design in your chosen software.
- Materiale placering: Place the material securely on the engraving bed.
- Fokusjustering: Adjust the laser module's focus using the integrated focus gauge.
- Softwareindstillinger: Configure laser power, speed, and passes based on the material type and desired outcome.
- Rammetest: Use the software's framing function to ensure the design fits within the material.
- Start drift: Start graverings- eller skæreprocessen. Overvåg maskinen nøje.
6.3 Using the Rotary Roller
When engraving cylindrical objects, the rotary roller replaces the standard flat bed operation.
- Install Rotary Roller: Connect the rotary roller as described in Section 5.2.
- Placer objekt: Secure the cylindrical object (e.g., cup, bottle) onto the rotary roller.
- Adjust Diameter: Set the rotary roller to the appropriate diameter using its adjustable gears (7 steps, 8mm to 110mm).
- Fokuslaser: Adjust the laser module height to focus on the surface of the cylindrical object.
- Softwarekonfiguration: In your engraving software (e.g., LightBurn), enable the rotary axis and input the correct diameter and steps per rotation settings.
- Start gravering: Proceed with the engraving process, ensuring the object rotates smoothly.
7. Vedligeholdelse
Regelmæssig vedligeholdelse sikrer optimal ydeevne og forlænger levetiden for din lasergravør.
- Rengør laserlinse: Periodically clean the laser module's lens with a lint-free cloth and lens cleaning solution.
- Rengør skinner og hjul: Keep the guide rails and wheels free from dust and debris to ensure smooth movement.
- Smør bevægelige dele: Apply a small amount of lubricant to the guide rails and lead screws as needed.
- Firmwareopdateringer: Check the Ortur official webwebstedet for tilgængelige firmwareopdateringer til din maskine.
- Efterse kabler: Kontrollér regelmæssigt alle kabler for slid eller beskadigelse.
8. Fejlfinding
Hvis du støder på problemer, kan du se følgende almindelige problemer og løsninger:
- Ingen laseroutput:
- Check power connection and laser module cable.
- Ensure safety features (e.g., tilt sensor) are not triggered.
- Verify software settings for laser power.
- Maskinen opretter ikke forbindelse til computeren:
- Kontroller USB-kabelforbindelsen.
- Install necessary drivers for the engraver.
- Prøv en anden USB-port eller et andet kabel.
- Dårlig graverings-/skæringskvalitet:
- Verify laser focus is correctly set.
- Adjust laser power and speed settings for the material.
- Rengør laserlinsen.
- Sørg for, at materialet er fladt og sikkert fastgjort.
- Rotary Roller Not Rotating:
- Check the rotary roller's motor cable connection.
- Ensure rotary axis is enabled and configured correctly in software.
- Verify the object is not too heavy or causing friction.
For further assistance, consult the Ortur support webwebsted eller kontakt kundeservice.
9. Specifikationer
9.1 Ortur Laser Master 2 S2 LU2-10A Engraver
- Model: Laser Master 2 S2 LU2-10A
- Laser modul: LU2-10A (10W Optical Output Power)
- Compressed Spot Size: 0.05 mm x 0.1 mm
- Graveringsområde: 390 mm x 410 mm
- Machine Dimensions (Approx.): 500 mm (L) x 540 mm (B) x 150 mm (H)
- Skæreevne: Up to 30mm acrylic, 20mm wood
- Kompatibilitet: Windows 7/8/XP/10/11, macOS (with LightBurn)
- Understøttet File Formater: SVG, DXF, JPG, JPEG, PNG, BMP, TIF, CR2 osv.
9.2 Ortur Laser Rotary Roller (YRR2.0)
- Model: YRR2.0
- Justerbar graveringsdiameter: 8mm to 110mm (7 steps)
- Dimensioner (ca.): 129 mm (L) x 184 mm (B) x 81 mm (H)

Image: Technical specifications and dimensions of the Ortur Laser Rotary Roller, showing approximate measurements of 129mm in length, 184mm in width, and 81mm in height.
10. Garanti og support
Ortur products come with a standard manufacturer's warranty. Please refer to the warranty card included with your product or visit the official Ortur webhjemmeside for detaljerede garantivilkår.
For technical support, troubleshooting assistance, or spare parts, please contact Ortur customer service through their official website or the retailer where you purchased the product. Provide your product model and serial number for faster service.