
Indledning
The IN WIN D5 is a mid-tower computer chassis designed to accommodate E-ATX motherboards up to 12" x 10", including the latest back-connector motherboards. It features a widely perforated front panel for optimized airflow and a modular, rotatable PCI-E slot bracket for flexible GPU installation. This manual provides essential information for the proper assembly, operation, and maintenance of your D5 chassis.
Key features include support for back-connect motherboards, a modular PCI-E bracket, a concealed headphone hanger, premium airflow design, and an integrated cable shroud for efficient cable management.
Pakkens indhold
Før monteringen påbegyndes, skal du kontrollere, at alle komponenter er til stede:
- IN WIN D5 Mid Tower Chassis
- Tilbehørsæske (skruer, afstandsstykker, kabelbindere osv.)
- One pre-installed Neptune AN120 ARGB fan
- Brugervejledning (dette dokument)

Billede: Forside view of the IN WIN D5 chassis, showcasing the perforated front panel and IN WIN logo.
Opsætning og installation
Follow these steps for proper installation of your computer components into the D5 chassis.
1. Klargøring af chassiset
- Place the chassis on a flat, stable surface.
- Remove the side panels. The tempered glass side panel can be removed by unscrewing the thumbscrews (if present) or using the quick-release mechanism.

Billede: Interiør view of the IN WIN D5 chassis, showing the spacious layout for component installation.
2. Installation af bundkort
- Install the necessary motherboard standoffs onto the motherboard tray according to your motherboard's form factor (E-ATX, ATX, Micro-ATX).
- Placer forsigtigt dit bundkort på afstandsstykkerne, og juster skruehullerne.
- Fastgør bundkortet med skruer.
- The D5 supports back-connector motherboards, allowing for cleaner cable routing.

Image: Diagram illustrating the maximum dimensions for E-ATX motherboards, GPUs (up to 365mm), and PSUs (up to 180mm) within the D5 chassis.
3. Installation af strømforsyningsenhed (PSU)
- The D5 features a bottom-mount PSU design with an individual PSU chamber.
- Slide the PSU into its designated compartment from the rear of the chassis.
- Secure the PSU with screws from the rear.
4. Installation af lagerdrev
- The chassis supports up to 3 x 3.5" HDDs and 4 x 2.5" SSDs.
- Locate the drive bays and mounting points. Install your storage drives using the provided screws or tool-less mechanisms.

Billede: Bageste interiør view of the IN WIN D5 chassis, highlighting the cable management area and drive bays behind the motherboard tray.
5. Installation af grafikprocessor (GPU)
- The D5 features a modular, rotatable PCI-E slot bracket. This allows for both horizontal and vertical GPU mounting without additional brackets.
- For horizontal mounting, remove the necessary PCI-E slot covers and insert your GPU directly into the motherboard's PCI-E slot.
- For vertical mounting, rotate the PCI-E bracket and use a compatible PCI-E riser cable (not included) to connect your GPU to the motherboard.
- A complementary magnetic GPU holder is included to provide additional support for heavier graphics cards.

Image: Diagram showing the modular PCI-E bracket and options for installing a GPU horizontally or vertically. Note: PCI-E riser cable is not included for vertical mounting.
6. Installation af kølesystem (ventilatorer og radiatorer)
- The D5 comes with one pre-installed Neptune AN120 ARGB fan.
- Chassiset understøtter omfattende kølekonfigurationer:
- Front: 3 x 120mm or 3 x 140mm fans / 280mm or 360mm radiator
- Top: 3 x 120mm or 3 x 140mm fans / 280mm or 360mm radiator
- Bag: 1 x 120 mm blæser
- Installer yderligere ventilatorer eller radiatorer efter behov, og sørg for korrekt luftstrømningsretning.

Image: Diagram illustrating the versatile cooling options of the D5 chassis, including fan and radiator placements at the front, top, and rear.

Image: Close-up of the Neptune AN120 ARGB fan, highlighting its design and customizable lighting.
7. Kabelforvaltning
- Utilize the cable shroud on the motherboard tray to channel cables directly from the front to the motherboard, promoting a clean interior and improved airflow.
- Route all power and data cables neatly behind the motherboard tray using the provided cable ties and routing points.
8. Headphone Hanger
- The D5 includes a cleverly concealed headphone hanger. Locate this feature and utilize it to keep your desk space organized.

Billede: Et sammensat billedeasing key features of the D5 chassis: individual PSU chamber, integrated headphone hanger, quick-release side panel mechanism, and cable management integration.
Betjeningsvejledning
Once all components are installed and secured, and all cables are connected:
- Ensure all external peripherals (monitor, keyboard, mouse, etc.) are connected.
- Connect the power cable to your PSU and a wall outlet.
- Press the power button on the chassis to start your system.
- The pre-installed Neptune AN120 ARGB fan will illuminate upon power-on. Its ARGB lighting can typically be controlled via your motherboard's software or a dedicated controller (if applicable).
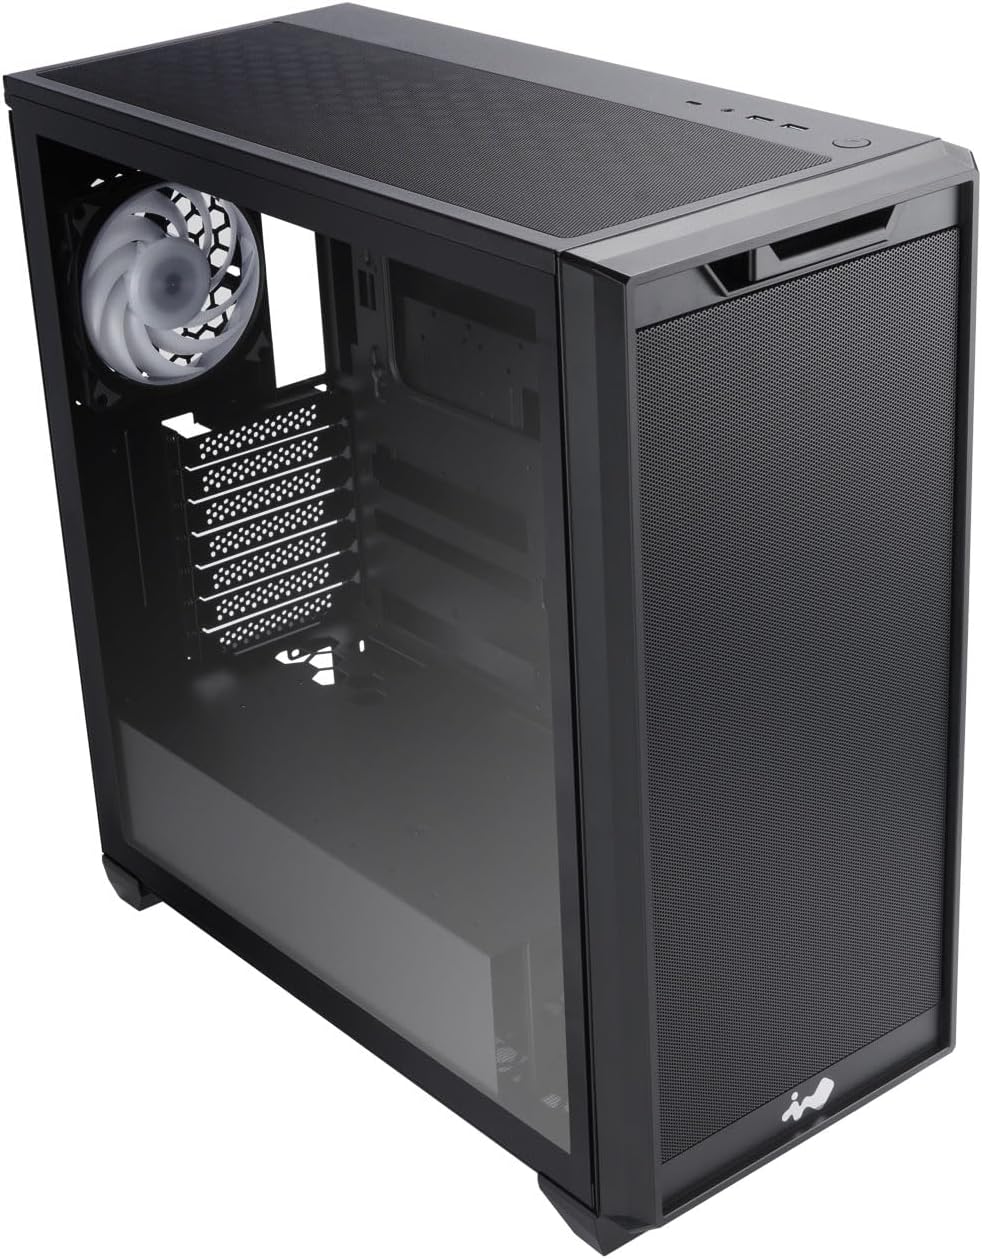
Image: The IN WIN D5 chassis with internal components and ARGB fans illuminated, demonstrating the aesthetic appeal and functional setup on a desk.
Opretholdelse
Regular maintenance helps ensure optimal performance and longevity of your D5 chassis and its components.
- Støvrensning: Periodically clean dust from the perforated front and top panels, as well as any dust filters, using compressed air or a soft brush. This maintains optimal airflow.
- Udvendig rengøring: Tør de udvendige overflader af med en blød, damp klud. Undgå slibende rengøringsmidler eller opløsningsmidler.
- Kabelhåndteringstjek: Occasionally inspect internal cables to ensure they remain neatly routed and do not obstruct airflow.
Fejlfinding
This section addresses common issues you might encounter with your chassis.
- Systemet tænder ikke:
- Check all power connections, including the PSU to the wall, PSU to motherboard, and front panel power switch cables to the motherboard.
- Sørg for, at strømforsyningskontakten er i "ON"-positionen.
- Dårlig luftgennemstrømning/Overophedning:
- Verify that all installed fans are spinning correctly and are oriented for proper intake/exhaust.
- Clean any dust buildup on fan blades and filters.
- Sørg for, at ingen kabler blokerer luftstrømmen.
- ARGB Fan Not Lighting Up:
- Check the ARGB cable connection from the fan to the motherboard's ARGB header or a dedicated ARGB controller.
- Sørg for, at ARGB-softwaren eller controllerindstillingerne er konfigureret korrekt.
Specifikationer
| Mærke | I VIND |
| Modelnavn | D5 |
| Varemodelnummer | IW-CS-D5BLK-1AN120 |
| Sagstype | Mid Tower |
| Bundkort kompatibilitet | E-ATX (up to 12" x 10"), ATX, Micro-ATX |
| Materiale | Metal, hærdet glas |
| Farve | Sort |
| Produktmål (LxBxH) | 19.4 x 8.7 x 18.6 tommer (49.3 x 22.1 x 47.2 cm) |
| Varens vægt | 18.3 pund (8.3 kg) |
| Strømforsyningsmonteringstype | Bundmontering |
| Afkølingsmetode | Luft, vand |
| Forudinstallerede ventilatorer | 1 x Neptune AN120 ARGB fan |
| Max GPU-længde | 365 mm |
| Max CPU Heatsink Height | 165 mm |
| Max PSU-længde | 180 mm |
| Drive Bays | 3 x 3.5" harddisk, 4 x 2.5" SSD |

Image: Dimensional drawing of the IN WIN D5 chassis, showing its height, width, and depth.
Garantioplysninger
For detailed warranty terms and conditions, please refer to the official IN WIN webwebstedet eller garantikortet, der fulgte med dit produkt. Garantidækningen omfatter typisk fabrikationsfejl i en bestemt periode fra købsdatoen.
Støtte
For technical support, troubleshooting assistance, or any inquiries regarding your IN WIN D5 chassis, please visit the official IN WIN webwebsted:
You may also contact IN WIN customer service directly through the contact information provided on their webwebsted.