
1. Produktet er slutview
The Cuifati H310 LGA 1151 DDR4 Motherboard is designed to support 8th and 9th generation Intel Core processors. It features a Micro ATX form factor, dual-channel DDR4 memory support, and a range of expansion options including M.2 NVMe, PCIe slots, and multiple I/O ports for versatile connectivity.
Nøglefunktioner omfatter:
- Wide CPU Compatibility: Supports 8th and 9th generation Intel Core processors (LGA 1151 socket).
- Dobbeltkanals DDR4-hukommelse: Supports up to 32GB DDR4 RAM across two DIMM slots, with frequencies up to 2666MHz.
- Stabil strømforsyning: Features a three-phase power supply with solid capacitors and 24+8 pin power sockets for reliable operation.
- High-Speed H310 Chipset: Provides stable and efficient performance for various computing tasks.
- Integreret grafik: Equipped with an integrated graphics processor and multiple display outputs (DVI, HDMI, VGA) for multi-monitor setups.
- Rich Expansion Ports: Includes SATA 6Gb/s, NVME M.2, PCIe X16, PCIe X1, USB 3.0, USB 2.0, PS/2, RJ45, and audio ports.

Figur 1: Top-down view of the Cuifati H310 LGA 1151 DDR4 Motherboard, showing CPU socket, RAM slots, and various connectors.
2. Opsætning og installation
This section provides instructions for installing the Cuifati H310 motherboard and its components into a computer case.
2.1 Sikkerhedsforanstaltninger
- Afbryd altid strømforsyningen fra stikkontakten, før du installerer eller fjerner komponenter.
- Bær en antistatisk håndledsrem, eller rør ofte ved en jordforbundet metalgenstand for at forhindre elektrostatisk udladning (ESD).
- Hold bundkortet i kanterne for at undgå at berøre følsomme komponenter.
2.2 CPU installation
- Find LGA 1151 CPU-sokkelen på bundkortet.
- Tryk forsigtigt ned på belastningshåndtaget, og træk det til siden for at åbne CPU-sokkeldækslet.
- Justér det trekantede mærke på CPU'en med det tilsvarende mærke på soklen. Sæt forsigtigt CPU'en i soklen uden at tvinge den.
- Luk stikkontaktdækslet, og skub læssehåndtaget tilbage på plads, indtil det klikker.
- Påfør termisk pasta på CPU'en, og installer CPU-køleren i henhold til producentens anvisninger.
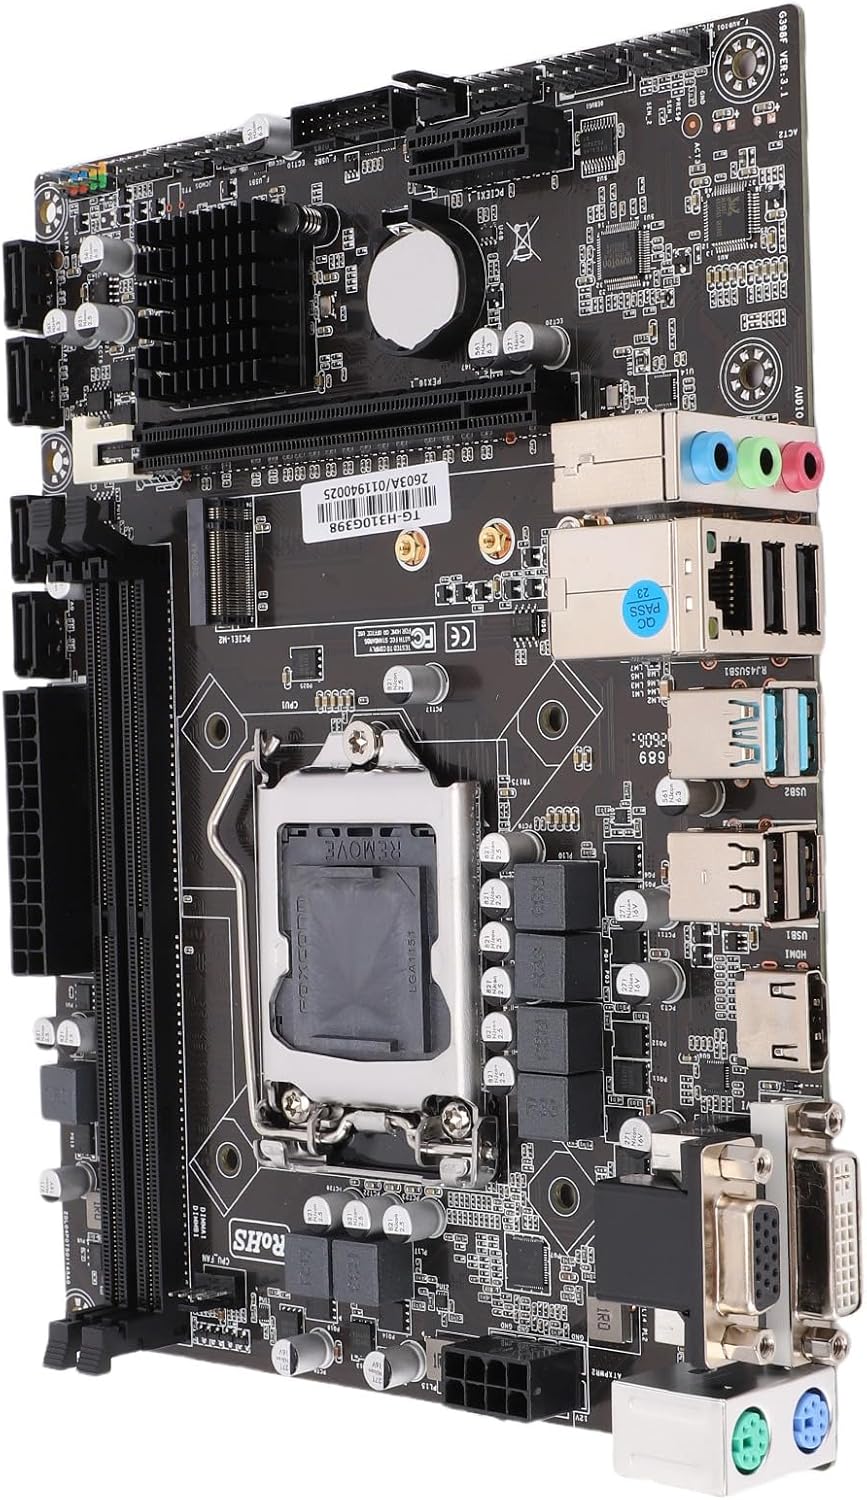
Figur 2: Vinklet view af bundkortet, med fremhævelse af LGA 1151 CPU-sokkelen og de omkringliggende komponenter.
2.3 RAM-installation
- Åbn klipsene i begge ender af DDR4 DIMM-pladserne.
- Juster hakket på DDR4-hukommelsesmodulet med nøglen i DIMM-stikket.
- Sæt hukommelsesmodulet godt ind i stikket, indtil klipsene klikker på plads. Sørg for, at begge klips er lukkede.
- For dual-channel operation, install memory modules in matching slots as indicated in the motherboard manual (typically alternating slots).
2.4 Installation af lagerenhed (M.2 NVMe/SATA)
2.4.1 M.2 NVMe SSD
- Find M.2-slottet på bundkortet.
- Fjern M.2-afstandsskruen.
- Insert the M.2 NVMe SSD into the slot at a 30-degree angle.
- Tryk forsigtigt SSD'en ned, og fastgør den med afstandsskruen.
2.4.2 SATA-drev
- Connect one end of a SATA data cable to a SATA 6Gb/s port on the motherboard.
- Tilslut den anden ende af SATA-datakablet til din SATA-harddisk eller SSD.
- Tilslut et SATA-strømkabel fra din strømforsyning (PSU) til SATA-drevet.
2.5 Strømforbindelser
- Tilslut det 24-bens ATX-strømstik fra din strømforsyning til det tilsvarende stik på bundkortet.
- Tilslut det 8-bens ATX 12V CPU-strømstik fra din strømforsyning til stikket i nærheden af CPU'en.
2.6 Frontpanel og I/O-forbindelser
- Connect the front panel headers (Power LED, HDD LED, Power Switch, Reset Switch) to the designated pins on the motherboard. Refer to the motherboard's silkscreen labels for correct orientation.
- Tilslut USB 2.0- og USB 3.0-stik på frontpanelet.
- Tilslut lydheaderen på frontpanelet.
- Install the I/O shield into the computer case opening before installing the motherboard.

Figure 3: Rear I/O panel of the motherboard, showing ports for USB, DVI, VGA, HDMI, RJ45, and audio.
2.7 Installation af udvidelseskort (PCIe)
- Locate the PCIe X16 slot for a graphics card or other PCIe X1 slots for expansion cards.
- Fjern det tilsvarende dæksel til stikkontakten fra computerens kabinet.
- Align the expansion card with the slot and press it firmly until it is seated correctly.
- Fastgør kortet til kabinettet med en skrue.
3. Betjeningsvejledning
After successful installation, follow these steps for initial system operation.
3.1 Indledende tænding
- Ensure all components are securely connected and the power supply is plugged into a wall outlet.
- Tryk på tænd/sluk-knappen på computerens kabinet.
- Systemet burde tænde, og du burde se et display på din skærm.
3.2 BIOS/UEFI-opsætning
- Tryk gentagne gange på knappen under opstart. DEL or F2 key (common keys, may vary) to enter the BIOS/UEFI setup utility.
- In the BIOS/UEFI, you can configure boot order, system time, CPU settings, memory settings, and other hardware parameters.
- Save changes and exit to continue booting into your operating system installer or existing OS.
3.3 Driverinstallation
- After installing your operating system, install the necessary drivers for the motherboard chipset, integrated graphics, audio, and LAN.
- Drivers are typically provided on a support CD/DVD or can be downloaded from the manufacturer's webwebsted.
4. Vedligeholdelse
Korrekt vedligeholdelse sikrer dit bundkorts og systems lange levetid og optimale ydeevne.
4.1 Rengøring
- Fjern regelmæssigt støv fra indersiden af dit computerkabinet, især omkring ventilatorer og køleplader, med trykluft.
- Sørg for, at systemet er slukket og frakoblet stikket, inden rengøring.
- Undgå at bruge flydende rengøringsmidler direkte på komponenterne.
4.2 BIOS/UEFI-opdateringer
- Tjek producentens website periodically for BIOS/UEFI updates.
- Updates can improve compatibility, stability, and performance.
- Follow the update instructions carefully to avoid system damage.
5. Fejlfinding
Dette afsnit omhandler almindelige problemer, du kan støde på, og giver potentielle løsninger.
5.1 No Power / System Does Not Turn On
- Tjek strømforbindelser: Sørg for, at 24-bens ATX- og 8-bens CPU-strømstikkene er korrekt isat.
- Strømforsyning: Verify the PSU switch is in the 'ON' position and the power cable is firmly connected to both the PSU and the wall outlet.
- Frontpanelets overskrifter: Confirm the power switch header is correctly connected to the motherboard.
5.2 No Display on Monitor (No POST)
- Skærmforbindelse: Ensure the monitor is connected to the correct display output (DVI, HDMI, or VGA) on the motherboard or graphics card and is powered on.
- VÆDDER: Genindsæt RAM-modulerne. Prøv at starte med kun ét RAM-modul installeret.
- CPU: Verify the CPU is correctly installed and the CPU cooler is properly seated.
- Grafikkort: If using a dedicated graphics card, ensure it is properly seated in the PCIe slot and has adequate power. Try removing it and using the integrated graphics.
5.3 Periferiudstyr ikke registreret
- Tjek forbindelser: Ensure the peripheral (e.g., USB device, SATA drive) is correctly connected.
- Drivere: Installer eller opdater de nødvendige drivere til den eksterne enhed.
- BIOS/UEFI-indstillinger: Check if the port or device is enabled in the BIOS/UEFI settings.
6. Specifikationer
Detailed technical specifications for the Cuifati H310 LGA 1151 DDR4 Motherboard.
| Feature | Detalje |
|---|---|
| Modelnavn | H310 LGA 1151 DDR4 |
| Fabrikant | Cuifati |
| CPU socket | LGA 1151 |
| Kompatible CPU'er | 8th and 9th Generation Intel Core Processors (e.g., Intel Core i7-8700K, Intel Core i9-9900K) |
| Chipsæt | Intel H310 |
| Hukommelsesteknologi | DDR4 dobbeltkanal |
| Hukommelsessokler | 2 x DIMM-pladser |
| Maksimal RAM-kapacitet | 32 GB (2 x 16 GB) |
| Hukommelses urhastighed | 2133 MHz, 2400 MHz, 2666 MHz |
| Grafikgrænseflade | Integrated, PCI-Express x16 |
| Vis udgange | 1 x VGA, 1 x DVI, 1 x HDMI |
| Udvidelsesslots | 1 x PCI Express X16, 1 x PCI Express X1 |
| Lagerporte | 4 x SATA 6Gb/s, 1 x NVME M.2 connector |
| USB-porte | 2 x USB 3.0 (rear), 4 x USB 2.0 (rear), 1 x USB 3.0 header (supports 2 ports), 1 x USB 2.0 header (supports 2 ports) |
| LAN | Realtek 100/1000 Mbps Ethernet |
| Lyd | Realtek ALC662 6-kanals HD-lyd |
| Strømstik | 24+8 Pin ATX Power |
| Formfaktor | Micro ATX (Approx. 21.5 x 17 cm / 8.5 x 6.7 inches) |
| Batteri | CR2032 (integrated) |
7. Garantioplysninger
The Cuifati H310 LGA 1151 DDR4 Motherboard comes with a 1 års garanti mod fabrikationsfejlDenne garanti dækker materiale- og fabrikationsfejl ved normal brug i garantiperioden.
Garantien dækker ikke:
- Skader forårsaget af ulykke, misbrug, misbrug, oversvømmelse, brand, jordskælv eller andre eksterne årsager.
- Damage caused by operating the product outside the permitted or intended uses described by Cuifati.
- Damage caused by service (including upgrades and expansions) performed by anyone who is not a representative of Cuifati or an authorized Cuifati Service Provider.
- Products or parts that have been modified to alter functionality or capability without the written permission of Cuifati.
For warranty claims, please contact Cuifati customer support with your proof of purchase.
8. Kundesupport
If you encounter any issues not covered in this manual or require further assistance, please contact Cuifati customer support.
- Online support: Visit the official Cuifati webwebsted med ofte stillede spørgsmål, driverdownloads og supportressourcer.
- Kontaktoplysninger: Refer to your product packaging or the Cuifati webhjemmeside for de seneste kontaktoplysninger.
When contacting support, please have your product model (H310 LGA 1151 DDR4) and purchase information ready.