
hosabely SK80
Brugermanual til hosabely SK80-lydgrænsefladen
Model: SK80
1. Introduktion
Thank you for choosing the hosabely SK80 Audio Interface. This device is designed to enhance your audio experience for live streaming, podcasting, recording, and gaming. It features 48V phantom power, noise reduction, customizable sound pads, and various audio effects. Please read this manual carefully to understand the product's functions and ensure proper operation.

Figur 1: Forside view of the hosabely SK80 Audio Interface.
2. Pakkens indhold
Bekræft at alle varer er til stede i din pakke:
- 1 x hosabely SK80 Live Sound Card (Audio Interface)
- 1 x USB ladekabel
- 2 x lydkabler
- 1 x Engelsk brugermanual (dette dokument)
Note: Microphone is not included. The device is not compatible with USB microphones.
3. Produktet er slutview
3.1. Kontrolpanelets layout

Figur 2: Detaljeret view of the SK80 Audio Interface control panel.
The SK80 features a comprehensive control panel with various knobs and buttons for audio adjustment and effect activation. Key areas include:
- Microphone Volume Controls: Separate knobs for high, middle, and low frequencies, plus overall microphone volume.
- Tone Volume & Recording Controls: Adjust tone and recording levels.
- Line Volume & Instrumental Volume: Controls for line input and instrument input.
- Sound Effects Pads: Buttons for various live sound effects and customizable pads.
- Reverb & Voice Changer Controls: Knobs and buttons for reverb modes and voice modulation.
- 48V Phantom Power knap: Aktiverer fantomstrøm til kondensatormikrofoner.
- Knap til støjreduktion: Engages the noise reduction feature.
- Bluetooth (BT) On/Off: Slår Bluetooth-forbindelse til/fra.
3.2. Forbindelsesporte
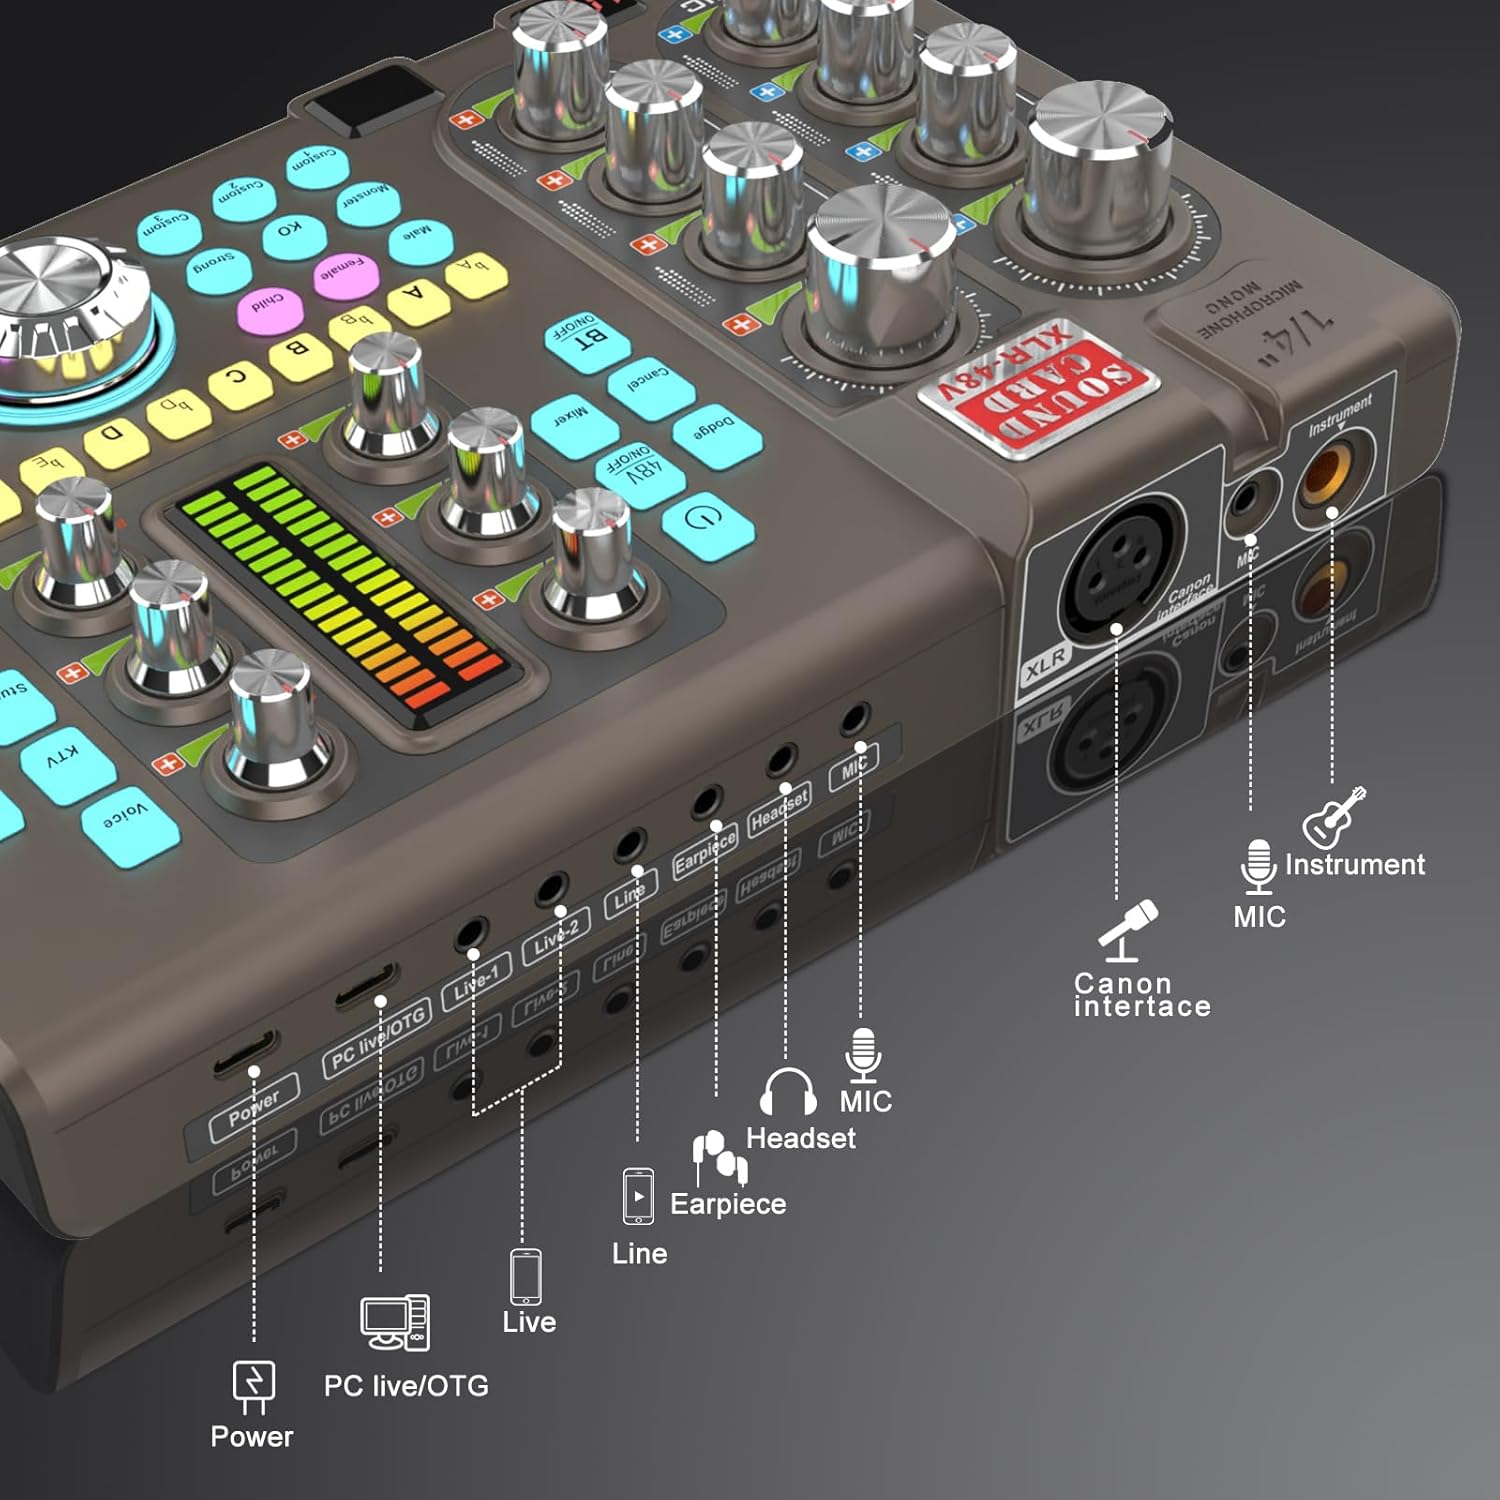
Figure 3: Labeled input and output ports on the SK80 Audio Interface.
Bagpanelet har vigtige forbindelsespunkter:
- Strømport: USB-C for power supply.
- PC Live/OTG Port: USB-C for connection to a computer or OTG-compatible smartphone/tablet.
- Live 1, Live 2, Line-1, Line-2 Ports: 3.5mm audio output ports for connecting to streaming devices or other audio equipment.
- Ørestykkeport: 3.5mm output for monitoring audio with an earpiece.
- Headset port: 3.5mm output for connecting a headset.
- MIC-port: 3.5mm input for a microphone.
- XLR-48V Interface: XLR input for condenser microphones requiring 48V phantom power.
- Instrument Port: 1/4" (6.35mm) input for connecting instruments like guitars.
4. Opsætning
4.1. Tænd for enheden
- Connect the USB Charging Cable to the Magt port on the SK80 and to a USB power adapter (not included) or a computer USB port.
- Press and hold the power button on the control panel to turn on the device.
4.2. Tilslutning af mikrofoner

Figure 4: XLR-48V and Instrument input ports.
- For Condenser Microphones (requiring 48V Phantom Power): Connect your XLR microphone cable to the XLR-48V Interface port. Press the 48V ON/OFF button on the control panel to activate phantom power. (Note: 48V is off by default to conserve battery. A light indicator will confirm activation.)
- For Dynamic Microphones or Microphones with 3.5mm Jack: Tilslut din mikrofon til MIC porten ved hjælp af et 3.5 mm lydkabel.
4.3. Connecting Instruments
Tilslut dit instrument (f.eks. guitar) til Instrument port using a 1/4" (6.35mm) cable.
4.4. Connecting to a Computer or Smartphone
- Via USB: Use the USB Charging Cable to connect the PC Live/OTG port to your computer. The device will be recognized as an audio input/output device.
- Via Bluetooth: Tryk på BT TIL/FRA button on the control panel. On your smartphone or tablet, search for and connect to the SK80 via Bluetooth settings.
4.5. Connecting Monitoring Devices
- Tilslut hovedtelefoner til Headset port for monitoring your audio.
- Connect an earpiece to the Højttaler port for discreet monitoring.
5. Betjeningsvejledning
5.1. Justering af lydniveauer

Figure 5: Audio adjustment knobs.
- Brug MIC VOL knobs (High, Middle, Low) to fine-tune your microphone's equalization.
- Juster Tone Vol knob for overall microphone tone.
- Control the output level with the Indspilning knop.
- Juster Line Vol for line input sources and Instrumental Vol for connected instruments.
- De Monitor Vol knob controls the volume of your monitoring headphones/earpiece.
5.2. Using Reverb Effects
The SK80 offers 6 reverb modes: VOICE, KTV, STUDIO, CONCERT, CORRECT, and MC. Select your desired mode using the dedicated buttons. Adjust the reverb depth and width using the corresponding knobs.
5.3. Customizing Sound Pads

Figure 6: Customizable sound pads.
The SK80 features 3 customizable sound pads. Each pad can record up to 30 seconds of audio. To record:
- Tryk og hold en af Skik buttons (Custom 1, 2, or 3) until it starts blinking.
- Record your desired audio (e.g., from a microphone, connected device, or Bluetooth input).
- Tryk på det samme Skik button again to stop recording. The button will stop blinking.
- Tryk på Skik button once to play the recorded sound. You can adjust the volume of each pad.
5.4. Voice Changer Functions
Transform your voice using the Stemmeskifter feature. Select from Male, Female, Child, or Monster voices. Adjust the STEMMEÆNDRING knob to modify the pitch and create various vocal effects.
5.5. Støjreduktion

Figure 7: Noise reduction display.
Aktiver Støjreduktion button to minimize environmental background noise. The device features a 15-level noise reduction system. The display shows the current noise reduction level.
5.6. Live Sound Effects
The SK80 includes 11 dynamic live sound effects (e.g., Dodge, Muffled, Play In, Laughter, Kiss, Gunfire). Press the corresponding buttons to trigger these effects during your live stream or recording. Each effect typically lasts for approximately 4 seconds.
6. Vedligeholdelse
- Hold enheden ren ved at tørre den af med en blød, tør klud. Undgå at bruge flydende rengøringsmidler eller opløsningsmidler.
- Opbevar enheden et køligt, tørt sted væk fra direkte sollys og ekstreme temperaturer.
- Undgå at tabe eller udsætte enheden for kraftige stød.
- The built-in 3000mAh battery provides approximately 3-5 hours of operation. Recharge the device when the battery indicator is low.
7. Fejlfinding
- Ingen lydoutput:
- Check all cable connections (microphone, headphones, output to PC/streaming device).
- Ensure volume knobs (MIC VOL, Recording, Monitor Vol) are turned up.
- Verify that the correct audio input/output device is selected on your computer or streaming software.
- Mikrofonen virker ikke:
- Hvis du bruger en kondensatormikrofon, skal du sørge for, at 48V fantomstrøm er aktiveret.
- Kontroller mikrofonkablets integritet.
- Confirm the microphone is properly connected to the correct input port (XLR or 3.5mm MIC).
- Static or Noise in Audio:
- Activate the Noise Reduction feature.
- Tjek for løse kabelforbindelser.
- Sørg for, at der ikke er stærke elektromagnetiske interferenskilder i nærheden.
- Adjust input gain levels to avoid clipping.
- Problemer med Bluetooth-forbindelse:
- Ensure the BT ON/OFF button is activated.
- Make sure the SK80 is discoverable and within range of your device.
- Prøv at ophæve parringen og parre enheden igen.
8. Specifikationer
| Varemodelnummer | SK80 |
| Mærke | hosabely |
| Forbindelsesteknologi | Bluetooth, USB |
| Antal kanaler | 4 |
| Varens vægt | 1.67 pund (0.76 kg) |
| Pakkedimensioner | 12.28 x 7.56 x 2.36 tommer |
| Batteritype | Lithium Polymer (3000mAh) |
| Kompatible enheder | Smartphone, PC, Guitar |
| Operativsystemsupport | Linux, Windows, macOS |
| Understøttet software | Ableton Live, FL Studio, Pro Tools, Logic Pro, Cubase (and others) |
9. Garanti og support
For any questions or issues regarding your hosabely SK80 Audio Interface, please refer to the seller's contact information provided at the point of purchase. Please retain your proof of purchase for warranty claims.
Ask a question about this manual
Ask about setup, troubleshooting, compatibility, parts, safety, or missing instructions. Manuals+ will review the question and use this page’s manual context to help answer it.