
1. Introduktion
Thank you for choosing the Zapco ST-1000XM III Monoblock Class D Amplifier. Det her amplifier is designed to deliver high-quality audio performance for your vehicle's sound system. Please read this manual thoroughly before installation and operation to ensure proper use and to maximize the ampliferens potentiale.
The ST-1000XM III is a single-channel, Class D bass amplifier featuring a new aluminum chassis, variable input gain control, variable electronic crossover, variable subsonic filter, variable bass boost control, variable center frequency for bass boost, and variable phase control. It is also strappable for use with a second amplifier on a single voice coil and includes a dash-mount remote gain control.
2. Sikkerhedsoplysninger
Overhold altid følgende sikkerhedsforanstaltninger under installation og drift:
- Frakobl køretøjets batteris negative pol, før du påbegynder nogen form for installation.
- Sørg for, at alle ledninger er korrekt ført og fastgjort for at forhindre skader eller kortslutninger.
- Brug passende ledninger til strøm-, jord- og højttalertilslutninger som angivet.
- Installer amplifier in a dry, well-ventilated location, away from direct sunlight, heat sources, and moisture.
- Betjen ikke ampHvis den er beskadiget eller ikke fungerer korrekt, skal du kontakte kvalificeret personale for at reparere den.
- High sound pressure levels can cause permanent hearing loss. Adjust volume levels responsibly.
3. Opsætning og installation
Korrekt installation er afgørende for optimal ydeevne og sikkerhed. Hvis du er usikker på nogen del af installationsprocessen, skal du kontakte en professionel installatør.
3.1 Montering af Amplivligere
Vælg et sikkert, tørt og godt ventileret sted til montering af amplifier. Ensure there is sufficient airflow around the heatsink. Use the provided mounting hardware to secure the ampSæt løfteren fast på en fast overflade i dit køretøj.
3.2 Ledningsforbindelser
Refer to the diagram below for proper wiring connections.
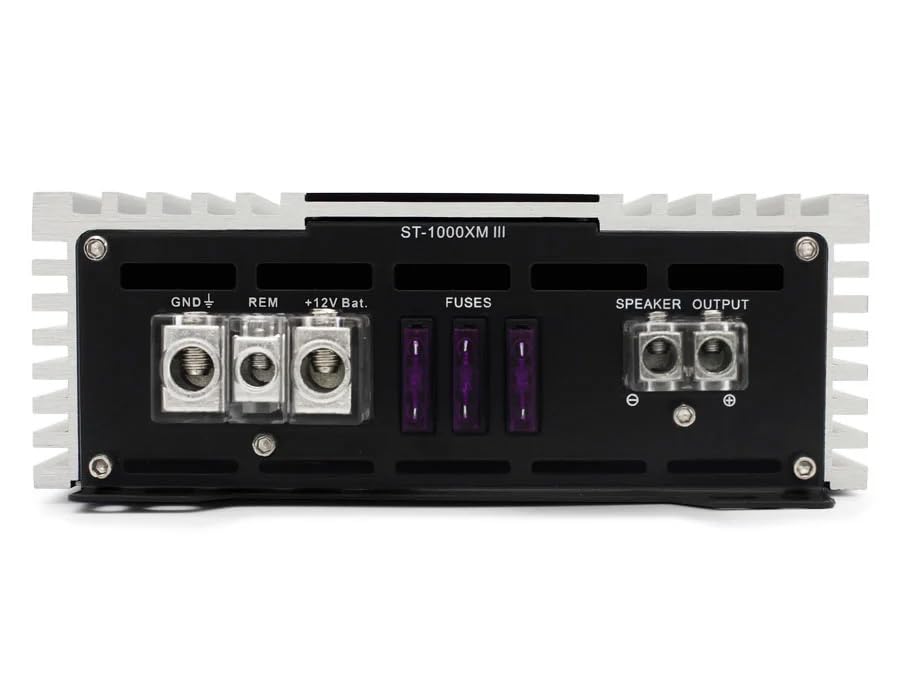
Figure 1: Rear panel connections for power, ground, remote, fuses, and speaker output.
- Strøm (BATTERI +12V): Connect a heavy-gauge wire (e.g., 4 AWG or larger, depending on cable length) directly from the vehicle's positive battery terminal to the +12V terminal on the ampInstaller en passende sikringsholder (medfølger ikke) inden for 45 cm fra batteriet.
- Jord (GND): Connect a heavy-gauge wire of the same size as the power wire from the GND terminal on the ampFastgør sikringen til en ren, umalet metaloverflade på køretøjets chassis. Sørg for en god elektrisk forbindelse.
- Fjernbetjening (REM): Tilslut en ledning med mindre diameter (f.eks. 18 AWG) fra REM-terminalen på amptil fjernbetjeningens tændingsudgang på din hovedenhed. Denne ledning tænder amptænd og sluk for højttaleren med dit stereoanlæg.
- Sikringer: De amplifier is equipped with internal fuses. Ensure these are correctly rated (refer to specifications). Do not replace with higher-rated fuses.
- Højttaler output: Connect your subwoofer(s) to the SPEAKER OUTPUT terminals. Observe correct polarity (+ to + and - to -). This is a monoblock ampLifier, designet til en enkelt kanaludgang.
- Input (RCA): Connect RCA cables from your head unit's subwoofer or full-range pre-out to the IN (RCA) terminals on the amplivligere.
- Fjernforstærkningskontrol: Connect the included remote gain control to the 'REMOTE' port on the amplifier's front panel. This allows for convenient bass level adjustment from the driver's seat.
4. Operating Controls and Adjustments
The Zapco ST-1000XM III features several controls to fine-tune your audio system. Refer to the diagram below for control locations.
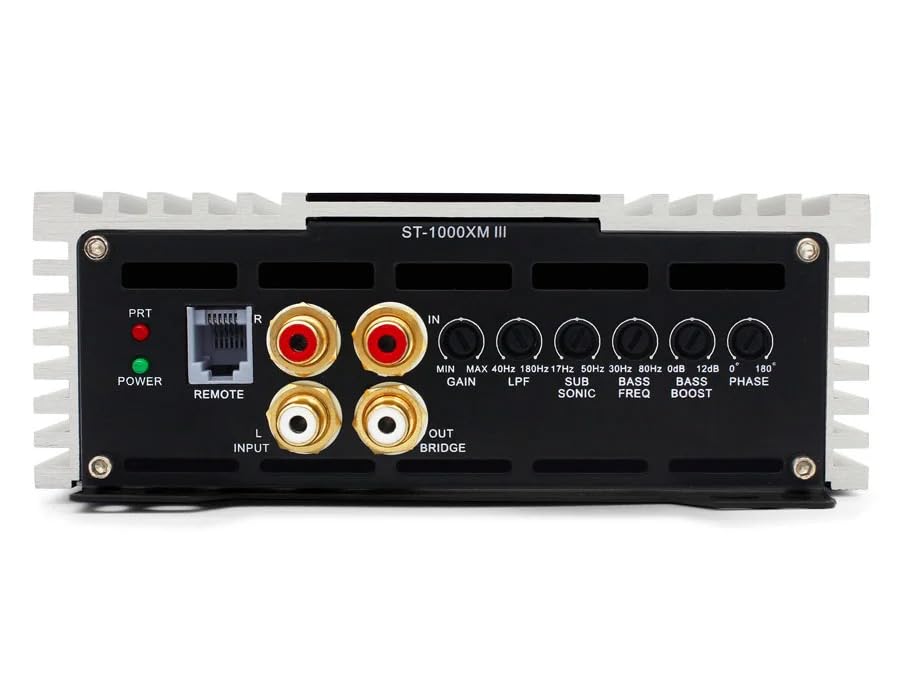
Figure 2: Front panel controls for audio adjustments.
- POWER/PRT Indicators: The POWER LED indicates the amplifier is on. The PRT (Protection) LED illuminates if the amplifier enters protection mode due to overheating, low impedance, or other faults.
- GAIN (indgangsfølsomhed): Justerer amplifier's input sensitivity to match the output voltage of your head unit. Start with the gain at minimum and slowly increase until desired volume is achieved without distortion. Range: 0.25V to 5V.
- LPF (lavpasfilter): Denne kontrol indstiller den øvre frekvensgrænse for amplifier's output. Only frequencies below the set point will pass through. Typically set between 50Hz and 200Hz for subwoofers.
- SUB SONIC (Subsonic Filter): Filters out extremely low frequencies that are inaudible and can damage subwoofers. Typically set below the port tuning frequency of a ported enclosure, or around 20-30Hz for sealed enclosures. Range: 17Hz to 50Hz.
- BASS BOOST: Increases the output level at a specific bass frequency. Use sparingly to avoid distortion. Range: 0dB to 12dB.
- BASS FREQ (Bass Boost Frequency): Selects the center frequency for the bass boost control.
- FASE: Adjusts the phase of the subwoofer output relative to the main speakers. This helps to ensure all sound waves arrive at the listener's ears in sync, improving bass impact and clarity. Adjustable from 0° to 180°.
5. Vedligeholdelse
The Zapco ST-1000XM III ampLifier kræver minimal vedligeholdelse. Følg disse retningslinjer for at sikre lang levetid:
- Behold ampFjerneren er ren og fri for støv og snavs. Brug en blød, tør klud til rengøring.
- Sørg for tilstrækkelig ventilation omkring amplifier at all times. Do not block cooling fins.
- Kontrollér regelmæssigt alle ledningsforbindelser for tæthed og korrosion.
- Undgå at udsætte amplifier til ekstreme temperaturer eller fugt.
6. Fejlfinding
Hvis du oplever problemer med din ampLifier, skal du konsultere følgende fejlfindingsvejledning, før du kontakter support.
- Ingen strøm:
- Kontrollér sikringen i ledningen nær batteriet og sikringerne på amplivligere.
- Verify all power, ground, and remote turn-on connections are secure and have proper voltage.
- Sørg for, at hovedenheden er tændt og sender et fjernsignal.
- Ingen lyd:
- Kontroller RCA-indgangskablerne for korrekt tilslutning og skader.
- Verify speaker wires are correctly connected and not shorted.
- Juster GAIN-kontrollen.
- Check head unit settings (e.g., subwoofer output enabled, volume up).
- Forvrænget lyd:
- Reducer GAIN-indstillingen.
- Check speaker impedance; ensure it is within the amplifier's rated limits.
- Juster indstillingerne for LPF, Subsonic og Bass Boost.
- Ensure speaker wires are not shorted or damaged.
- Amplifier Goes into Protection Mode (PRT LED on):
- Check for speaker wire shorts or impedance too low.
- Sørg for tilstrækkelig ventilation for at forhindre overophedning.
- Check for proper power and ground connections.
7. Specifikationer
| Feature | Specifikation |
|---|---|
| Amplivligere Type | Single channel, Class D, Bass Amplivligere |
| Power @ 1Ω | 1 x 1050 watt RMS |
| Power @ 2Ω | 1 x 750 watt RMS |
| Power @ 4Ω | 1 x 450 watt RMS |
| THD @ nominel effekt | <0.2 % |
| Signal til støj-forhold | > 100dB |
| THD + støj | <0.1 % |
| Effektivitet | > 85 % |
| Frekvensrespons | 10Hz to 200Hz ±1dB |
| Indgangsfølsomhed | 0.25V til 5V |
| Dimensioner (B x H x L) | 160mm x 58mm x 300mm (Chassis) |
| Overall Dimensions (W x H x L) | 160 mm x 58 mm x 325 mm |
| Varens vægt | 8 pund |
| Monteringstype | Overflademontering |
| Specifikation Met | FCC |
8. Garanti og support
The Zapco ST-1000XM III amplifier leveres med en 1-års garanti from the date of purchase, covering defects in materials and workmanship under normal use. This warranty does not cover damage caused by improper installation, accident, misuse, abuse, neglect, or unauthorized modification.
For technical support or warranty claims, please contact your authorized Zapco dealer or visit the official Zapco website for contact information. Please have your product model number and proof of purchase ready.