
Møn 87897
Moen Vandhane KTN Fjeder NORI Krom 87897 Brugermanual
Model: 87897
Indledning
This manual provides comprehensive instructions for the installation, operation, maintenance, and troubleshooting of your Moen KTN Spring NORI Chrome Faucet, model 87897. Please read this manual thoroughly before installation and use to ensure proper function and longevity of your product.
Produkt overview
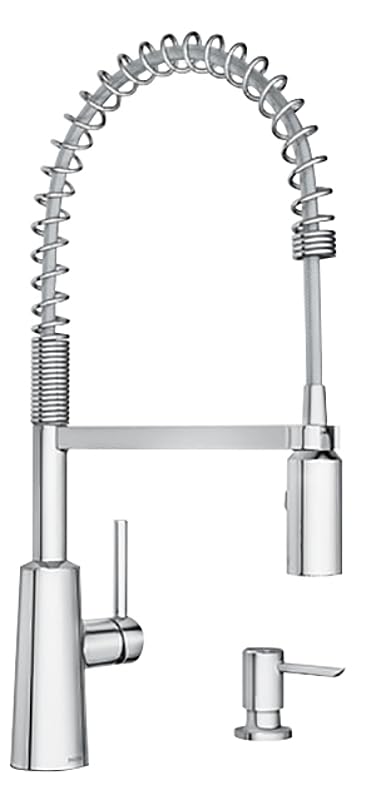
Figure 1: Moen KTN Spring NORI Chrome Faucet (Model 87897)
This image displays the complete Moen KTN Spring NORI Chrome Faucet system. It features a tall, arching neck with a visible spring coil, indicating a pull-down sprayer functionality. The main faucet body is on the left, with a single lever handle for water control. To the right, a separate, smaller soap dispenser is visible. Both components are finished in polished chrome, reflecting light and indicating a sleek, modern design. The overall appearance suggests a robust and functional kitchen or utility faucet.
The Moen KTN Spring NORI Chrome Faucet (Model 87897) is a deck-mount, single-hole installation faucet designed for modern kitchens. It features a polished chrome finish, a durable stainless steel construction, and a convenient pull-down sprayer for enhanced functionality. The single lever handle provides precise control over water temperature and flow.
Opsætning og installation
1. Før du begynder
- Ensure you have all necessary tools: adjustable wrench, Phillips screwdriver, plumber's putty or silicone sealant, safety glasses, and a bucket.
- Turn off the main water supply to your home or the specific hot and cold water lines leading to the installation area.
- Ryd området under vasken for nem adgang.
2. Removing Your Old Faucet (If Applicable)
- Disconnect the hot and cold water supply lines from the old faucet.
- Unscrew the mounting nuts securing the old faucet to the sink or countertop.
- Lift the old faucet assembly from the sink. Clean the mounting surface thoroughly.
3. Installing the New Faucet
- Place the gasket or O-ring (if provided) on the base of the new faucet.
- Sæt vandhanen ind i det enkelte hul på din vask eller bordplade.
- From underneath the sink, secure the faucet using the mounting washer and nut. Hand-tighten first, then use a wrench to snug it up, ensuring the faucet is straight.
- Connect the hot and cold water supply lines from the faucet to your home's water supply. Use thread sealant tape on the threads for a watertight seal.
- Attach the pull-down sprayer hose to the quick-connect fitting under the faucet. Ensure it clicks securely into place.
- Install the weight onto the pull-down hose at the marked location (usually 6-8 inches from the end of the hose) to ensure proper retraction.
- If included, install the soap dispenser into its designated hole and secure it from underneath.
4. Sidste trin
- Tænd langsomt for hovedvandforsyningen.
- Kontrollér for lækager ved alle forbindelser. Spænd om nødvendigt.
- Run both hot and cold water through the faucet for several minutes to flush out any debris from the lines.
Betjeningsvejledning
Vandgennemstrømning og temperaturkontrol
- Enkeltgrebet styrer både vandgennemstrømning og temperatur.
- To turn on the water, lift the handle upwards. The further you lift, the greater the water flow.
- For at justere temperaturen skal du flytte håndtaget til venstre for varmt vand og til højre for koldt vand.
- To turn off the water, push the handle downwards.
Using the Pull-Down Sprayer
- To use the sprayer, simply pull the spray head down from the spout. The flexible hose allows for extended reach.
- The spray head typically has buttons or a toggle to switch between stream and spray functions. Press the desired button to change the water pattern.
- When finished, guide the spray head back into the spout. The weight on the hose will assist in its retraction.
Vedligeholdelse og pleje
Rengøring af vandhanen
- Rengør vandhanen regelmæssigt med en blød klud og mild sæbe.
- Undgå slibende rengøringsmidler, barske kemikalier eller skuresvampe, da disse kan beskadige den polerede kromfinish.
- Skyl grundigt med rent vand efter rengøring og tør med en blød klud for at undgå vandpletter.
Vedligeholdelse af belufter
- Hvis vandgennemstrømningen falder eller bliver uregelmæssig, kan perlatoren være tilstoppet.
- Unscrew the aerator from the tip of the spout (you may need an aerator key or pliers with a cloth to protect the finish).
- Rinse out any debris or mineral deposits. For stubborn deposits, soak the aerator in a 50/50 solution of white vinegar and water.
- Saml perlatoren igen, og skru den fast på tuden.
Fejlfinding
| Problem | Mulig årsag | Løsning |
|---|---|---|
| Lav vandgennemstrømning | Tilstoppet perlator; delvist lukkede afspærringsventiler; knækket forsyningsledning. | Clean aerator (see Maintenance); fully open shut-off valves; check supply lines for kinks. |
| Lækager ved forbindelser | Loose connections; worn washers/O-rings. | Tighten connections; replace washers/O-rings if damaged. |
| Vandhanedryp | Slidt patron. | Kontakt Moens kundesupport for en erstatningspatron. |
| Sprøjten trækkes ikke helt tilbage | Improperly positioned hose weight; obstruction under sink. | Adjust hose weight position; clear any obstructions. |
Specifikationer
- Mærke: Møn
- Modelnavn: FAUCET KTN SPRING NORI CHROME
- Modelnummer: 87897
- Monteringstype: Dækmontering
- Installationstype: Enkelt hul
- Udfør type: Poleret
- Materiale: Rustfrit stål
- Farve: Chrome
- Antal håndtag: 1
- Håndtagstype: Løftestang
- Håndtagsplacering: Højre
- Speciel funktion: Pull Down Sprayer, Easy to Install
- Tuddesign: Træk ned
- Udløbsrækkevidde: 10 tommer
- Varens vægt: 5 pund
- Produktdimensioner: 10 x 10 x 10 tommer
- UPC: 026508324349
- Inkluderede komponenter: Moen FAUCET KTN SPRING NORI CHROME 87897 (Faucet Assembly, Soap Dispenser)
Garanti og support
Moen products are manufactured under the highest standards of quality and workmanship. For warranty information, product registration, or technical assistance, please visit the official Moen webhjemmeside eller kontakt deres kundeservice direkte.
Moen Officiel Webwebsted: www.moen.com
Hav venligst modelnummeret (87897) og købsdatoen klar, når du kontakter support.
Ask a question about this manual
Ask about setup, troubleshooting, compatibility, parts, safety, or missing instructions. Manuals+ will review the question and use this page’s manual context to help answer it.