1. Introduktion
This manual provides essential information for the safe and efficient use of your Wiltec T1 PTO Drive Shaft. Please read these instructions carefully before installation, operation, or maintenance. Keep this manual for future reference.
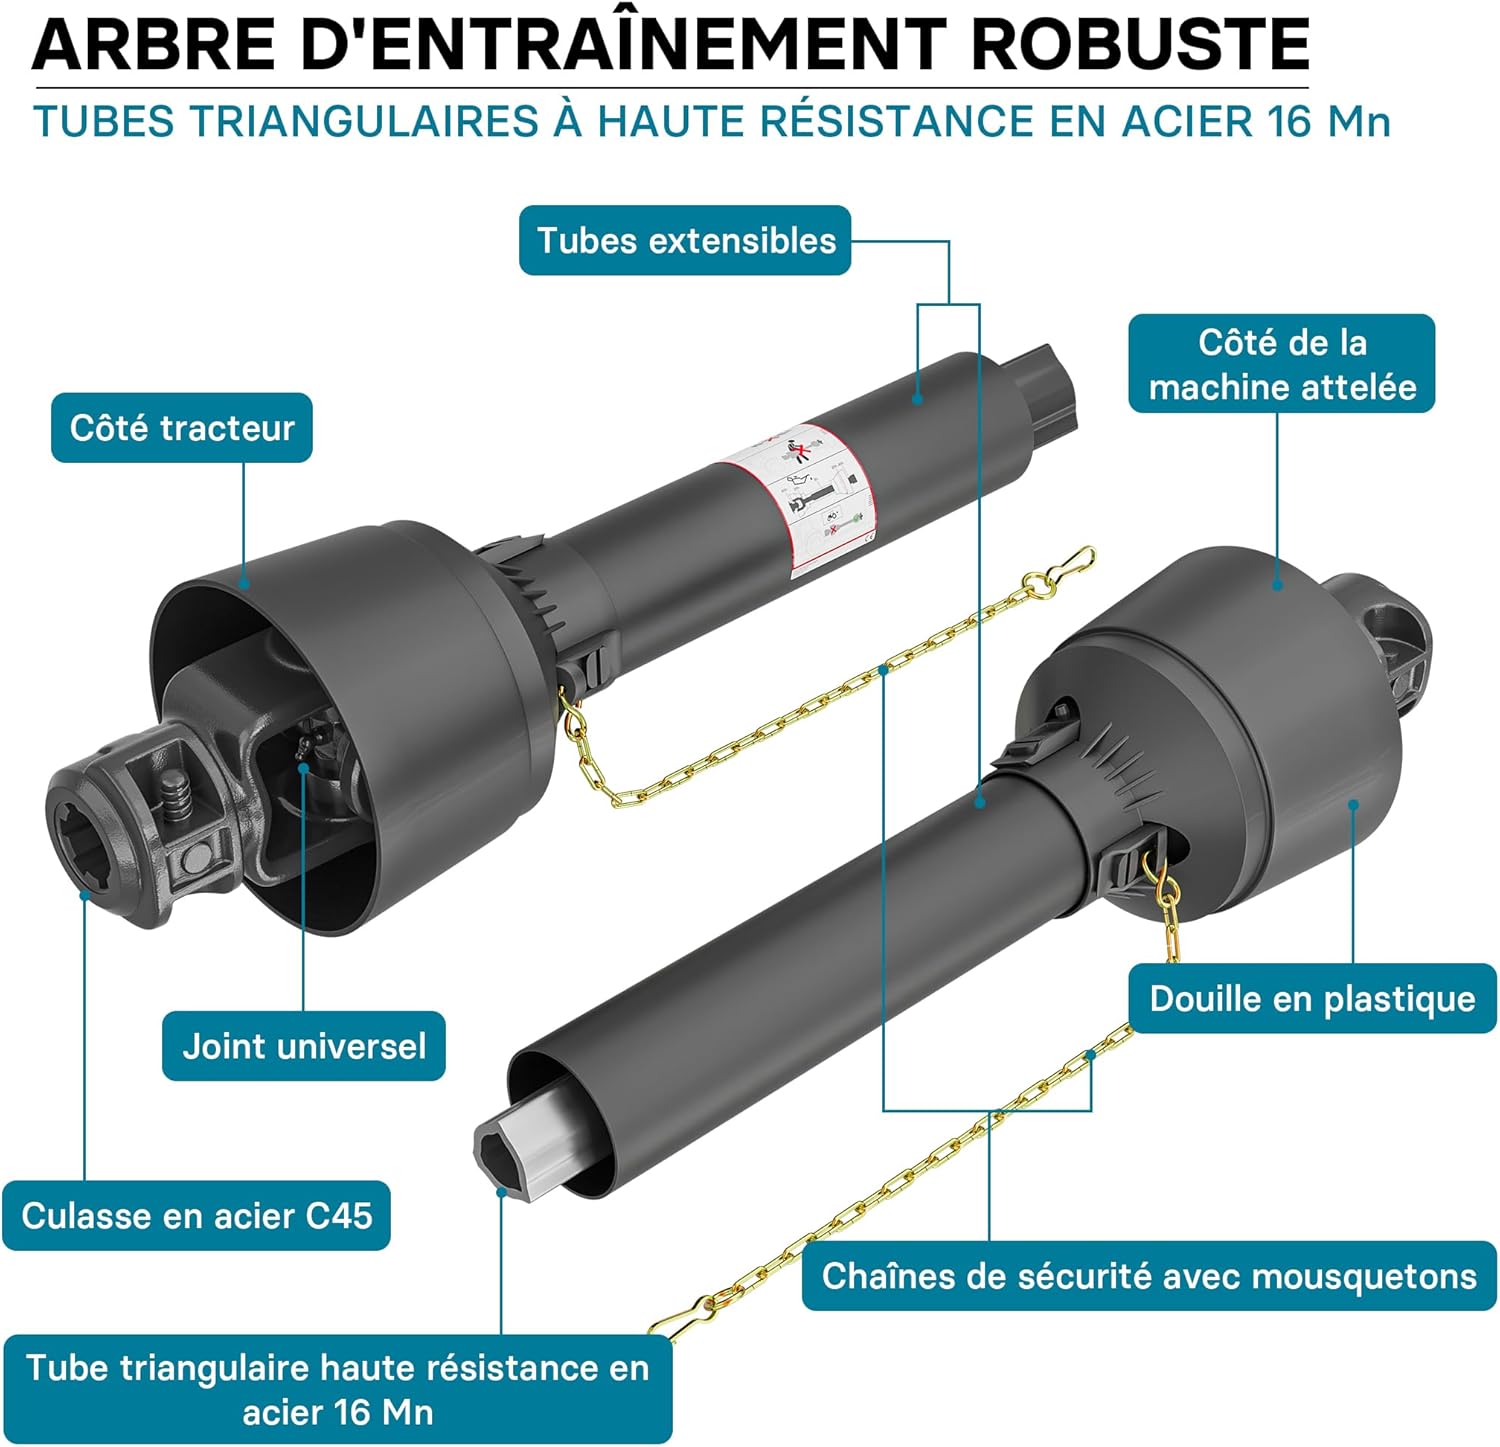
The Wiltec T1 PTO Drive Shaft is designed for optimal power transfer in agricultural and forestry applications, connecting tractors to various implements such as threshers and circular saws. It is constructed from high-quality materials to ensure durability and reliability under demanding working conditions.
2. Sikkerhedsinstruktioner
Always prioritize safety. Failure to follow these instructions can result in serious injury or equipment damage.
- Læs manualen: Before operating, ensure all users have read and understood this instruction manual and the manuals for the tractor and implement.
- Protective Devices: Never operate the attached machine without proper protective devices for the PTO, tractor, and machine.
- Free Rotation: The PTO shaft guards must be able to rotate freely on the PTO. Regularly check for obstructions.
- Klarering: Keep operators and bystanders away from all moving parts at all times. Maintain a safe distance from the PTO shaft during operation.
- Opretholdelse: Perform all maintenance and adjustments only when the engine is off and the PTO is disengaged.
- Korrekt forbindelse: Ensure the PTO shaft is correctly attached to both the tractor and the implement before starting any operation.

3. Produktkomponenter og funktioner
The Wiltec T1 PTO Drive Shaft is engineered for robust performance and includes the following key components:
- Universal Joints: Two stable universal joints ensure flexible and reliable power transmission.
- Beskyttelsesbetræk: Durable covers shield the rotating components for enhanced safety.
- Sikkerhedskæde: Equipped with a carabiner, the safety chain secures the shaft to prevent accidental detachment.
- High-Strength Triangular Tubes: The drive shaft features extensible triangular tubes made of 16 Mn steel for high resistance and durability.
- C45 Steel Yoke: The yoke is constructed from C45 steel for robust connection.

4. Specifikationer
| Karakteristisk | Værdi |
|---|---|
| Model | T1 (Model 64485) |
| Length (Collapsed) | 950 mm |
| Længde (forlænget) | 1045 mm |
| Max Torque (540 RPM) | 210 Nm (12 kW / 16 HP) |
| Max Torque (1000 RPM) | 172 Nm (18 kW / 25 HP) |
| Tractor Yoke Type | 1 3/8", 6 splines |
| Implement Yoke Type | 1 3/8", 6 splines |
| Varens vægt | 7.1 kg |
| Pakkedimensioner | 95.5 x 13.5 x 13.5 cm |


5. Opsætning og installation
Follow these steps for simple and quick installation of the PTO drive shaft:
- Step 1: Remove Pins. Remove the three pins that hold the bearing in place on the shaft.
- Step 2: Determine Length. Measure and determine the necessary length of the PTO shaft for your specific tractor and implement setup.
- Step 3: Cut Tube. Shorten the inner and outer triangular tubes to the required length using an appropriate cutting tool.
- Step 4: Deburr. Deburr the cut edges of the tubes with a file to ensure smooth operation and prevent injury.
- Step 5: Shorten Plastic Sleeve. Shorten the plastic outer and inner sleeves to match the new tube length.
- Step 6: Assemble Shaft. Reassemble the drive shaft, ensuring all components are correctly aligned and secured.

6. Betjeningsvejledning
The PTO drive shaft is designed to transmit power from a tractor to an implement. Ensure the shaft is correctly installed and secured before operation.
- Forbindelse: Connect the tractor yoke to the tractor's PTO output and the implement yoke to the implement's input shaft. Ensure both connections are fully engaged and secured with pins.
- Sikkerhedskæde: Always attach the safety chain to a fixed point on both the tractor and the implement to prevent the shaft from detaching.
- Engagement: Engage the tractor's PTO at a low RPM initially, gradually increasing to the desired operating speed. Do not exceed the maximum specified RPM for the shaft or implement.
- Frakobling: Disengage the PTO before stopping the tractor or implement, or before performing any adjustments.
- Angle of Operation: Avoid operating the PTO shaft at extreme angles, as this can cause excessive wear and potential failure. Maintain the straightest possible alignment between the tractor and implement.


7. Vedligeholdelse
Regular maintenance is crucial for the longevity and safe operation of your PTO drive shaft.
- Smøring: Regularly lubricate the universal joints and telescopic tubes according to the manufacturer's recommendations (typically every 8-10 hours of operation or as specified by the implement manual). Use appropriate grease.
- Inspektion: Before each use, inspect the entire PTO shaft for signs of wear, damage, or corrosion. Check the universal joints, protective covers, and safety chain.
- Guard Integrity: Ensure all protective guards are intact, securely fastened, and rotate freely. Replace any damaged guards immediately.
- Renhed: Keep the PTO shaft clean from dirt, debris, and crop residue, especially around the universal joints and telescopic sections.
- Opbevaring: When not in use, store the PTO shaft in a clean, dry place, preferably disconnected from both the tractor and implement.
8. Fejlfinding
If you encounter issues with your PTO drive shaft, consider the following common problems and solutions:
- Overdreven vibration:
- Tjek for bøjede eller beskadigede komponenter.
- Ensure proper alignment between tractor and implement.
- Verify correct shaft length; it should not be too long or too short.
- Inspect universal joints for wear or damage.
- Difficulty Engaging/Disengaging:
- Ensure the tractor's PTO lever is fully disengaged.
- Check for rust or debris on the splines of the yokes. Clean and lubricate if necessary.
- Verify that the locking pins are functioning correctly.
- Usædvanlige lyde:
- Stop driften øjeblikkeligt.
- Inspect for loose or damaged components.
- Check lubrication levels in universal joints.
- Ensure guards are not rubbing against rotating parts.
For persistent issues, consult a qualified technician or contact Wiltec customer support.
9. Garanti og support
For information regarding warranty coverage, claims, or technical support, please refer to your purchase documentation or contact Wiltec directly. Ensure you have your product model number (64485) and purchase date available when contacting support.
Wiltec Wildanger Technik GmbH
For contact details, please visit the official Wiltec website or refer to the seller information provided at the time of purchase.